How to Paint Water – Ocean Painting Guide
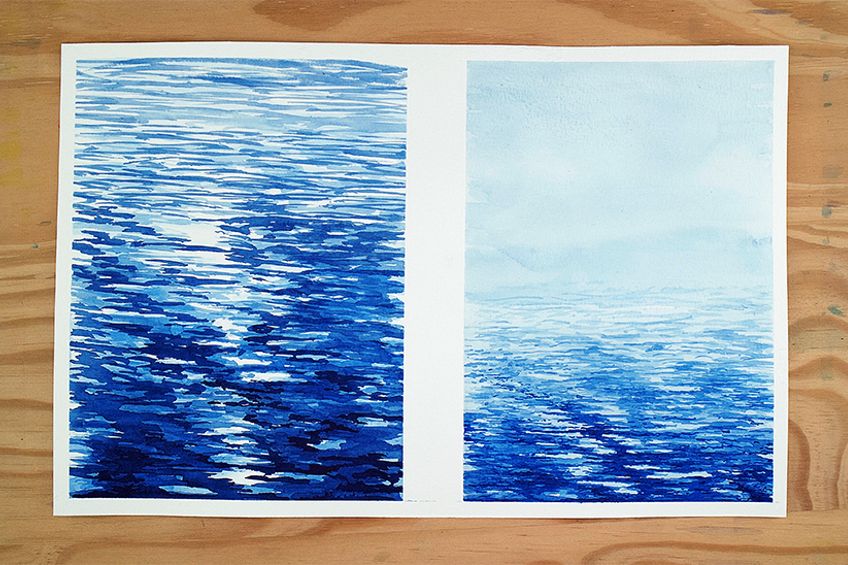
There are many ways to paint water with watercolor. Painting water works quite well with the watercolor medium due to the watery qualities of the watercolor itself. That being said there are a variety of ways to paint water, however, in this tutorial, we will be doing a painting of water that is depicted to be close up and then we will be doing a painting of water that is depicted to be in the distance. The process of painting water is simply a process of layering different shades of the same color.
Table of Contents
An Easy Watercolor Tutorial for Beginners
Essentially what water comes down to in a painting is the various ways of achieving ripples. This tutorial teaches you how to paint water ripples that describe a close-up to the water and a distance from the water. Since we are painting water we do not need a source image for reference.
The reason for this is two-fold. Firstly, this is a beginner’s tutorial on how to paint water with watercolor, which means we will not be doing something overly complex. Secondly, water is quite abstract and oftentimes can be hard to define as water unless contextualized by something in the water. Nevertheless, what we will be doing are two different paintings to help us understand the fundamental principles associated with achieving the qualities of water with watercolor.
Necessary Materials
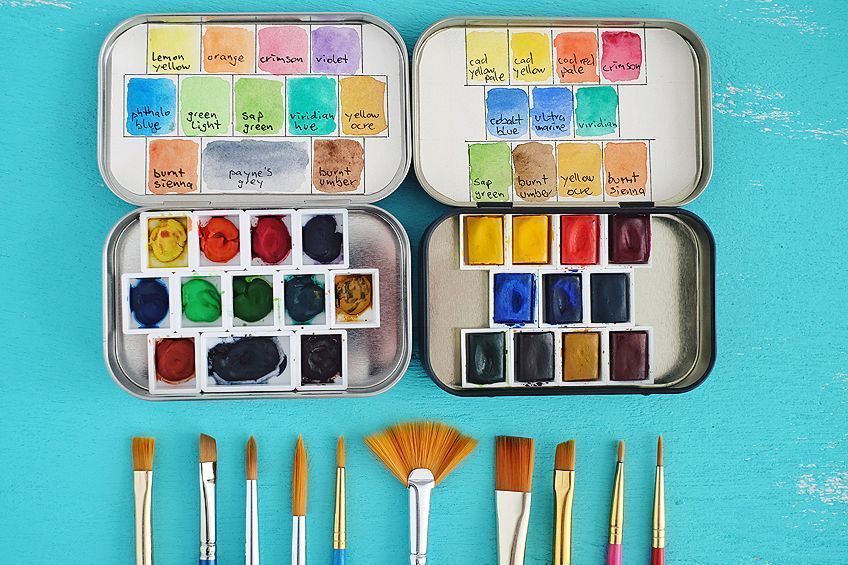
Firstly we want good paper, any watercolor paper is good and can be bought in your local art shop, however, make sure the grammage of the paper is above 300GSM. We will use a set of watercolor brushes, however, you can use various brushes for various effects. And lastly, we will be using a set of watercolor paints. Depending on where you are in the world and what is available to you is completely your choice. However, here are some suggested materials that potentially could be a preferred choice. Lastly, we will use some masking/scotch tape to keep our paper down and in place. Here are the items that you will need:
Preparation
When learning how to paint water with watercolors, we want to make sure we have an environment that is conducive to focusing. This means, place yourself somewhere where it is quiet and you can relax as you go through this tutorial. We want to make sure we have filled a cup with water, preferably two cups, to give our brushes a rinse between different tonal applications. Lastly, we want our paper prepared in front of us, you can do this tutorial on any sized paper as long as you can divide it into two with some scotch tape.

A Step-by-Step Guide on How to Paint Water
Painting water is really easy and can easily be over complicated. This tutorial is broken into two segments. The first part is how to paint water that seems to be close by and the second part is learning how to paint water that seems to be further in the distance.
When learning how to paint water with watercolor, you will find that the technique is predominantly associated with a specific wrist action. Learning how to paint water with watercolor is essentially learning how to paint using a slight flick of the wrist from left to right. This action makes a series of horizontal strokes that are either large or small which define the water in close proximity or at a great distance.
We will find that we will also slowly build our layers from dark to light. With that said, let us go through this tutorial on how to paint water with watercolor.
Painting Water That Seems Close By
As we learn how to paint water with watercolor we will first begin with learning how to paint water that seems to be in close proximity. Watercolor is a medium that lends itself to more abstract representations of reality. This means that it is a great way to represent something, in this case, water, by painterly effects that can often be considered abstract. What we want to do is grasp the concept of the strokes. The strokes that we apply will govern how the ripples can be defined as far away or close by. With that said let us go through the various steps.
Step 1: Wetting the Page
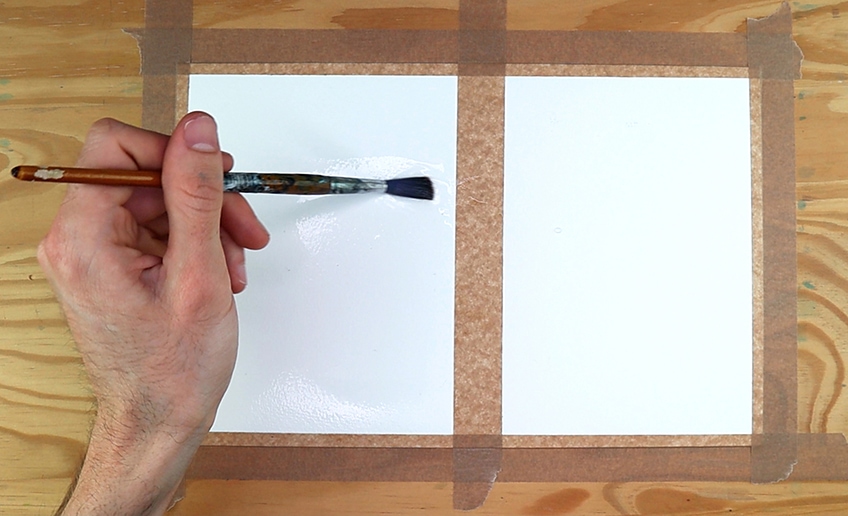
Let us begin our first painting by wetting one of our segmented sides. What we want to do is evenly distribute a thin layer of water over the surface of the paper. We want there to be an evenly spread layer of water on the surface of the page.
Step 2: Applying the First Strokes
Let us begin to wet our brushes and load our brushes with blue paint. However, we want the first layer to be very light and washed out so try to dip your brush in the water again before you apply the paint. Whilst the page is still wet let us begin to make side-to-side strokes of our blue. As you do this, lift your hand every once in a while to leave white space on the paper, especially in the center of the page.
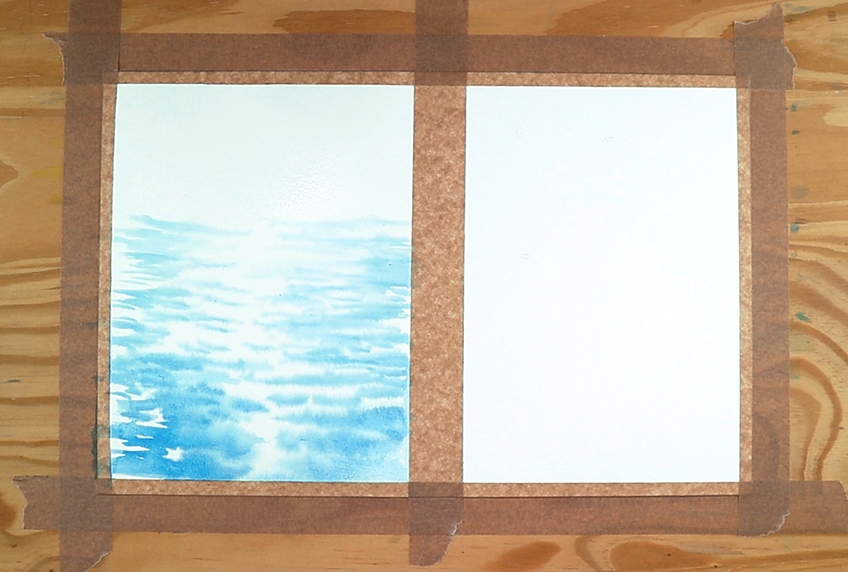
As we make these strokes from left to right we also want the strokes to not be completely smooth. Think of it as making slight squiggle actions with your hand. We also want to work our way up the page whilst leaving the center of the page fairly untouched with blue paint. Once that is done allow it to completely dry.
Step 3: Painting Mid-toned Ripples
Painting water is very abstract and can be done in a variety of ways. This tutorial on how to paint water demonstrates the application of light to dark layers of blue. As we go we can put a touch of black in our blue to darken it. With your brush begin to make jagged side to side marks on your paper.
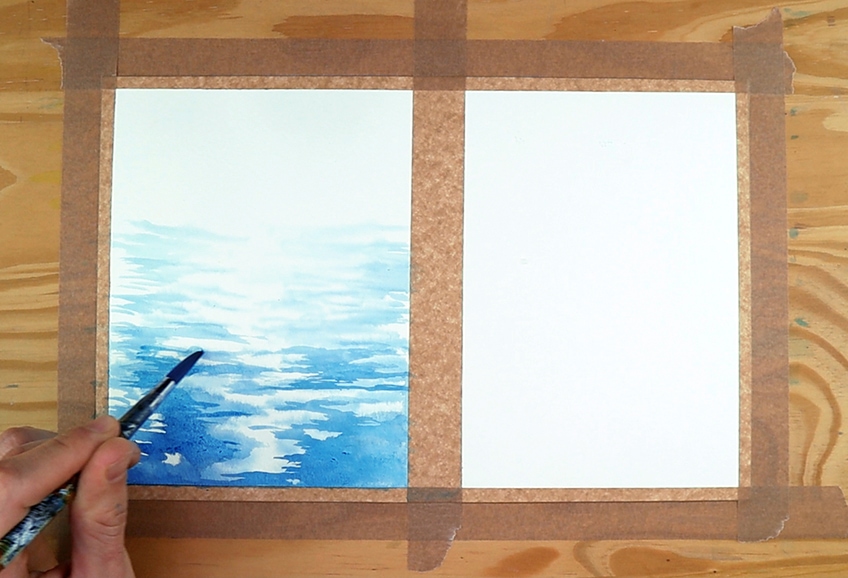
Think of it as if your hand is shaken rather than stable as you move from side to side. As we paint over the current lighter tones we want to leave little moments untouched to create a sense of light. It is also good to keep your strokes moving in a single direction to give the effect of flow.
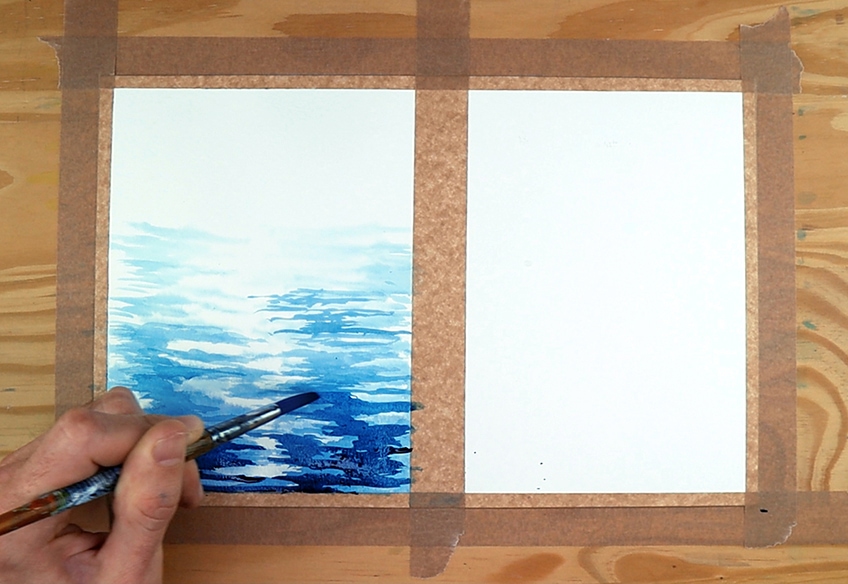
What we want to do as we paint water is to consider the concept of flow. As we make strokes and squiggles we want to make it move up the page. However, because we are depicting water from a close-up view, we want to keep our strokes thick up the page. However, every time we apply new strokes of paint allow it to naturally fade as you move up the page.
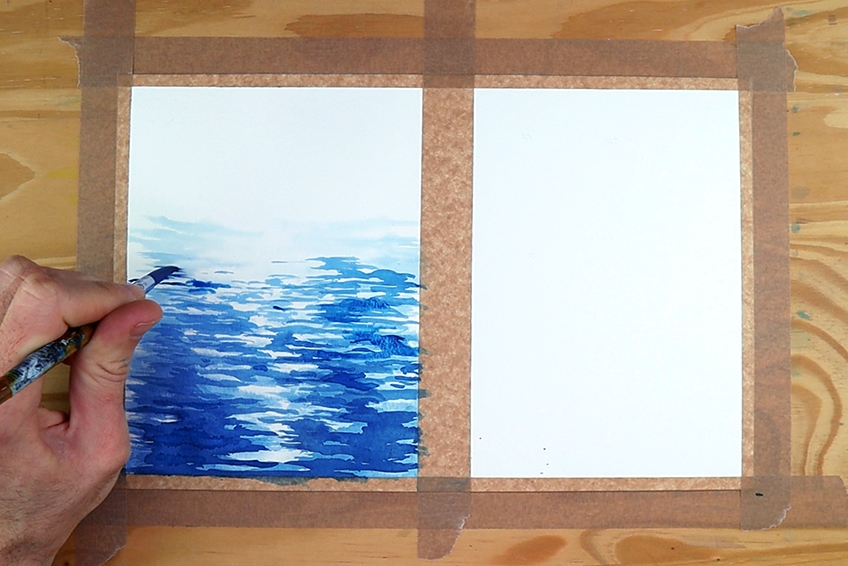
We can apply this mid-tone of blue from the center of the page moving upward. As we paint over the previous marks of painted water we want the overall progression to move to the top of the page. This means that we are not working with a horizon, giving the effect of water seeming closer in the vicinity.
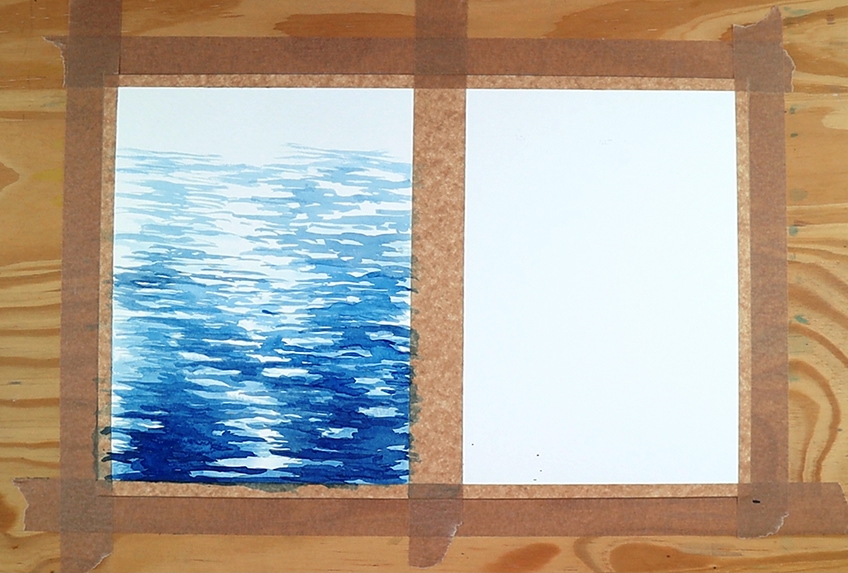
Allow yourself to keep making these squiggle side-to-side strokes up to your page. The paint will always seem darker when it is wet, so don’t worry about feeling like it may be overly dark for a mid-tone application. Allow the paint to fade as you make your marks from the center of the page moving up along the page.
Step 4: Painting Darker Ripples
We can now proceed to do a similar action with our darkest tone of blue which we can create by mixing 80% blue to 20% black. Use that as a guiding ratio as long as it’s darker than your previous application. This time we are going to become more sparing with our strokes.

As we continue with this staggered way of applying strokes, again, try to paint them toward a particular direction. For instance, you could paint them moving upward and left as if they were moving out of the frame into the distance. This way of painting will give it a quality of motion, which resembles the qualities of water. We want to keep going with this process as we paint the shakey strokes in an upward direction. Remember that the process of painting water is simply a matter of various strokes placed strategically in a pattern. We want to make sure that the flow of the pattern is moving upward toward the edges of the paper, this will give the effect of continuity.

As we continue with this process and move toward the top of the page, we can make our strokes a little more simplified and linear. By this, I mean that as the paint fades whilst you paint towards the top of the page, you want to start making your strokes normal side-to-side flicks. Giving a sense of smoothness in the water the further it gets away.
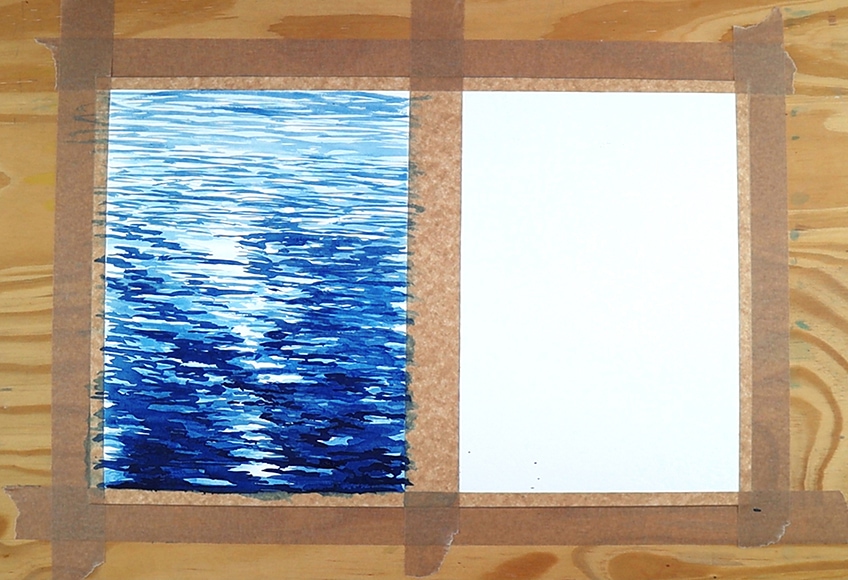
Keep with this process until you feel that you have painted the full frame of the paper. You want to allow your paint to naturally fade as you work your strokes up the page. Lastly, the idea is to keep the more prominent ripples in the foreground or at the bottom of the page. As we move up the page, the ripples can become more smooth and faint.
That’s the general process of painting water up close with watercolor. Firstly, we want to keep our strokes fairly large, giving a sense of proximity. Secondly, we can remove the horizon which also gives a sense of closeness. And then lastly, it is simply a process of layering darker tones over your light tone painted water.
Painting Water That Seems Far Away
Learning how to paint water fading into the horizon is a really fun activity. It is a very similar process to our previous painting with the addition of new elements. When we look at painted water the close-up qualities are generally abstract looking. It is the same with painting water in the distance, the painted water is a series of strokes and lines that is otherwise abstract if not contextualized.
We will be going through this painting learning predominantly how to paint ripples. With that said let us begin.
Step 1: Wetting the Page
Let us begin with wetting our page. However, we are going to use the slightly colored blue water from previously rinsing our blue brushes. We can also just dip our brushes in blue paint and mix it into the water to give it a blue tint. Let us proceed to wet our new segmented page evenly with a thin layer of water on the surface.
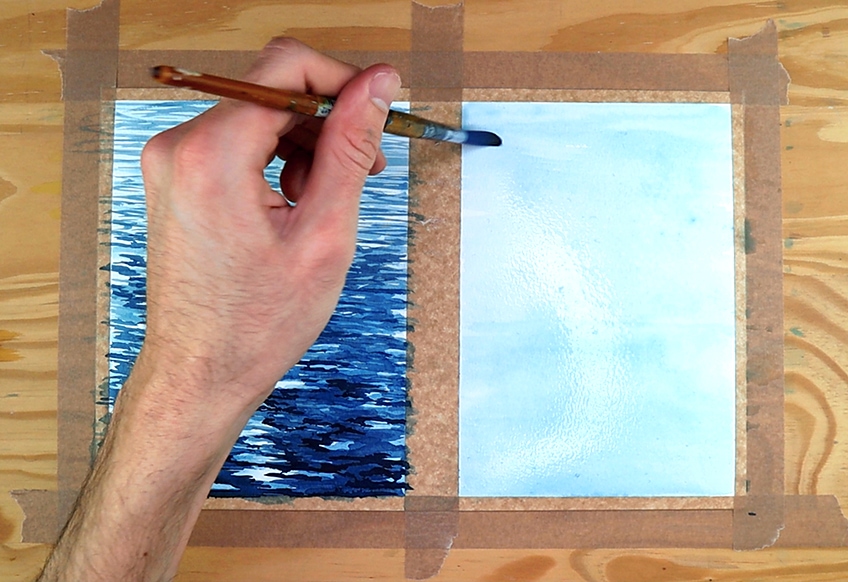
Our page should be evenly wet from corner to corner. We want the water to be evenly distributed on our paper before we proceed to apply some blue marks on our paper.
Step 2: Painting the Light Water Tones
Whilst our page is wet proceed to take your wet brush and dip it in your blue paint. Give it a rinse in water to dissipate some of the paint on the brush. Then, with a light blue coated brush begin to make some slight marks by painting strokes from left to right. In a similar fashion as before we want to have a slight shake in our hand as we make these strokes at the bottom of our page. What we want to do is keep a slight shake in your hand as you make these marks whilst lifting your hand once in a while to create light tones in the water.
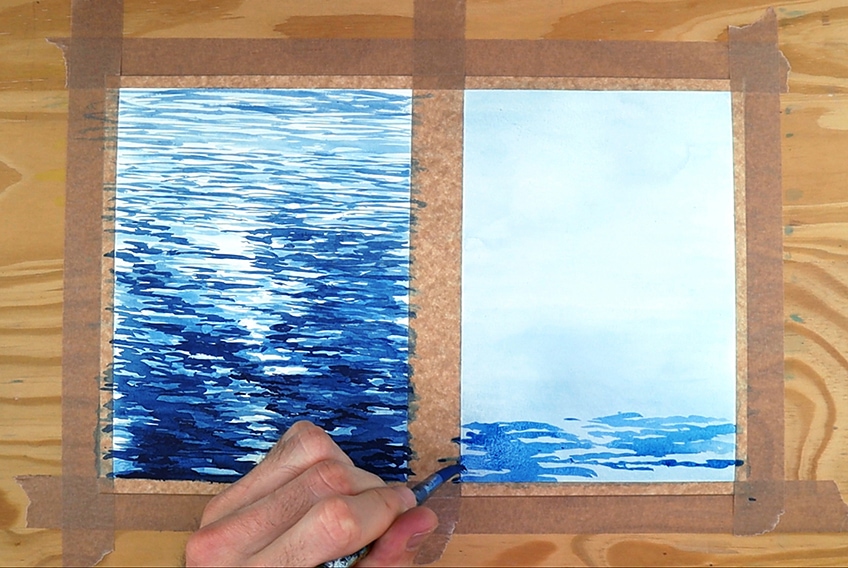
As we apply the paint to our paper we will find that the paint will fade as we make strokes. This is what we want as we paint darker strokes at the bottom of the page that will slightly fade as we move up the page. However, we don’t want to go beyond the center of our pages. This is because I want to create a horizon effect in our painting.
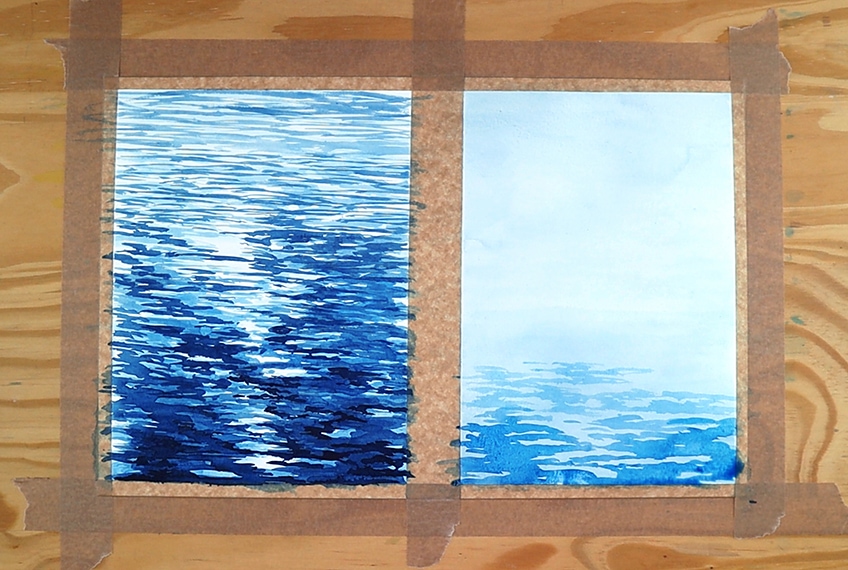
Don’t make your paint too dark as the aim is to build our layers from light to dark. Another good suggestion is to always give your brush a slight rinse with water before application. This is a great way to reassure that we are not making our strokes too dark. The strokes will also lighten as they dry, so keep that in mind.

As we make strokes from the bottom of our page toward the center of our page we can also make our strokes slightly slimmer. We want the strokes to become thinner the closer they get to the center of the page. Remember to stop painting once you arrive at the center of the page.
Step 3: Creating a Vanishing Horizon
Once we have allowed for our first layer of application to dry completely. What we are going to do is apply a very washed-out blue stroke along the center of our page. We want to make this stroke along with the last light strokes that we painted in the step before this. By keeping our stroke light and washed out it will create an effect of fading into a distance.

With the same light wash of blue, we can make strokes up along the top half of our page from where the water ends and the sky begins. Our painted water strokes should give us insight as to where the horizon is situated.
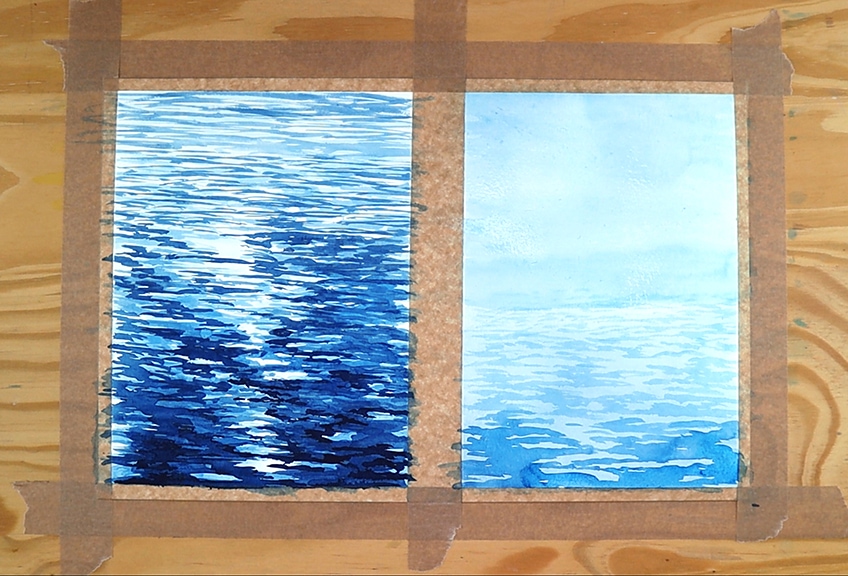
As we paint up toward the top of our page what we are doing is creating a seamless gradient from our horizon into the sky. Once it has dried it will create a quality of mistiness which is how we develop the fading-into-the-distance effect in our painting.
Step 4: Painting Mid-tone Ripples
Once our paint has dried we should have no distinctive line that describes the horizon. What should be present is a seamless fade from dark strokes to the middle of the page where a horizon line would be. However, painting water takes time to get right so don’t worry about perfecting it. We can now proceed to paint darker ripples. For the foreground or the ripples closest, we can use a medium round brush, however, we want to now start using a small pointed brush. The reason for this is that it is going to help develop ripples in the water that are small. This will make them appear to be more distant.
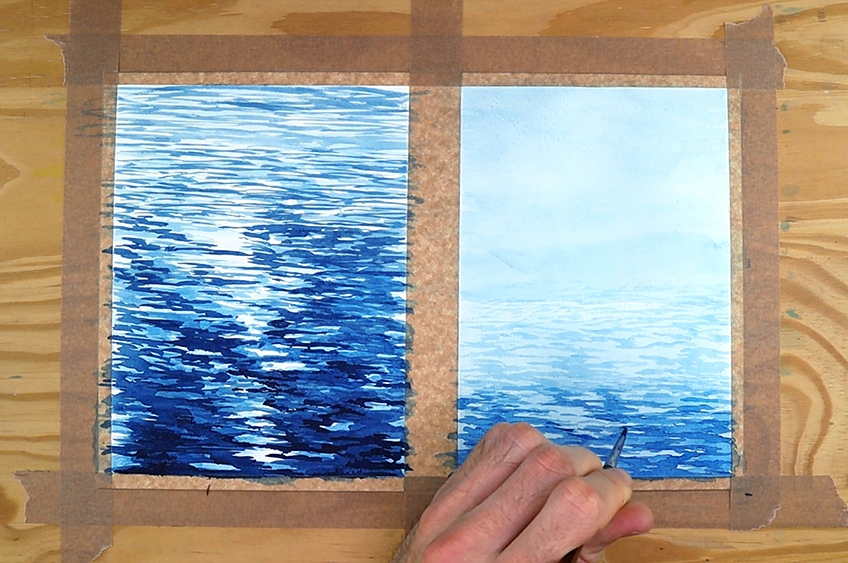
Again, think about the action as a side-to-side stroke that is not too smooth. You can either strategically distort the lines by painting jagged horizontal shapes or you can give your hand a light shake as you apply these marks. There are many ways to go about doing so, but remember to be cautious as you apply these marks.
Step 5: Painting Darker Ripples
Once we have let our painting dry we are going to proceed with making ripples in the water with some dark blue paint and a small paintbrush. We will be following the same process of application, whereby we make these horizontal squiggles that move in an upward direction toward the left side or right side of the page.

With these darker ripples, we want to be very sparing with how much we apply to the lighter ripples that were painted before. The aim here is to create a darkened water effect that we very cautiously apply over our mid-toned watermarks. We want a variety of tonal variations, this way the water has some depth to it. As we apply these darker painted water ripples, we want to have them scattered along the surface of the water. Again, each application that begins at the foreground or the bottom of the page will naturally fade in saturation as you continue to paint up toward the center of the page. Allow that to happen as you make small ripple marks in the water as you approach the center of the page near the faded horizon area.
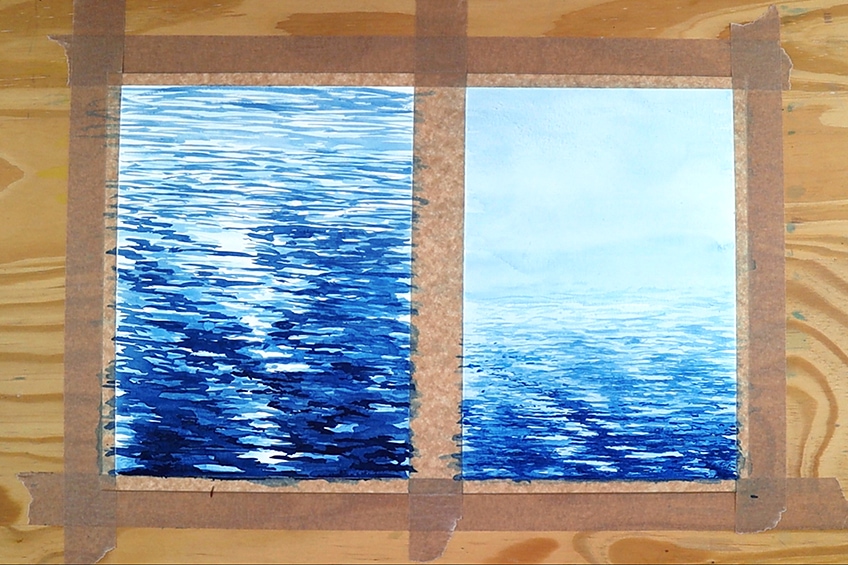
As we slowly apply these scattered squiggly lines through various areas within the water try to keep them moving in a single direction. By this, I mean that we can either move them up along the page in the leftward direction to create a sense of motion. As you paint these marks toward the right or the left it will naturally give it a more fluid quality. As we continue to slowly and cautiously paint these darker ripples in the water, we want to make sure that we allow the paint to naturally fade from the brush as we paint from the bottom of the page toward the center of the page.
As we continue to paint these marks, another great suggestion is that you could also do some light stippling toward the center of the page where the horizon would be.
You want these stippling marks to be very small and subtle, doing that gives some continuity to the ripples as they move into the distance from the foreground. Something that works as a. Good guide for the form of the water is that the marks naturally are slightly larger in the foreground due to the close vicinity that we would be able to encounter the water from. Then, naturally, the water will smoothen out as the ripples are further in the distance. We achieve this by allowing the paint to fade and our mark-making to become smaller as we create the effect of distance.
Tips to Remember
That’s it! Two interesting ways of painting water with watercolor paint. We should be left with two interesting paintings that describe water in close vicinity and water that seems to be in the distance. Again, painting water is abstract when not contextualized with objects. However, this is a great description of two techniques that you can use in the future when painting water with watercolor. Here are some great tips and tricks to help you with your watercolor painting.
- Always tape your paper down when painting with watercolor. This way we have our paper firmly placed on our table and it creates a beautiful frame around our work.
- Always keep two jars of water nearby. One for a rinse after painting and the second for another rinse to clean the brush thoroughly.
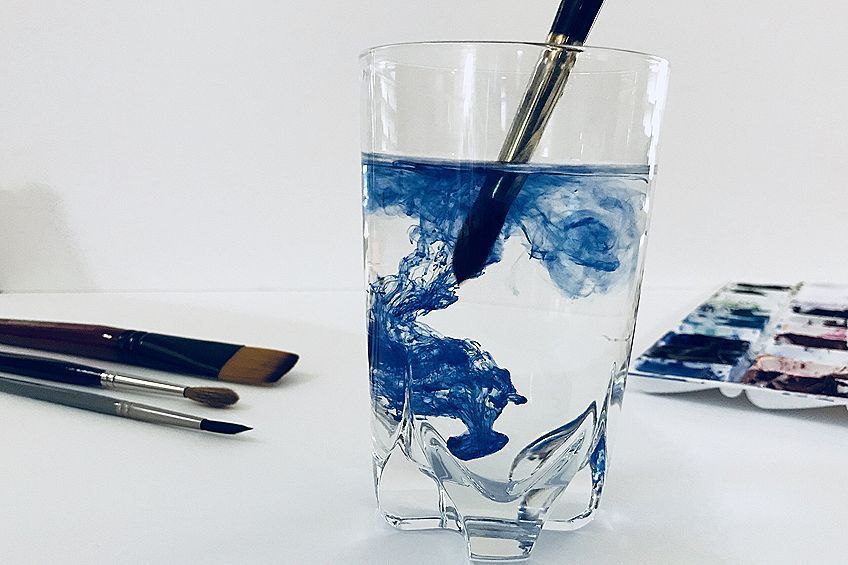
- Painting water is about painting ripples. If you can play around with various ways of creating ripples you can create water with watercolor in various ways.
- Always firmly tape your page with scotch tape. This is because we are working with a water-based medium that will inevitably warp the page.
- The watercolor process is just a process of layering. We apply these marks through a series of light to dark layers.
These are two interesting ways of painting water with watercolor paint. When you paint over lightly painted water with darker tones of blue, you should become more and more cautious every time you apply new marks. It’s all about figuring out the squiggly motion or jagged horizontal line quality. Once you have that, you can apply that pattern or line style in large and small variations. Remember, as water fades into the distance we see less of its ripples which means our mark-making becomes more straight and linear. This gives the effect of distance.
Frequently Asked Questions
What Are the Different Watercolor Techniques?
There are various watercolor techniques. In this tutorial, we go through some of them such as wet-on-wet for instance. This technique is where we apply our wet paint to our wet surface. This is good for soft and blurring backgrounds, as well as creating seamless gradients. Another technique is dry brushing. This technique is great for adding details toward the end of the softer tones. This is because we are applying dry paint which then will have less of a translucent quality, which will result in a stark appearance. These are just a few that are helpful for water surfaces.
How Do You Paint Water in Watercolor?
Water is quite simple to paint. With water you need to understand that there are various ways it can be, sometimes settled and sometimes motion. With ripples in the water, it is about creating quick strokes with the wrist generally moving along the plain of your landscape. This means if the plain of your landscape depicts a scene where the water should be moving horizontally then we want to make swift strokes with the wrist from left to right. We use light tones first and then we can and in darker strokes to give a sense of reflection variations. Lastly, you want to keep negative moments or white moments in the water to diversify the shine effect on the surface of the water.
How to Paint an Easy Watercolor Landscape?
When doing nature paintings with watercolor or just trying to produce an easy watercolor landscape it always starts by doing a rough sketch first. We want something to guide our watercolor landscape. Secondly, we want to develop the background around an event horizon, this is where we add the colors on a wet surface that will fade and produce an effect of distance that we can paint our foreground over. Then lastly, once the background is dry we can paint or foreground over that to create a unique depth in our scenery. Whatever you paint in the foreground is your choice but these are the general principles of the application process for an easy watercolor landscape.
Matthew Matthysen is an educated multidisciplinary artist and illustrator. He successfully completed his art degree at the University of Witwatersrand in South Africa, majoring in art history and contemporary drawing. The focus of his thesis was to explore the philosophical implications of the macro and micro-universe on the human experience. Matthew uses diverse media, such as written and hands-on components, to explore various approaches that are on the border between philosophy and science.
Matthew organized various exhibitions before and during his years as a student and is still passionate about doing so today. He currently works as a freelance artist and writer in various fields. He also has a permanent position at a renowned online gallery (ArtGazette) where he produces various works on commission. As a freelance artist, he creates several series and successfully sells them to galleries and collectors. He loves to use his work and skills in various fields of interest.
Matthew has been creating drawing and painting tutorials since the relaunch in 2020. Through his involvement with artincontext.org, he has been able to deepen his knowledge of various painting mediums. For example, watercolor techniques, calligraphy and lately digital drawing, which is becoming more and more popular.
Learn more about Matthew Matthysen and the Art in Context Team.
Cite this Article
Matthew, Matthysen, “How to Paint Water – Ocean Painting Guide.” Art in Context. February 24, 2022. URL: https://artincontext.org/how-to-paint-water/
Matthysen, M. (2022, 24 February). How to Paint Water – Ocean Painting Guide. Art in Context. https://artincontext.org/how-to-paint-water/
Matthysen, Matthew. “How to Paint Water – Ocean Painting Guide.” Art in Context, February 24, 2022. https://artincontext.org/how-to-paint-water/.


