How to Paint a Watercolor Butterfly – A Watercolor Butterfly Tutorial
Learning how to paint butterflies is such a useful task as it can function as a feature to enhance a lot of other paintings. Learning how to paint a watercolor butterfly is quite simple, however, it does come with a little bit of time so patience is essential throughout the process. As you go through this watercolor butterfly tutorial you must know that this is only one of many ways to paint a watercolor butterfly. This method is really fun and simple and can be done quite easily through a series of a few simple steps. Butterfly paintings are great for enhancing your watercolor skills.
Table of Contents
- 1 An Easy Watercolor Butterfly Tutorial
- 2 Step-by-Step Instructions on How to Paint a Watercolor Butterfly
- 2.1 Step 1: Drawing the Butterfly
- 2.2 Step 2: Painting the Main Color of the Butterfly
- 2.3 Step 3: Painting the Body and the Left Wing Details
- 2.4 Step 4: Painting the Right Butterfly Wing
- 2.5 Step 5: Painting the Veins in the Wings of Your Watercolor Butterfly
- 2.6 Step 6: Adding Details to Your Butterfly Painting Wings
- 2.7 Step 7: Touching Up the Details in Your Watercolor Butterfly
- 3 Tips to Remember for Butterfly Painting
- 4 Frequently Asked Questions
An Easy Watercolor Butterfly Tutorial
In this watercolor butterfly tutorial, you will find that the process of painting a butterfly is quite simple. It begins with a general sketch of the shape and size of the butterfly. We can also explore which kind of color we would like to use, however, a good suggestion is to use blue in our watercolor butterfly painting. We can play around with the various washes of blue, which will give beautiful texture and details to our watercolor butterfly. Butterflies are a great watercolor exercise to practice your watercolor skills and can be a great feature of many paintings.
Necessary Materials
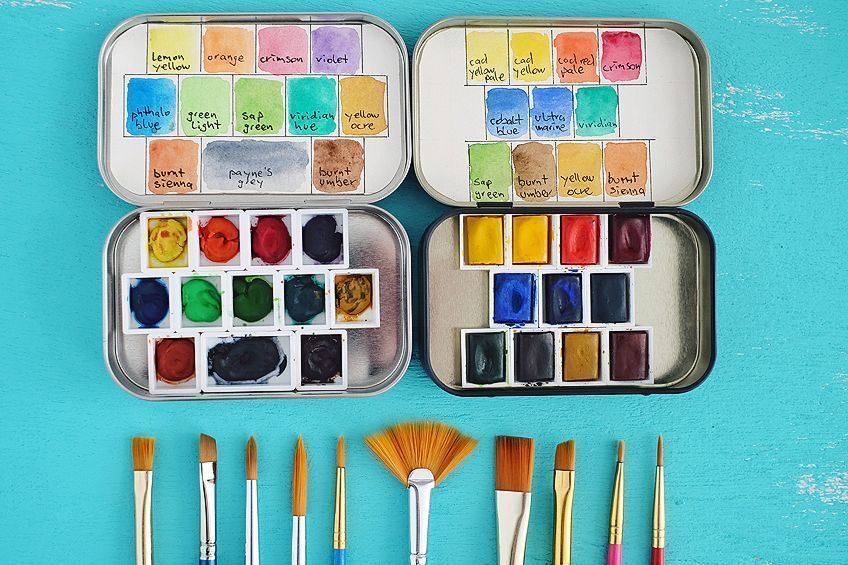
As we go through this butterfly painting, we will need a few items. Some good watercolor pan paints are a great suggestion for this watercolor butterfly tutorial. Painting butterflies in watercolor starts with a rough sketch with a pencil. We want to have an eraser because it will take a little time until we get it right. We will want to make sure that we have good brushes so that we can have the best marks in our watercolor butterfly painting. An essential item is some good paper, preferably 300 GSM in thickness. Most of these items you can get from your local stationery shop. However, here is a list of items you can buy online:
Preparation
As we learn how to paint a watercolor butterfly, perhaps prioritize some time and a good space that is conducive to focusing. Make sure all your materials are in place and your paper is on a nice flat surface. Make sure you also have at least two jars of water nearby for giving your brushes a rinse and a second a rinse to make sure your brushes are clean. Most of all, have fun painting the watercolor butterfly and don’t feel pressured to get it right the first time.
A watercolor butterfly can be tricky so it might take a few tries, however, this watercolor butterfly tutorial is really easy and fun.
Step-by-Step Instructions on How to Paint a Watercolor Butterfly
As we go through this watercolor butterfly tutorial we will begin by shaping the butterfly with a pencil. We want to make sure that our watercolor butterfly painting is guided by our pencil marks. As we continue learning how to paint a watercolor butterfly we will go from developing the main color of the butterfly to the color of our choice. We then proceed to add details to our watercolor butterfly painting with some black paint. We then make some light washes with the same color to give more texture and detail to our watercolor butterfly painting. That’s it! With our materials ready and our paper in front of us, we can now get into this watercolor butterfly tutorial.
Step 1: Drawing the Butterfly
We will begin by doing a rough sketch of our butterfly. Because butterflies are quite symmetrical in their wings, We want to make sure that we get the shape right. Let us begin by drawing the body. The body is quite a simple shape, you could think of it as the shape of a pen tip.
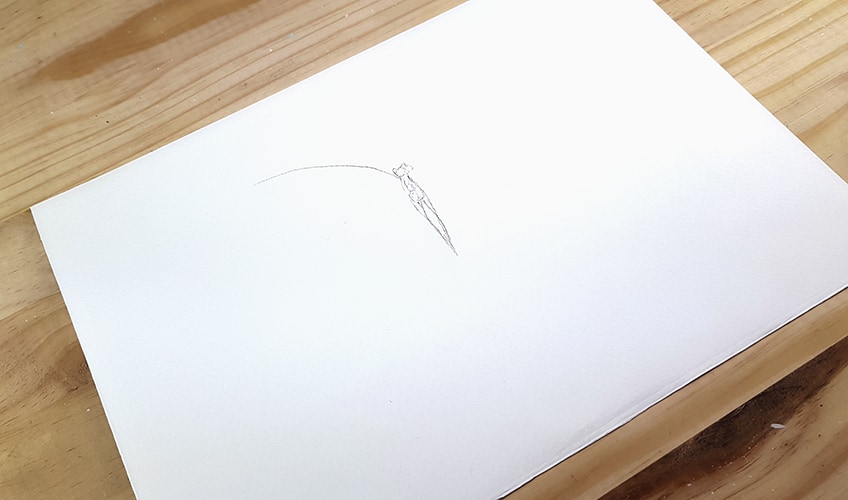
There is no reference image in this tutorial, simply because it is unnecessary. However, you can search for an image of a butterfly for guidance if need be. The shape of the top wings is almost like two right-angle triangles. However, we want to add curvature or an arch near the top of the wings.
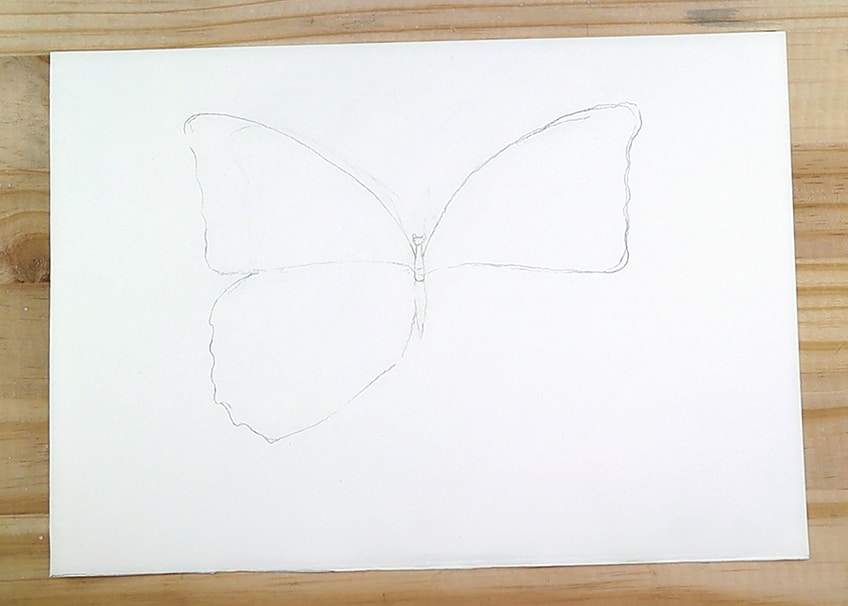
Allow yourself some time with this part of the tutorial as the wings should be as symmetrical as possible. As we draw the bottom wings, we want to give them a more circular shape. The bottom wings resemble more of a circular or oval shape. They could also be seen as two spearhead shapes pointing into the body of the butterfly.
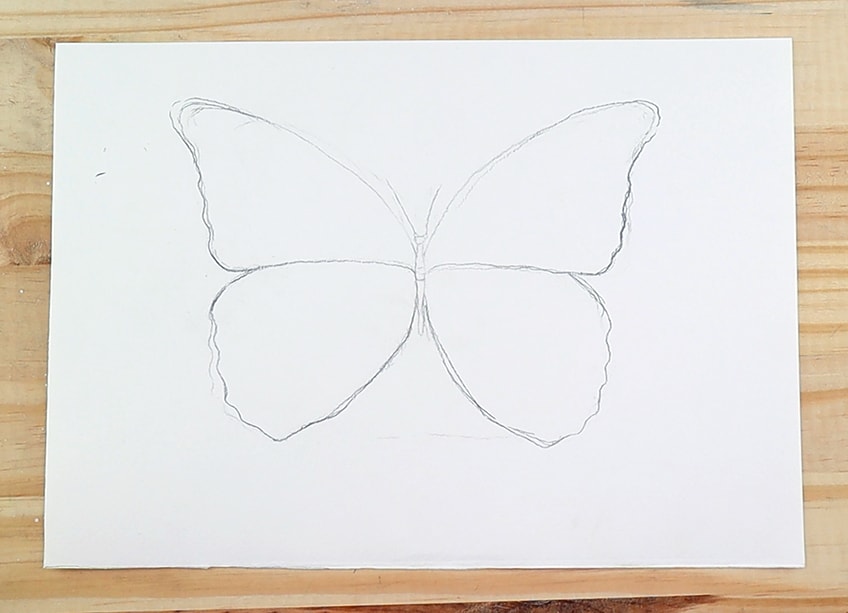
We want to give some interesting shapes to our butterflies, which we can do by creating curvatures in the wings. Creating little curvatures along the sides of the wings gives it a more unique quality to the wings which gives the butterfly a more realistic quality.
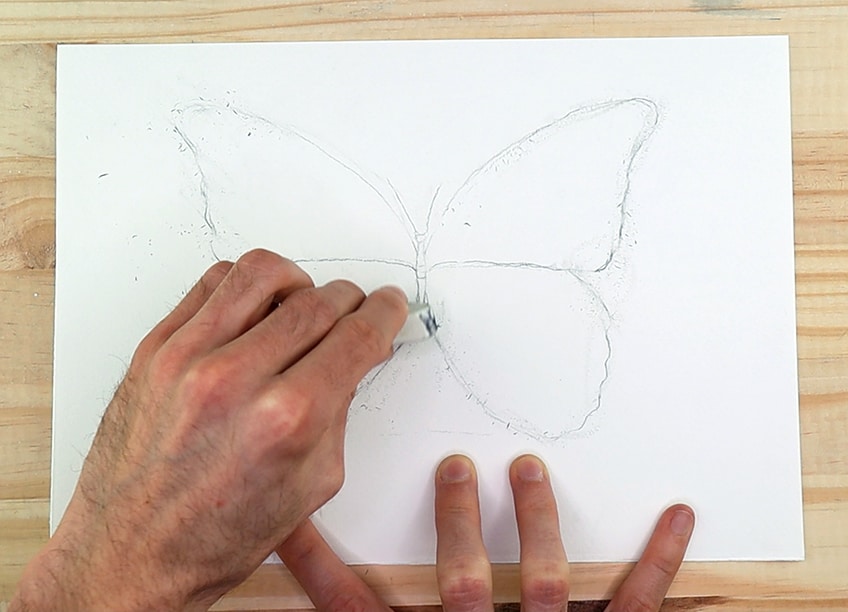
Once we have drawn and defined the general shape of our butterfly, we now want to give the drawing a light erase with an eraser. We want to lightly erase the pencil marks so that they are present for guidance but not overpowering the painting part of our tutorial.
Step 2: Painting the Main Color of the Butterfly
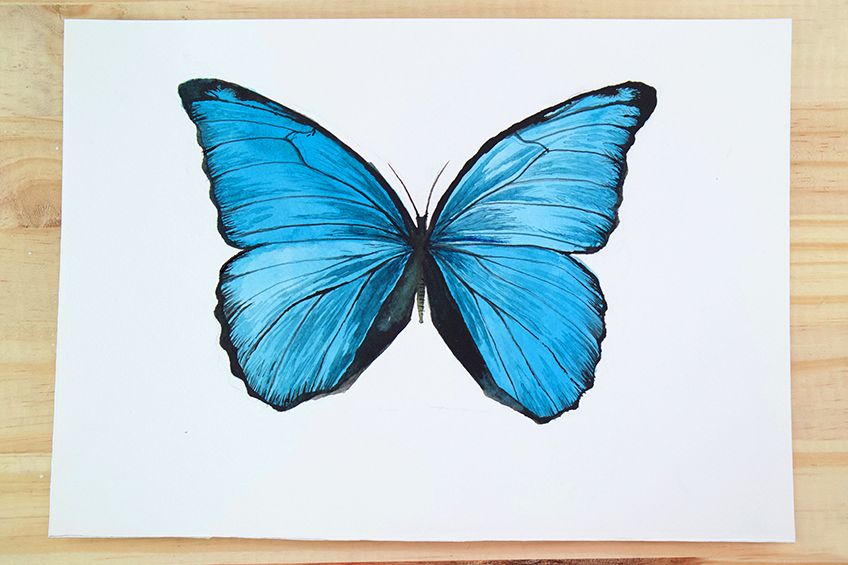
Let us begin the painting portion of our tutorial by making a mix of light blue. We will now proceed to paint the wings of the butterfly with a light wash of blue. As you paint the wings be careful around the edges, We don’t want to paint out of the wings.
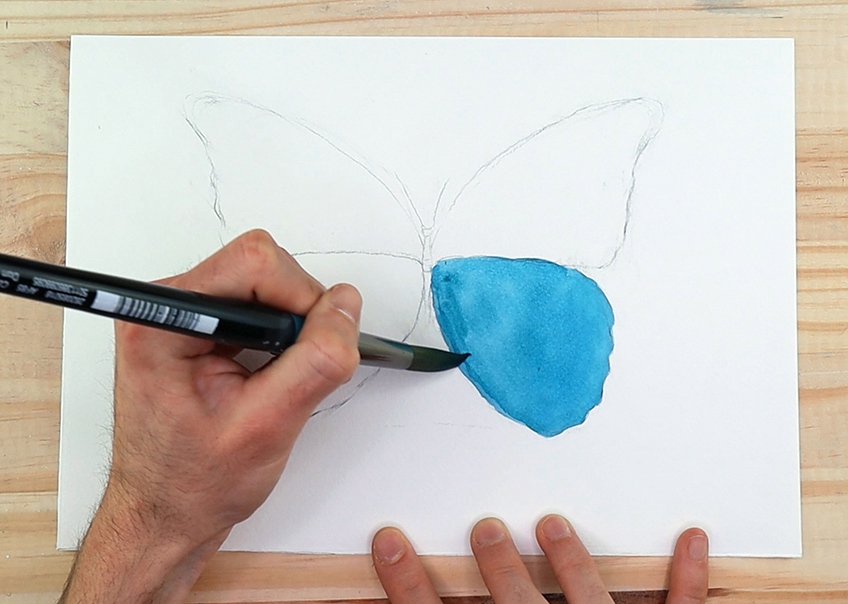
As you paint the wings we will find that one wing might be slightly lighter or darker than the other. This is okay, it is great because it gives the wings a unique variety. We will see that this will enhance the marks that we will paint over this light wash later.
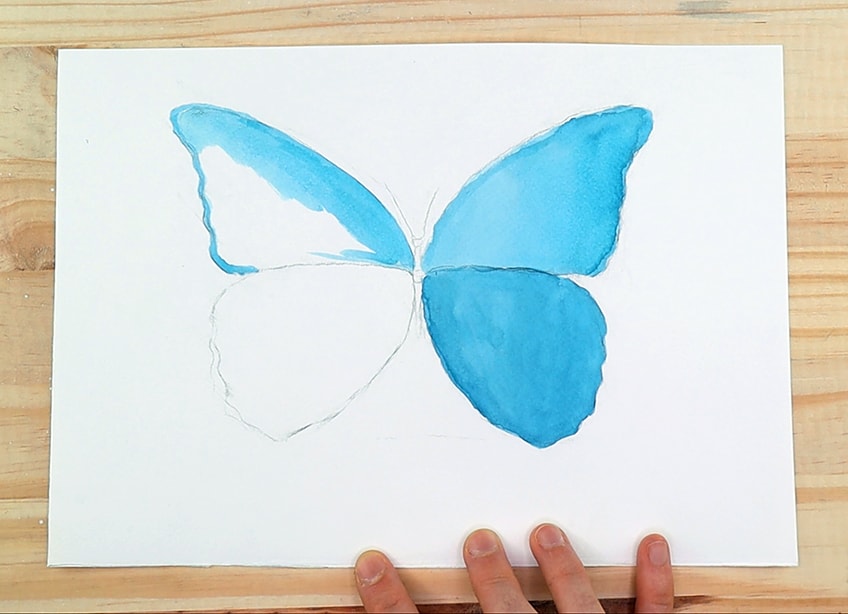
You can work multiple layers over your blue wash if you would like to darken any of the wings. However, the main aim here is to give the butterfly wings the first coat of what will be the overarching color palette for our watercolor butterfly.
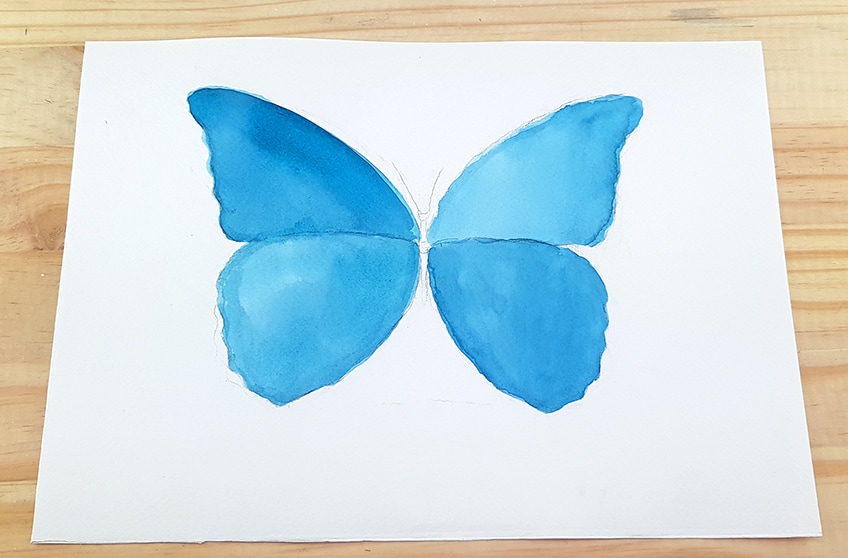
Again, as you paint the blue in your watercolor butterfly make sure that you take a precise and gentle approach to paint along the edges of the wings. We want to make sure that we paint the wings as precisely as possible, so take your time getting this right if need be.
Step 3: Painting the Body and the Left Wing Details
We will now go on to painting the body, as well as the edges of the butterfly’s wings. We want to start by taking a small thin brush and loading it with some black paint. Using black paint is the most simple way of painting the body of our watercolor butterfly. We can go ahead and paint the whole body in black paint.
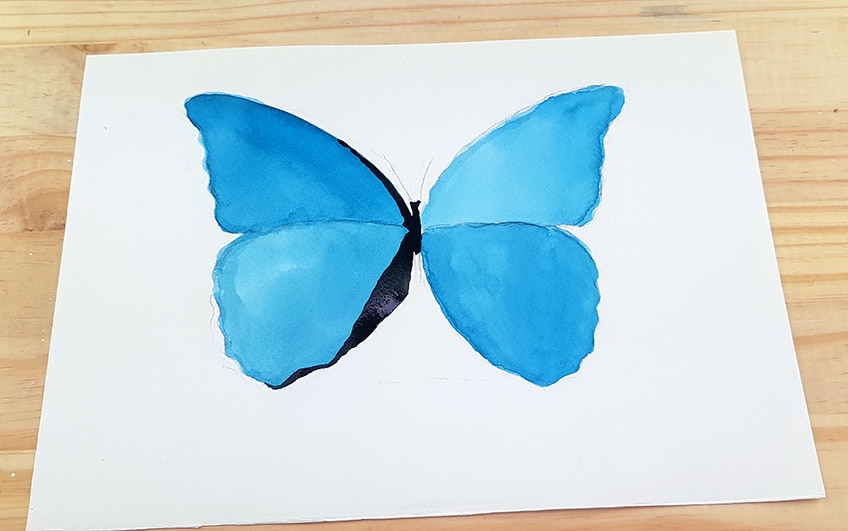
Using our black paint, we can paint a thick dark stripe down the side of the bottom wing. Start with one wing before moving on to the next. This strip should be relatively thick, however, we want to make it as straight as possible with a sharp angle that starts to move into the side of the bottom wing.
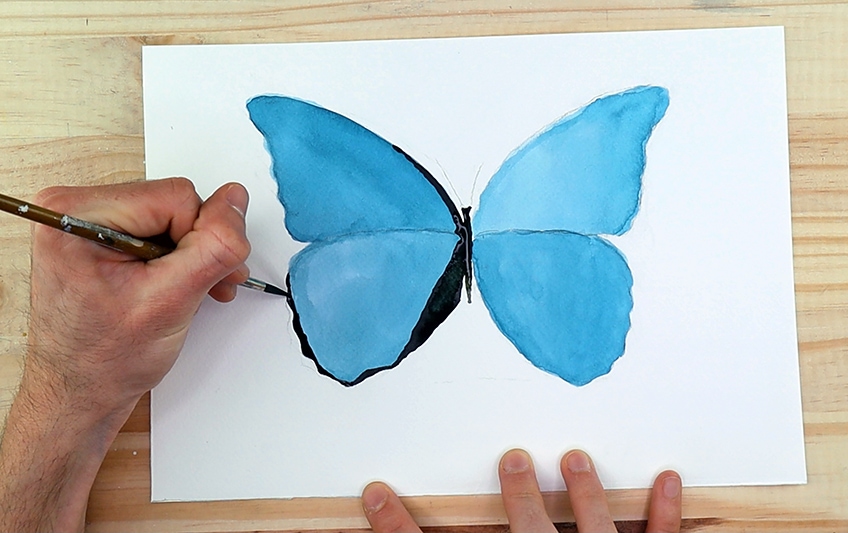
The aim here is to paint a black stripe along the sides of the wings. However, this black strip is thicker near the inner parts of the wings and becomes thinner as it starts to move along the sides of the wings. As we paint along the sides of the wings we want to follow the little curvatures in the wing.
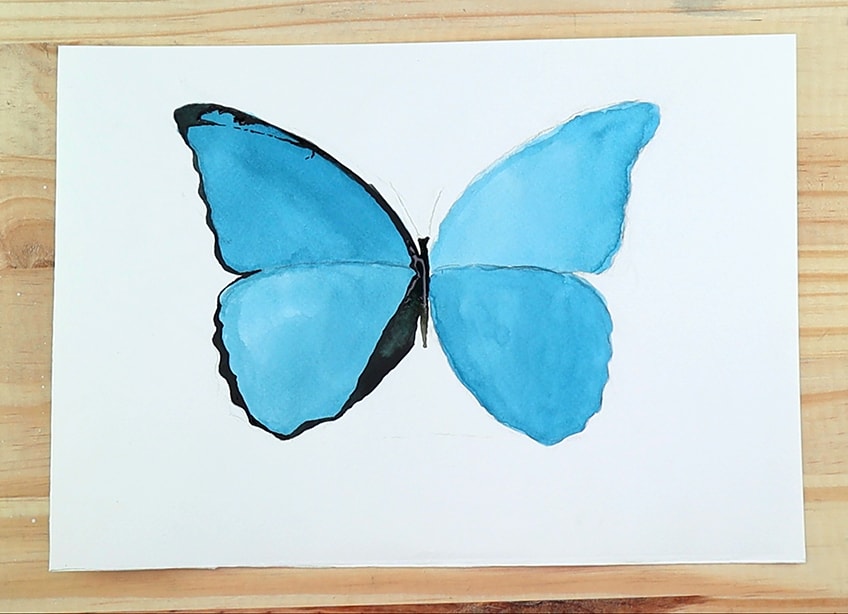
The two black strips that come from the body and move along the upper wings should be thinner than that of the bottom wings. However, as they both move along the sides of the wings they become thinner. As you paint along the side edges of the butterfly wings you want to slim the black detailing as if the butterfly has burnt edges on its wings. A good detail to add to the top corners of the upper wings is triangular curves that arch down into the wing.
Again, you can use a source image to get a better understanding of this detail as most butterflies have this feature on their upper wings. We have the freedom to create various features as long as we can mirror them in the other wing.
Step 4: Painting the Right Butterfly Wing
We now want to consider the dark marks we have made that move along the edges of the butterfly wings. We will now proceed to mirror these details along the edges of the right-wing. Again, let us begin with the upper wing this time by painting the dark details that move along the edge of the wing.
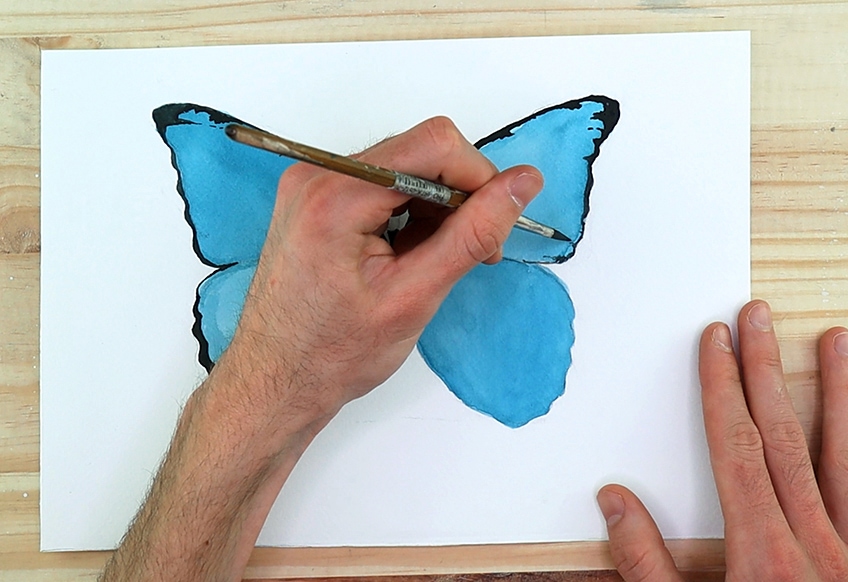
With the upper wing, we want to mirror all the details, this includes the little top corner detail that arches into the wing. We are not trying to paint perfectly mirrored details, however, we want to try to at least make them the same as possible. If there are subtle differences don’t worry about it.
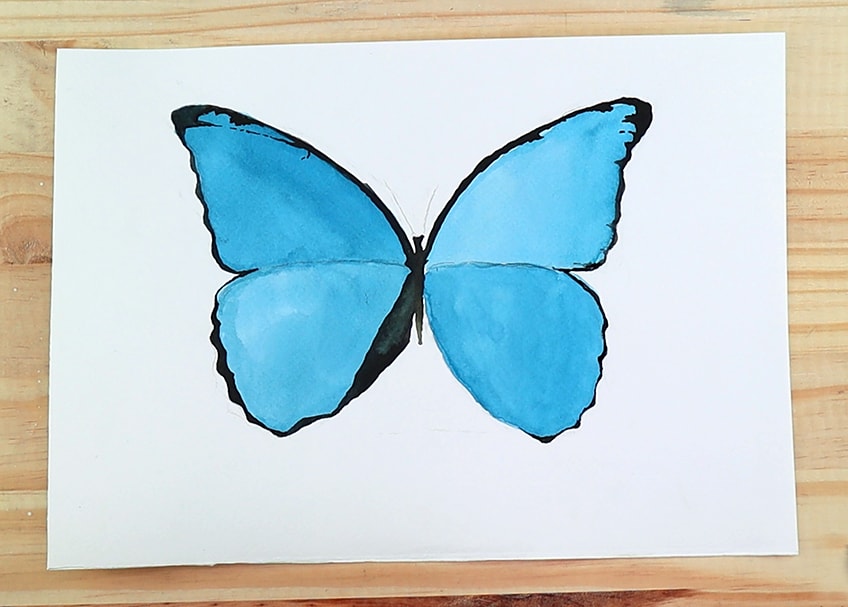
As we paint the details along the edges of the right butterfly wing, we want to make sure we are mirroring the left wing as we slowly work our way toward the bottom wing. As we paint the black edges on the little curves in the wings we will then proceed to paint the thick black strip of the inner part of the bottom wing.
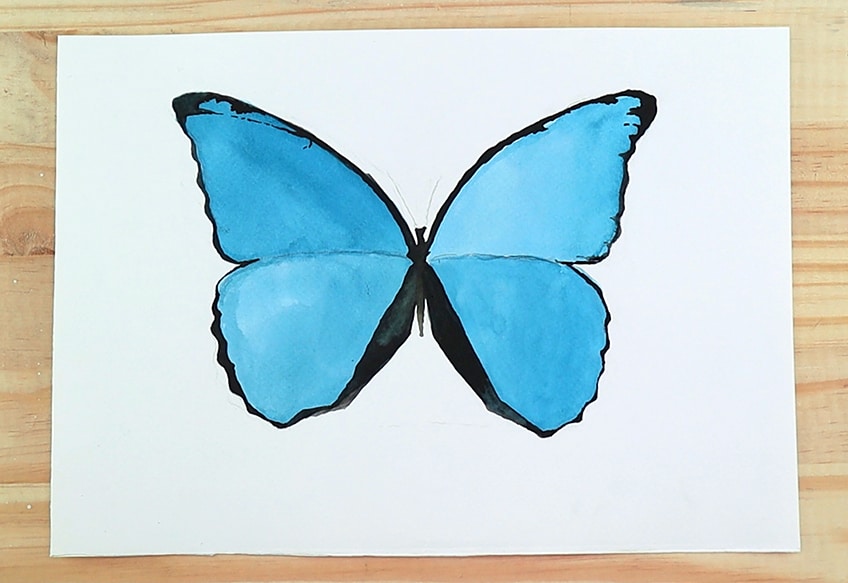
Remember to take your time, what we should be left with after this step is a blue butterfly with black detailing that moves along the edges of the wings. The two black stripes on the inner section of the bottom wings should flow into the body of the butterfly.
Step 5: Painting the Veins in the Wings of Your Watercolor Butterfly
We can now move on to painting the veins in the wings. Painting the veins in a butterfly’s wings is quite simple but we do want to approach it with a gentle hand. We want to begin with making a light wash of black paint. With a small, thinner brush, begin to paint thin strokes from the body moving into the arched detail in the top wings.
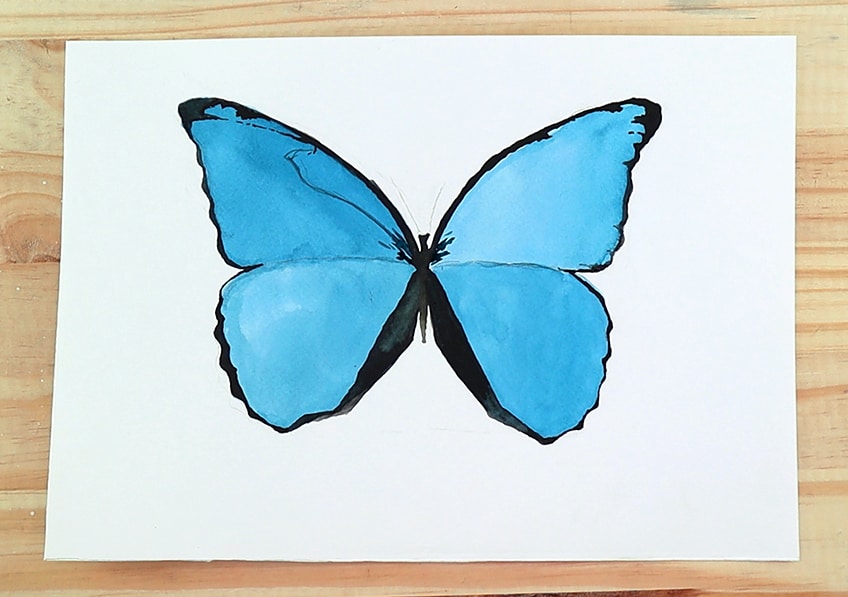
Again, we do not need a source image, however, you can use one for assistance if you need one. Focusing on the right wing, let us make some simple lines that merge into the edges of the wings. Try to connect your lines to the peaks of the little curves along the sides of the wings. We can also darken the ends of the veins as they connect to the sides of the wings.
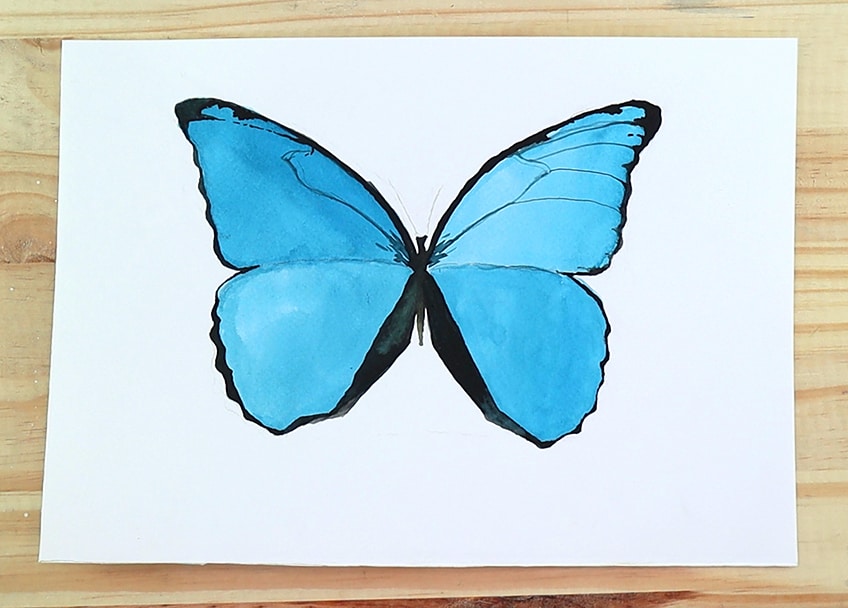
We don’t want to make too many lines in the wings, so try to keep the wings simple. Another nice detail that we can add is little sprouting marks that sprout outwardly from the body. Each vein we paint should flow into the body, merging into the little sprouting marks to make it seem as if the lines flow outwardly from the body.
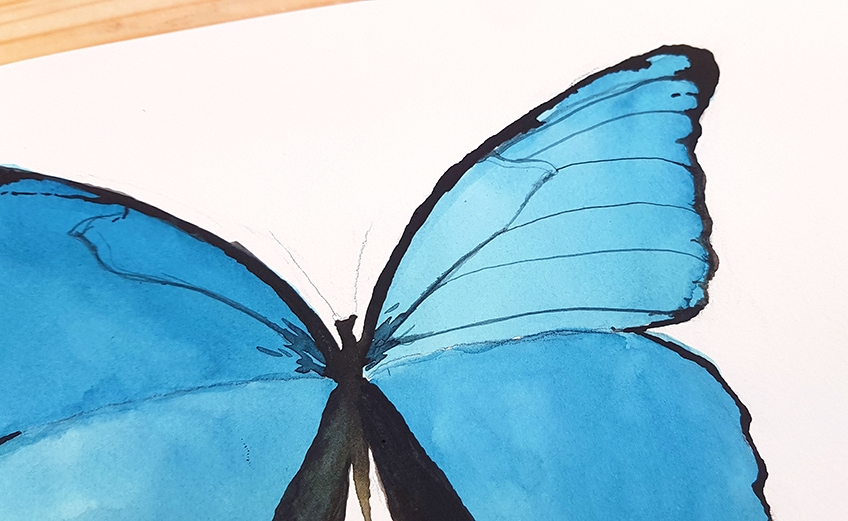
Another nice feature to add is little black lines that you stroke inwardly from the edges of the wings. Painting these little strokes of lines gives the inner edges of the wings a little more texture. However, try to keep these details thin and short, not moving into the wing so that they don’t disrupt the veins as a feature.
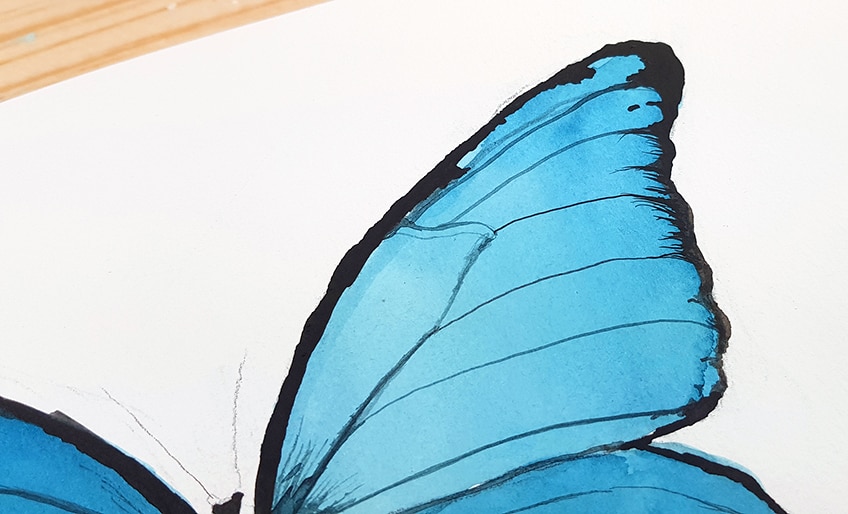
Once you have painted one wing you can proceed to imitate the same process in the right-wing. Again, the bottom wings try to emulate a similar variety of veins to that of the top wings. We don’t want to have too many veins, we also want the veins to sprout from the body and connect to the edges of the wings like spokes on a bicycle.
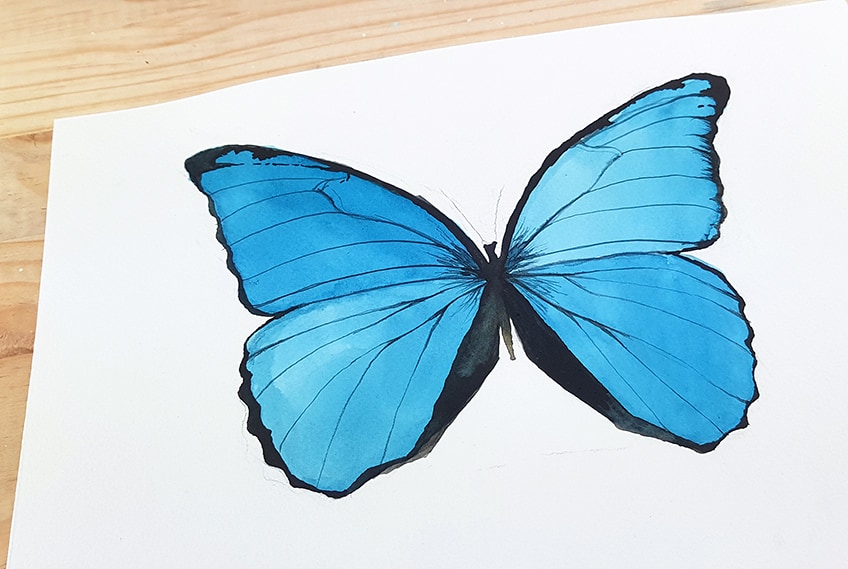
As you paint these veins remember to be slow and gentle with your application. We want these lines to be seamless and elegant as they spoke outwardly from the body and branch into the edges of the wings. Once you have the veins painted, we can paint little black strokes along the edges of the wings moving inwardly.
Step 6: Adding Details to Your Butterfly Painting Wings
Once our veins are painted we can add further details to the wings of our butterflies. There are many ways to learn how to paint a watercolor butterfly, however, this method demonstrates the simple process of layering. Once our butterfly is completely dry, with a light wash of blue we can paint some more sprouting marks moving outward from the body.
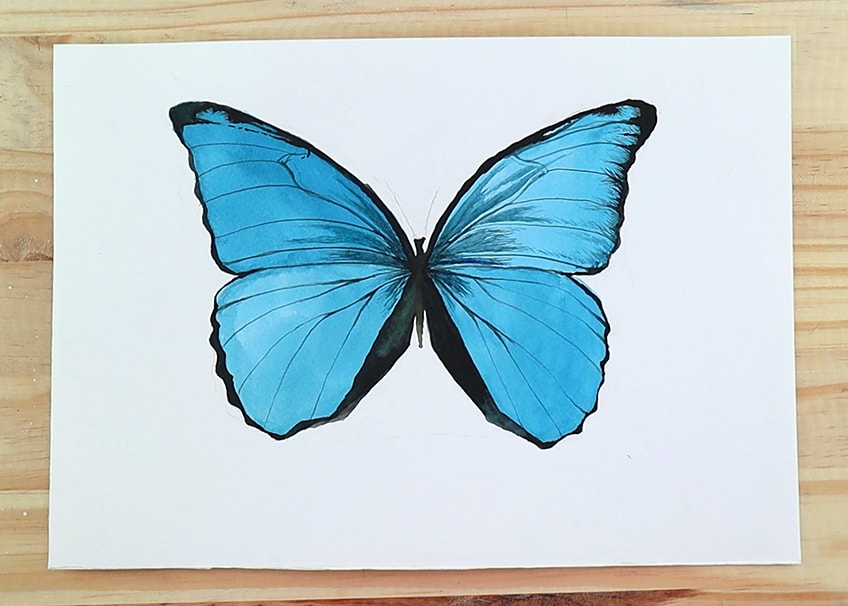
Paint these marks in between the veins. We want the wash of blue to be very light so that when it dries they don’t overpower the veins. At this point, we can now play around with various line marks. We want to paint these marks in between the veins, as we do so, the light wash will dry and create a soft texture within the wings.
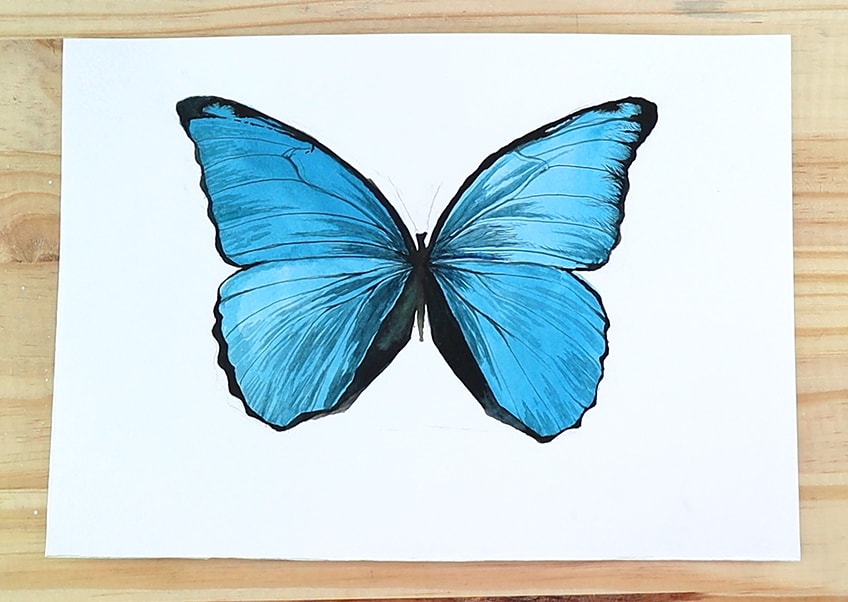
Allow yourself to be playful with this part of the tutorial, the only thing to remember is to be cautious around the veins, just so that they do not smudge. Try to also paint with the flow of the veins, working with lines that move along the veins within the wings. We do not need to be too symmetrical for this part as the aim of making these marks is to define texture as opposed to a specific feature within the butterfly.
Playing around with where these marks form on the wings creates the quality of shadow and form in the wings.
Step 7: Touching Up the Details in Your Watercolor Butterfly
Once we are satisfied with the marks that we have made, we can allow the painting to dry completely before touching up any details. Make sure that you add the antenna to your butterfly. These can be painted with a thin brush and can form thin lines that curve outward from the head of your watercolor butterfly.
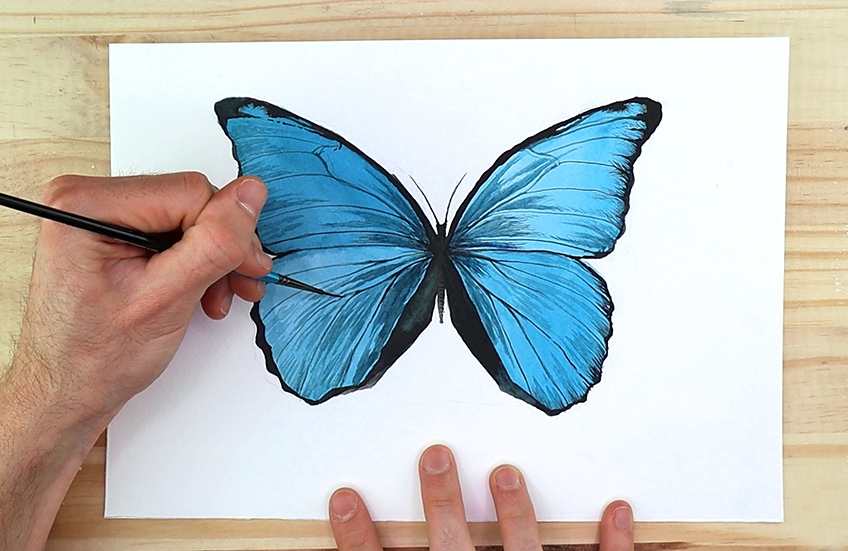
Another good suggestion is to reload your thin brush with some black paint and slowly go over the veins in the butterfly wings. Remember, we want to just darken these lines so that they stand out more as a feature. Be patient and gentle as you paint over these lines. Lastly, give your butterfly another look to see if there are any other details you might want to add. Perhaps you could add some more linework with your light blue wash. Another good suggestion is to add a few more little black strokes of lines along the edges of the wings.
There you have it, a basic tutorial on how to paint a watercolor butterfly!
Tips to Remember for Butterfly Painting
As you learn how to paint watercolor butterflies, you will find that there are many ways to go about doing so. Here are some additional tips and tricks to help you with the painting process.
- You do not need to tape down your page because we are not working with the entire page, so don’t worry about the page warping a little bit.
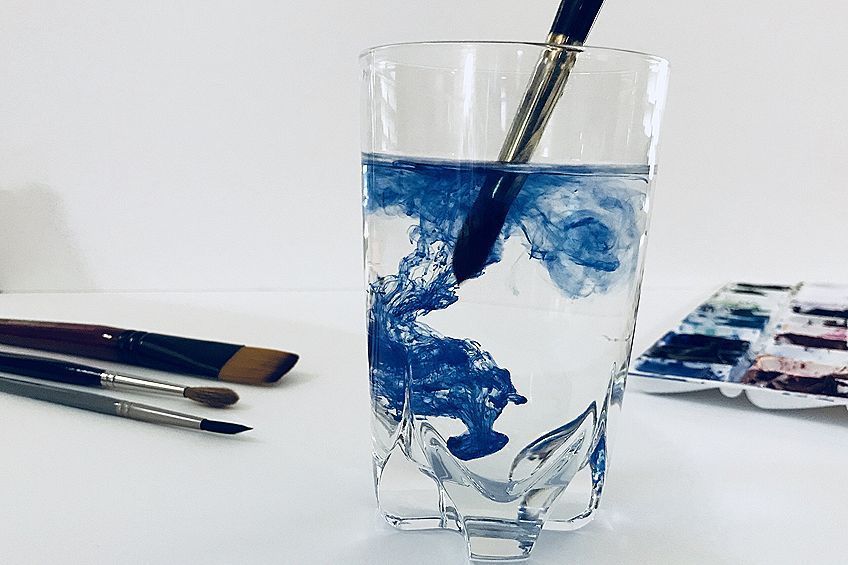
- Make sure you have two jars of water while you paint. We want to rinse the brush for a first rinse and then a second rinse to make sure the brush is clean.
- We want to make sure each layer of our watercolor butterfly painting is dry before applying new marks.
- Take your time with this watercolor butterfly tutorial, don’t worry if you don’t get it right the first time because it can be tricky.
- We do want to make sure that the wings are symmetrical, however, it is ok if they are slightly different.
- Make sure you have fun whilst doing this tutorial, so don’t put too much pressure on yourself to make sure it’s perfect.
In this watercolor butterfly tutorial, we focus on a more simple approach whereby we paint a watercolor butterfly in the predominant color which we then add layers of details on top of. From painting the watercolor butterfly in blue, we then focus on adding details that create a nice contrast in the butterfly. This watercolor butterfly tutorial breaks down how to paint a watercolor butterfly simply and easily to follow. You can also check out our butterfly coloring pages for inspiration.
Frequently Asked Questions
How Do You Paint a Watercolor Butterfly For Beginners?
When learning how to paint a watercolor butterfly you will find that there is freedom with how you paint the patterns in the wings. This is because butterflies often have very abstract features on their wings. However, you want to make sure the butterfly is as symmetrical as you can. This is because butterflies are very symmetrical and the patterns on both wings mirror each other quite perfectly. However, the best way to go about painting a watercolor butterfly is by drawing it first and getting the shape correct. We then proceed to add paint into the wings that will serve as the predominant color of the butterfly. From there it’s just a matter of adding details and texture. The body of the butterfly can be painted quite dark, which will make it look realistic as well as it’s an easy way to paint the body.
How to Paint Wings In a Butterfly?
We start by drawing the whole butterfly in its entirety. We want to make sure that the wings are as similar in shape and size as possible. We then proceed to add the main color we want our watercolor butterfly to be. From there we will proceed to paint the details, spending time on the veins in the wings of the watercolor butterfly. From this, we can make some light washes of the same color in the wings to add another layer and texture to the wings that allow the butterfly to seem more realistic. This is a general idea of how to paint a watercolor butterfly in a simple and doable way.
What Colors Should I Use to Paint a Watercolor Butterfly?
There are no specific colors that you should use for painting a watercolor butterfly. When learning how to paint butterflies we will find that there are many ways to make interesting features in the wings. We can either do this by merging colors with a wet on wet technique, however, the easiest way is to layer marks on dry surfaces. This is the easiest way to make a butterfly painting and allows more control in your watercolor butterfly painting. Painting butterflies in watercolor comes with a variety of color combinations, which is open to choice seeing that butterflies are often very colorful. A good suggestion for painting butterflies in watercolor is to use some vibrant and bright colors, which you can contrast with finer dark details.
Matthew Matthysen is an educated multidisciplinary artist and illustrator. He successfully completed his art degree at the University of Witwatersrand in South Africa, majoring in art history and contemporary drawing. The focus of his thesis was to explore the philosophical implications of the macro and micro-universe on the human experience. Matthew uses diverse media, such as written and hands-on components, to explore various approaches that are on the border between philosophy and science.
Matthew organized various exhibitions before and during his years as a student and is still passionate about doing so today. He currently works as a freelance artist and writer in various fields. He also has a permanent position at a renowned online gallery (ArtGazette) where he produces various works on commission. As a freelance artist, he creates several series and successfully sells them to galleries and collectors. He loves to use his work and skills in various fields of interest.
Matthew has been creating drawing and painting tutorials since the relaunch in 2020. Through his involvement with artincontext.org, he has been able to deepen his knowledge of various painting mediums. For example, watercolor techniques, calligraphy and lately digital drawing, which is becoming more and more popular.
Learn more about Matthew Matthysen and the Art in Context Team.
Cite this Article
Matthew, Matthysen, “How to Paint a Watercolor Butterfly – A Watercolor Butterfly Tutorial.” Art in Context. February 7, 2022. URL: https://artincontext.org/how-to-paint-a-watercolor-butterfly/


