How to Paint Watercolor Leaves – Easy Botanical Art Tutorial
Learning how to paint watercolor leaves is such a great exercise for two reasons. For one, we learn a variety of tips and tricks for the watercolor medium, and secondly, it’s a helpful feature for many other watercolor paintings in the future. Watercolor paints come in a variety of shapes and color combinations. As we go through the process of leaves painting, we will find that there is freedom around both color choice and shapes that can be contextualized by a few simple details. Most of all, this tutorial is easy and relaxing, leaves painting is very blissful and can be a very soothing activity. So, remember, as you go through this tutorial on how to paint watercolor leaves, try to relax and have fun.
Table of Contents
- 1 An Easy Watercolor Leaves Tutorial
- 2 Instructions on How to Paint Watercolor Leaves
- 2.1 How to Paint Black Locust Leaves
- 2.2 How to Paint Beech Leaves
- 2.3 How to Paint Little Berries on a Branch
- 2.4 How to Paint a Northern Oak Leaf
- 2.5 How to Paint Ponytail Palm Leaves
- 2.6 How to Paint Betel Leaves
- 2.7 How to Paint Sandbar Willow Leaves
- 2.8 How to Paint a Maple Leaf
- 2.9 Adding Final Details
- 3 Tips to Remember
- 4 Frequently Asked Questions
An Easy Watercolor Leaves Tutorial
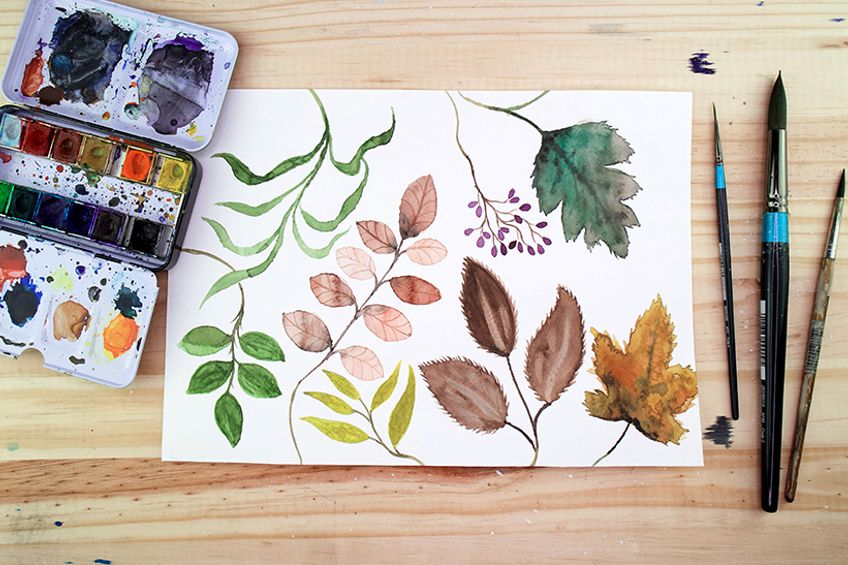
Painting watercolor leaves is no daunting task. Leaves come in all sorts of shapes as you will see in this tutorial whilst learning how to paint watercolor leaves. Painting any sort of watercolor plants or watercolor greenery will come with a few interesting details that can be applied. Such as watercolor branches, stems, and veins within the leaves. As you learn how to paint watercolor leaves you will also come across a few different techniques such as wet on wet or wet on dry and so on. With that being said let us see what we will need as we learn how to paint watercolor leaves.

Preparation
As we paint watercolor greenery and explore various watercolor leaves, we want to make sure we prioritize a good portion of time to the tutorial. When learning how to paint watercolor leaves, you will need to be patient whilst we wait for some leaves to dry. We will also learn how to act swiftly when adding details to wet surfaces. Watercolor plants take some focus so make sure you have your paper in front of you with your jars of water nearby in a nice quiet environment. Learning how to paint leaves takes time so try not to rush.

Instructions on How to Paint Watercolor Leaves
In this tutorial, we will paint various types of watercolor leaves that all have a different visual quality. Learning how to paint watercolor leaves is about understanding shape and color combinations. From there, there is a lot of freedom when adding details in each of these different types of watercolor leaves and watercolor plants. We will try different techniques as well as different color combinations for both summer and autumn-themed leaves. We will go through painting watercolor branches and explore various styles of how to paint leaves.
With that being said, let us learn how to paint watercolor leaves in a few simple steps.
How to Paint Black Locust Leaves
As we learn how to paint Black Lotus leaves, we will find that painting leaves is quite simple. Most often we are dealing with variations of the same shape. It’s a matter of how we change subtle details in these shapes that indicate what kind of leaf they are.

Step 1: Painting the Leaves
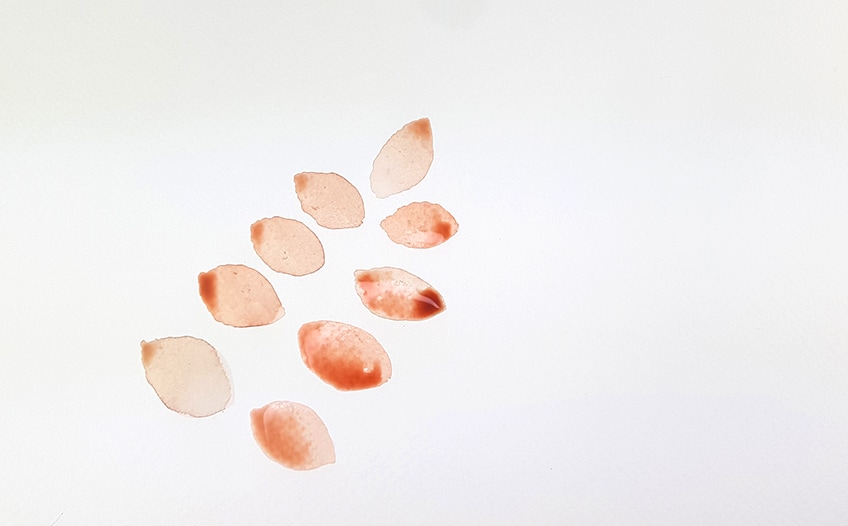
There are a variety of different types of leaves to paint, we will start with the black locust leaf. The Black locust leaf is a great autumn leaf and simple to paint. We start by making a mix of red, yellow, and brown, however, we want there to be mostly brown in the mix. We can then proceed to paint little circular spearheaded shapes in a row.
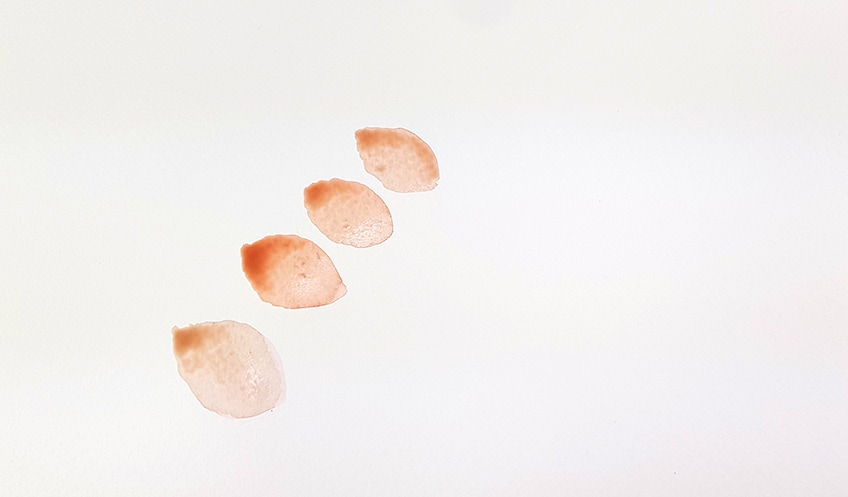
We want to make two parallel rows of leaves for this single black locust branch. So, try to keep them small. As you paint two parallel rows of leaves next to each other, paint one leaf perpendicular and the top of both rows. This gives the branch form.
Step 2: Painting the Branches
We will then proceed to draw a thin dark brown line through the center of the parallel rows. We can then take that same dark brown mix and make small thin lines that connect to the ends of each leaf. Make sure all leaves are connected as you paint the watercolor branches.

You can also darken your leaves by painting some hints of brown and red over the existing layer. This gives the leaves more texture and creates a nice rustic color quality for the autumn look.

Step 3: Painting the Details in the Leaves
Once your leaves have completely dried, you can then paint little veins with a light wash of paint. Make sure you paint a line from one end of the leaf to the other. From there you can paint lines that deviate towards the sides of the leaf. You want to paint the deviated lines with an arch.

How to Paint Beech Leaves
With the Beech Leaf, we will find that we are almost painting a Black Lotus leaf. The shapes are similar spearhead shapes with subtle differences.
Let’s go through the various steps.
Step 1: Painting the Leaves
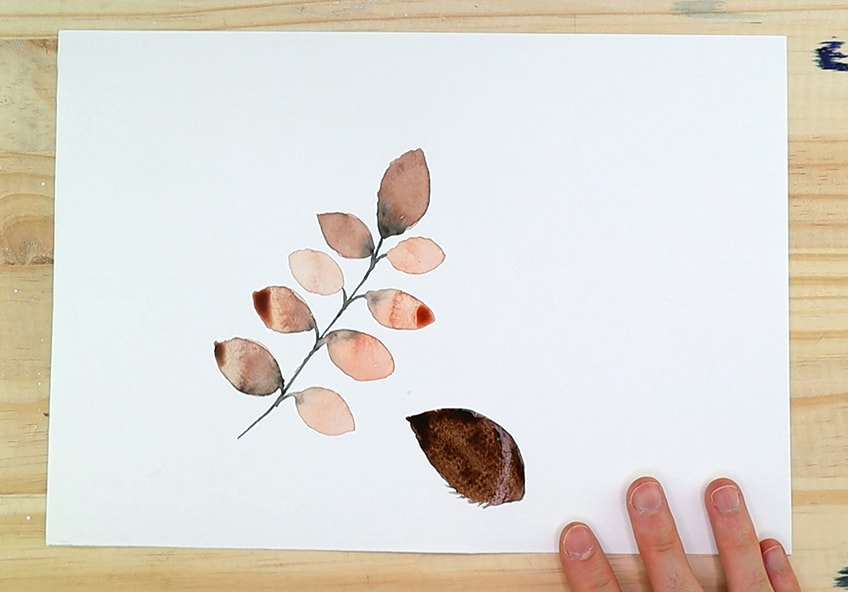
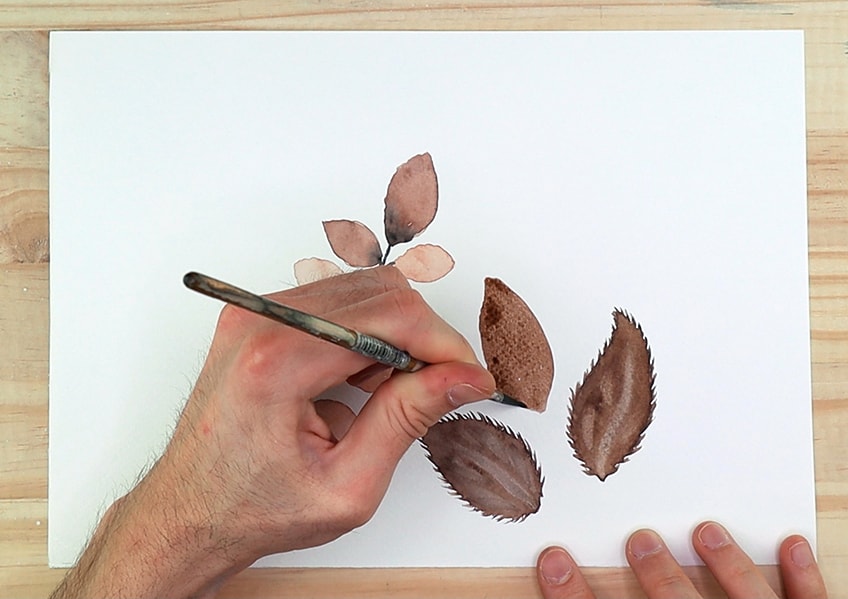
The Beech Leaf is probably one of the most common leaves. Sticking with the autumn palette, let us make a dark mix of brown by using hints of black. We can then proceed to paint a spearheaded shape, however, this time we can make its point slightly narrower near the tip of the leaf. We can paint this leaf in any open space on the page.
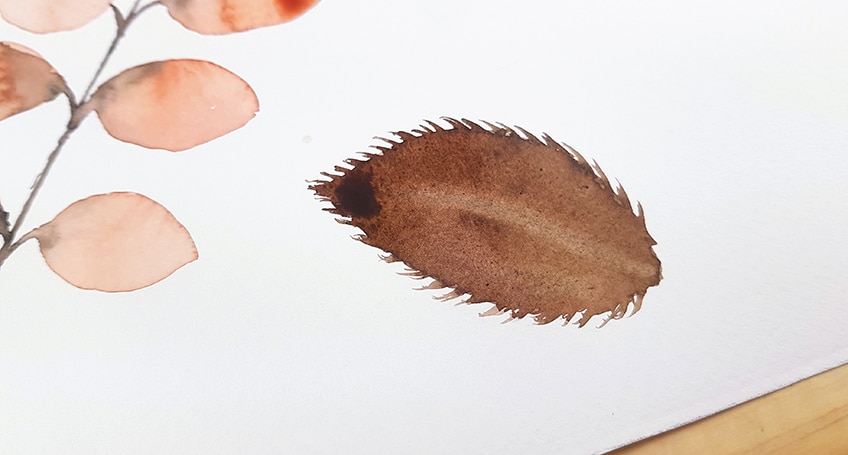
Once we have the general spearheaded shape, we want to then take a small thin brush and begin to paint little sharp spikes around the sides of the leaf. We want to paint little spikes on the sides of the leaf. This is a common quality found in leaves that gives them more texture and makes them more realistic.
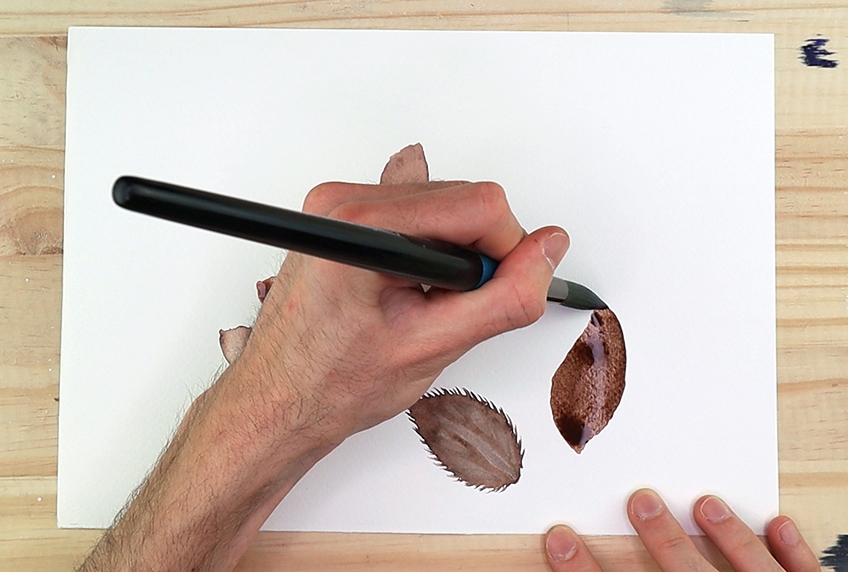
We can proceed to paint another spearheaded leaf shape next to this one. We want to make a combination of three leaves to give it a more complete look. Again, the shape could be thought of as a circle-type shape. We want to add these little spikes on all the sides of the leaves that we paint. This is a common feature of the beech leaf.
Step 2: Painting Details in the Leaves
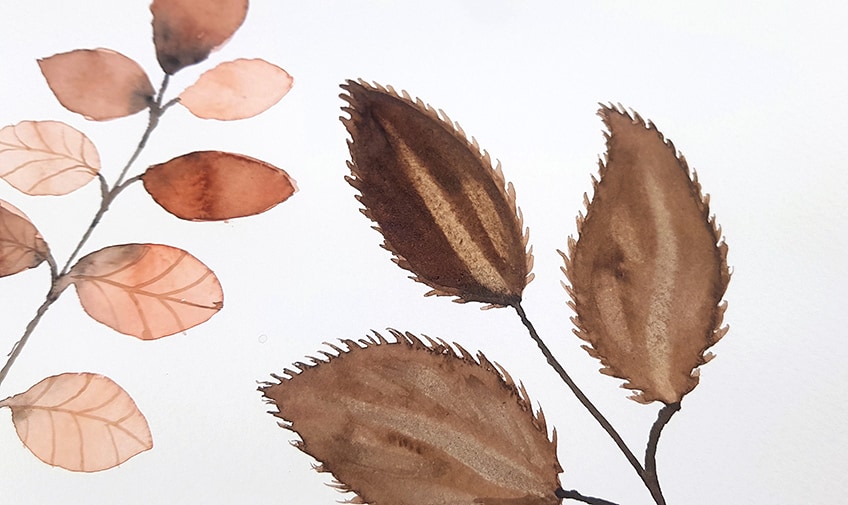
As you paint all three leaves, try to spread them out in a star position. As you paint the leaves, we can add some details with the lifting technique. What we will do is take a small dry watercolor brush, and make dry strokes in the leaves to lift the paint. We can make a variety of marks with this technique which gives the leaf interesting textures.
Once we have painted all three of our leaves, we can then connect the leaves by painting a branch in the center of all of them. We want to make sure that we are painting the branch very thin, which we then can connect to all the leaves with deviating lines.
How to Paint Little Berries on a Branch
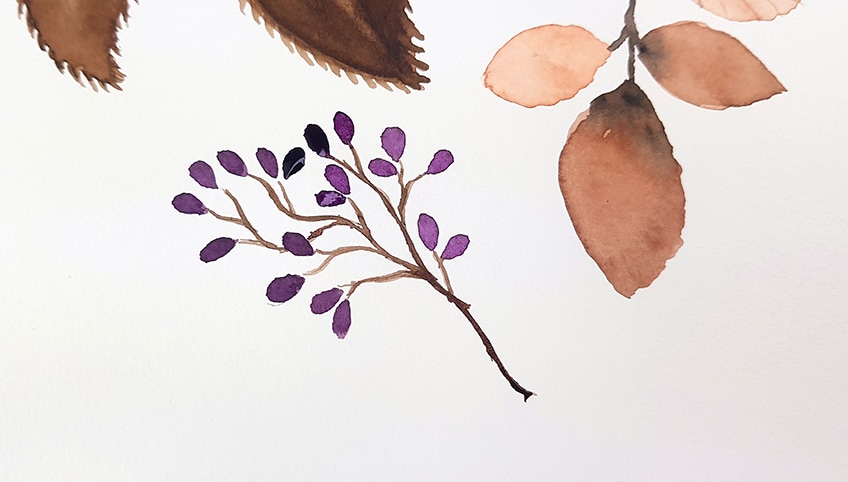
Let’s shift gears and paint something a little different. Painting berries is quite simple. Berries are like little teardrops that are contextualized by being in groups and connected to branches.
Step 1: Painting the Branches
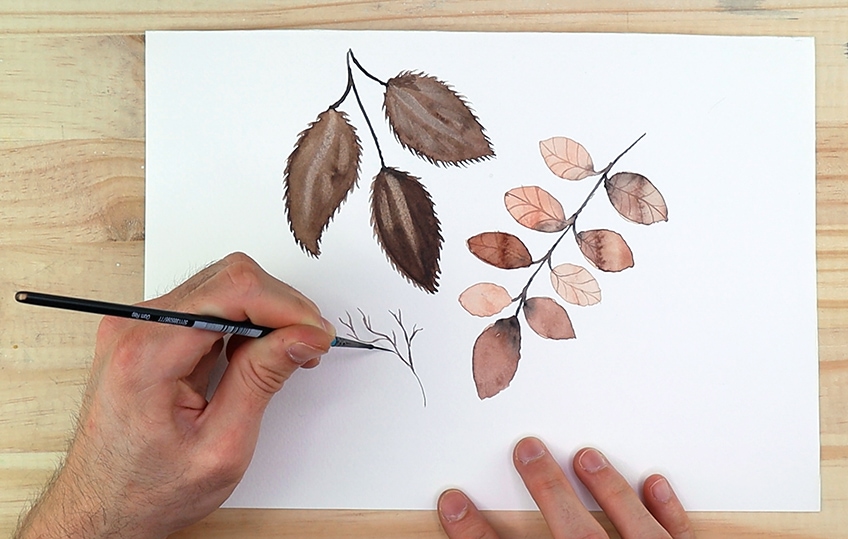
Let us mix it up a little bit with this next step. Let us begin by painting watercolor branches that are connected to little berries. Sometimes painting greenery or learning how to paint leaves comes with learning other little features that are often associated with them. We can begin by painting little lines to indicate a branch.
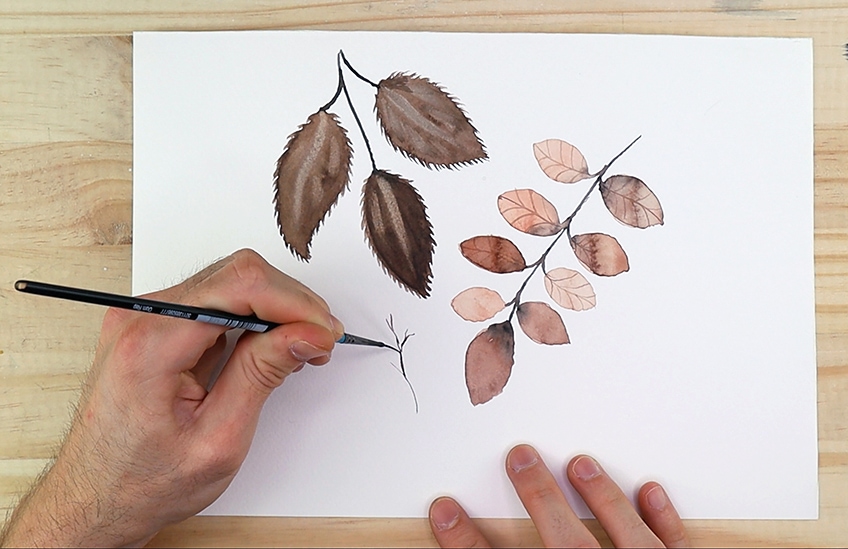
We want to use a thin small brush for this branch. Branches can vary in their form oftentimes, in this case, let us paint a branch that is quite geometrical and straight. Think of it as sharp angles combined with curved lines. We can allow these sharp angles and curved lines to go in various directions.
Step 2: Painting the Berries
We can then proceed to paint little teardrop shapes at the end of each branch. We want to make a deep purple mix, which we can make by mixing purple with a hint of black.
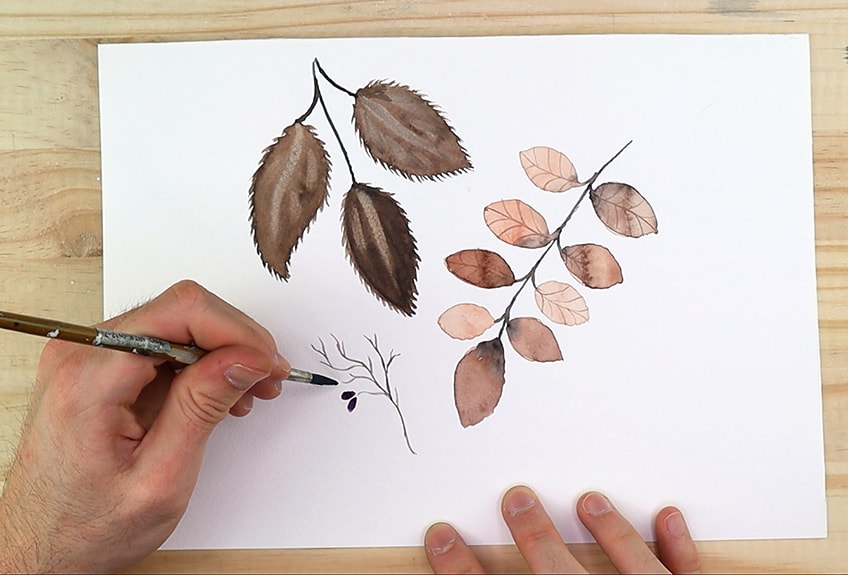
You can add more watercolor branches onto your existing branch if you want. You can paint these various branches deviating in various directions. As long as you paint little teardrop shapes at their ends, you will find that they will naturally look like little berries.
How to Paint a Northern Oak Leaf
Painting the Northern Oak is quite similar to a Christmas tree shape. Its segments make the shape of a Christmas tree.
It also still resembles the spearhead shape simultaneously.
Step 1: Painting the Leaves
Oak trees produce some of the most visually familiar leaves. There are various kinds of oak leaves, however, as we learn how to paint leaves, we will find that the oak leaf is essential for this exercise. Let us begin by making a mix of green with a little bit of black. We will then proceed to paint a Christmas tree shape with only
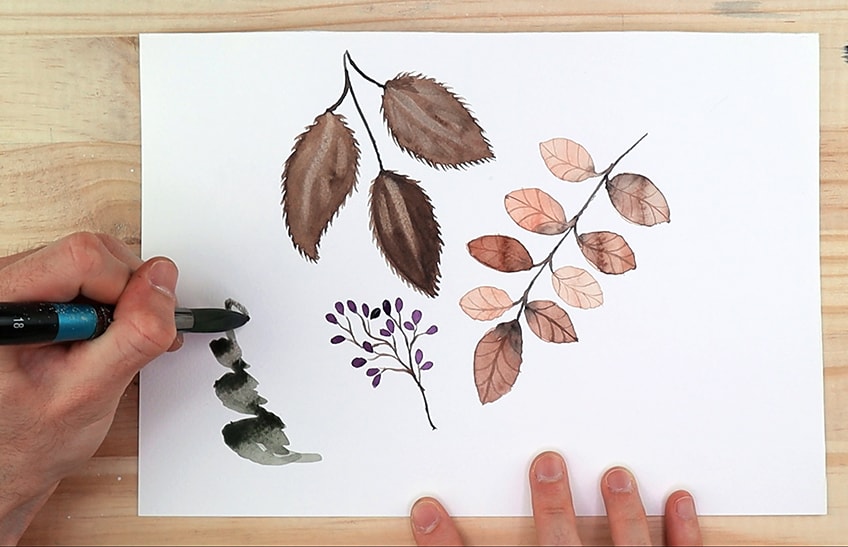
Think of it as a combined shape of an arrowhead with three segments on each side like that of a generic Christmas tree shape. You can paint this in any available space on your page. We can also add a small little stem or watercolor branch near the base of the leaf.
Step 2: Adding Details and Color to the Oak Leaves Painting
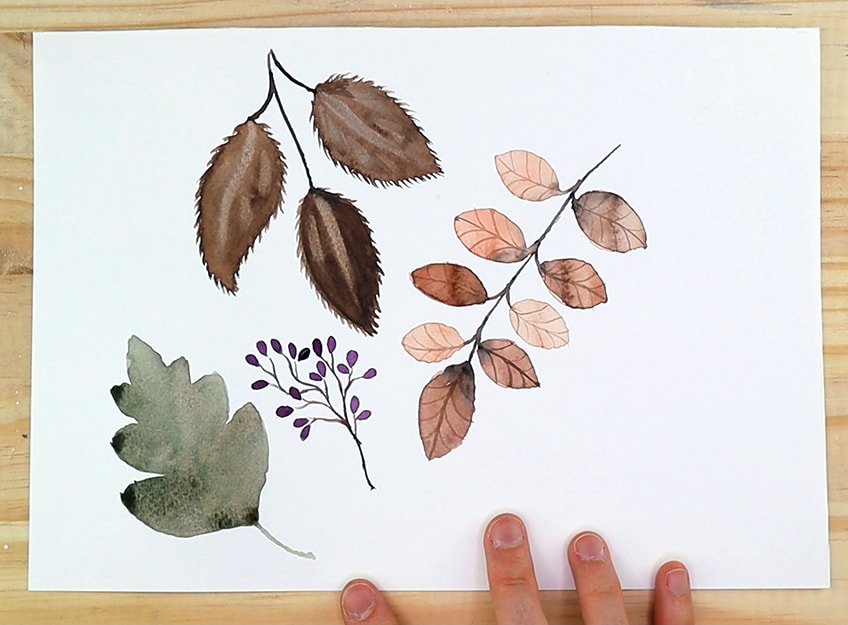
Whilst the leaf is still wet let us begin to add another coat of green paint to darken the leaf. This will allow the color to seep into the leaf, giving it more body and texture. If you want you can add some brown into the wet paint so there is a nice seamless mix between green and brown within the leaf.
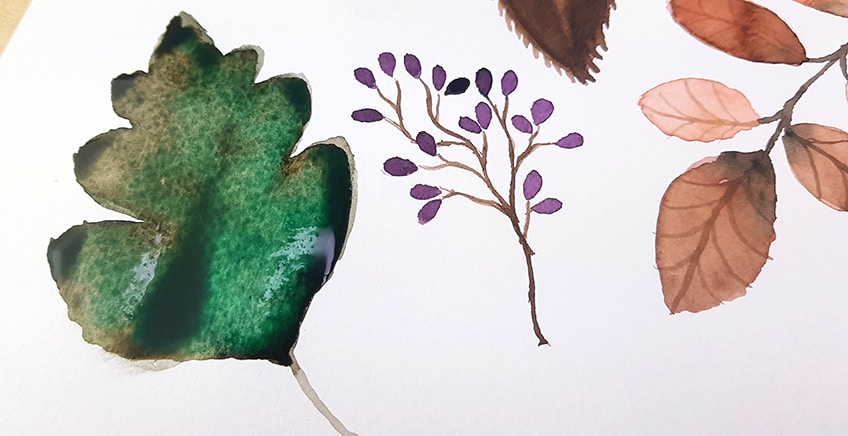
Now, with swift action, take a small brush and add a single stroke up the center of the leaf. You can then paint single line strokes with black paint in each segment of the leaf. By doing this we are giving the leaf veins, allowing for the black paint to merge into the wet paint.
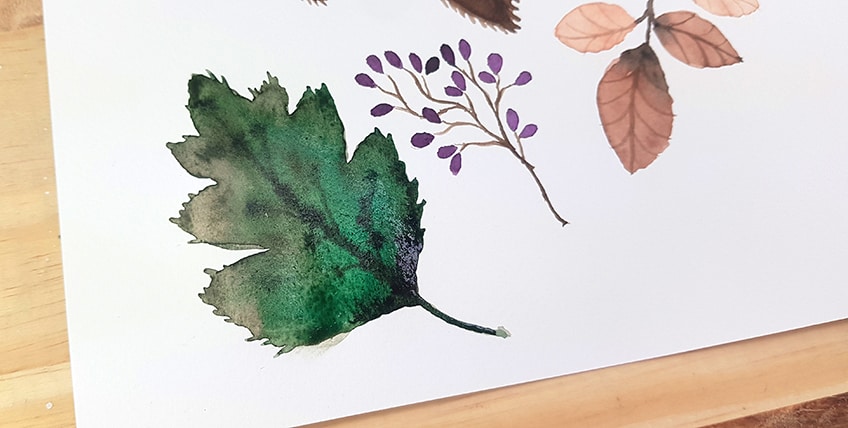
This wet-on-wet action makes the details in the leaf seem as if it is inside the leaf. This is just a nice trick that you can use to add details to a leaf. Once you have done that you can paint little spikes at the ends of each segment in the leaf. Again, this adds texture as well as gives it a more organic and natural quality.
How to Paint Ponytail Palm Leaves
Ponytail palms are a classic for understanding watercolor greenery. These leaves are really easy and fun to paint. They can be incorporated into various Watercolor scenes.
Let’s get into the various steps.
Step 1: Painting the Leaves
Watercolor greenery and learning how to paint watercolor leaves come in all sorts of shapes. A very common-shaped leaf is the Ponytail palm leaf. These leaves are simple to paint. We begin with making a lighter mix of green. We then proceed with our medium brush and make long strokes which we end off with a light-handed thin tip.

Leaves painting is quite simple. For the ponytail palm leaf, we can make the strokes as long as we want as long as we end them with a pointed tip. We can also make them fold by painting short strokes with pointed tips. We can then paint from that tip and curve our strokes which can make the plant seem as if it is hanging.

Step 2: Painting the Watercolor Branches
We want to make sure though that we connect the bottom or base of these plants directly to the main branch. We do this by painting a long thin stroke of green. We then simply connect the bottom of each plant by extending the stroke into the branch.
We want the leaves to merge directly into the main watercolor branch or stem.
You could do this however many times you want and it would look like a long stem with various leaves connected to it. This plant is a great watercolor greenery feature that can look beautiful in various natural watercolor landscapes.
How to Paint Betel Leaves
Again, Betel leaves take on the spearhead quality, however, they are quite small and have a similar body to that of the Oakleaf. Let’s go through the few simple steps on painting these Leaves.

Step 1: Painting the Leaves
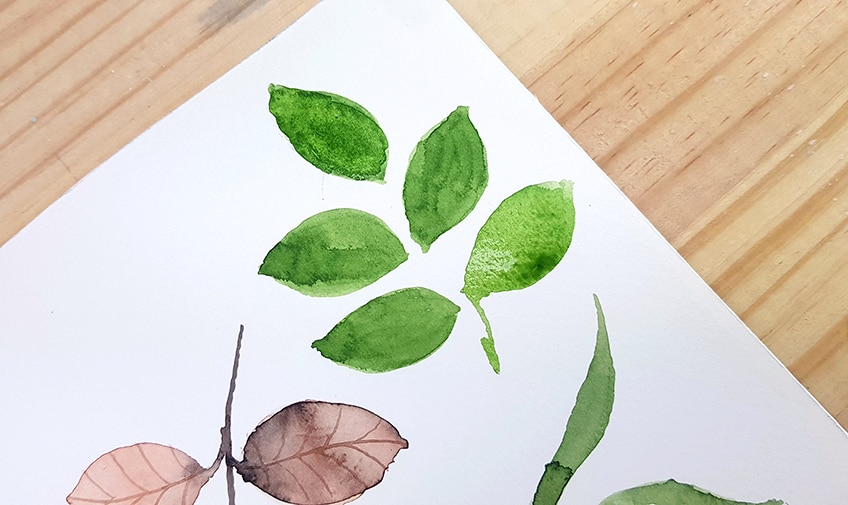
Of all the leaves that you may have come across, the Betel leaf is probably the most common of them all. This leaf is a common leaf shape that is found in various plants. We can begin by making a light green mix. We paint this leaf by making a circular shape, which we then have a small pointed tip at the ends.
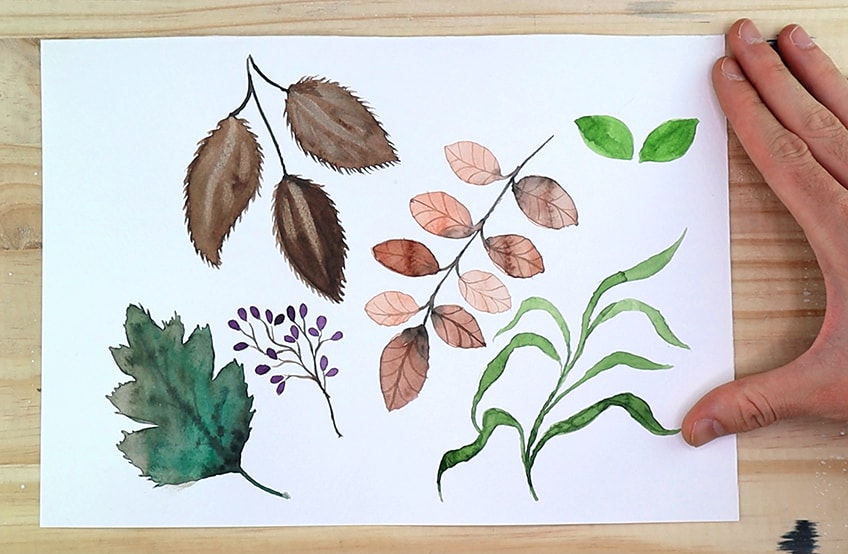
This leaf is simple to paint; it is similar to the Beech leaf but is often smaller. The shape is also similar to that of the black locust leaf but it is more rounded in its body. This leaf also works well as a common green leaf.
Step 2: Painting the Branches
You can paint many of these leaves in a row and simply connect them by painting thin green watercolor branches. These branches should be curvier as the green color implies that they are more and less rigid in their movement.
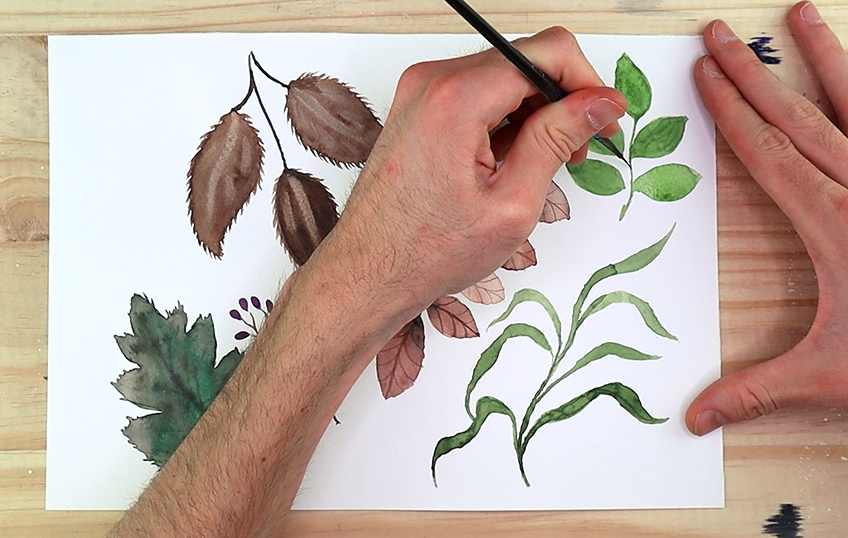
These leaves have smaller branches that can be connected to the main stem of the plant. These work well with watercolor greenery and are a classic leaf to know when learning how to paint leaves. If you want, you can always darken your leaves with another coat of green paint.
How to Paint Sandbar Willow Leaves
Sandbar Willow Leaves are smaller, rounder leaves. Their shape resembles that of the Black Locust Leaf. Again, this leaf also has the quality of the spearhead but its body does round out quite a bit.
Let us go through the various steps.
Step 1: Painting the Leaves
When painting leaves, you will find that most of them have a similar shape with few minor changes. The same could be said for the Sandbar Willow leaf. Painting this leaf is simple. We begin by making a light mix of yellow with a hint of brown. We then proceed to make small little surfboard shapes with thin tips on both ends.

This leaf is a surfboard shape, but it is quite narrow so we want to make sure we paint them quite thin. Painting these little leaves in a yellow tone gives it a nice autumn color tone. If you need to turn your page around for space then go for it.

Step 2: Painting the Watercolor Branches
This leaf is a simple sharp little leaf that connects to a thin branch. Each little branch connected to each leaf should be connected to the main stem. This main stem can be painted with the same yellow, which should run through the middle of the leaves.

How to Paint a Maple Leaf
Last but not least is the very famous maple leaf. The maple leaf obviously also has a spearheaded shape, however, it has little sharp ridges along its edges.
It can also resemble the Christmas tree quality by the deviation of its various segments.
Step 1: Painting the Leaves
There are various kinds of maple leaves, however, we will paint the common Northern Maple leaf. Let us begin by making a mix of yellow with a hint of brown. We then will proceed to paint the Christmas tree shape again, however, this time there are only two segments on each side of the leaf.
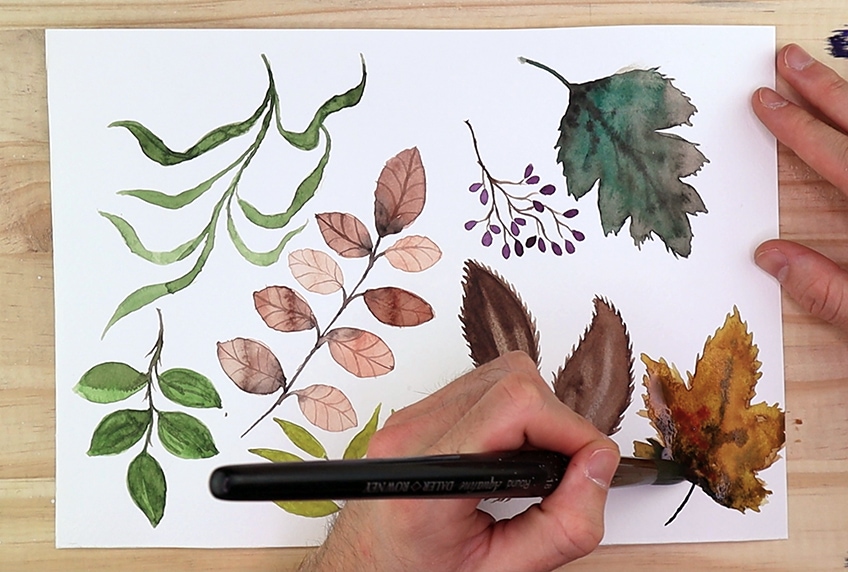
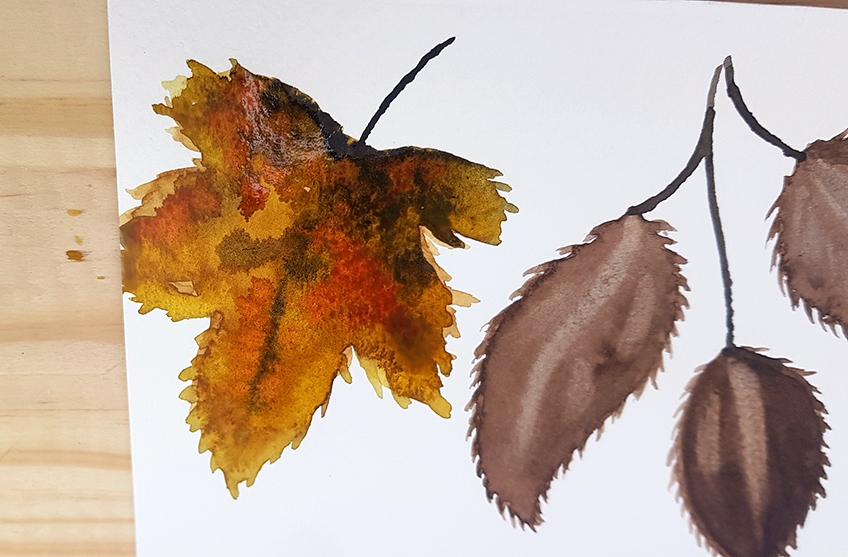
We want to work whilst the paint is still wet. With your mix of yellow paint give each tip of the leaf segments some spikes. The maple leaf has spiky edges at the tips of its leaf segments. We can also add hints of red and brown into the leaf to give it a beautiful autumn feel.
Step 2: Adding Details to Your Leaves Painting
Once your leaf has dried you could add more details with black paint, however, it looks nice when it is left without further detail. The colors will dry together and create a seamless integration with one another. If you run out of space on your page, then just paint out of the border.
Adding Final Details
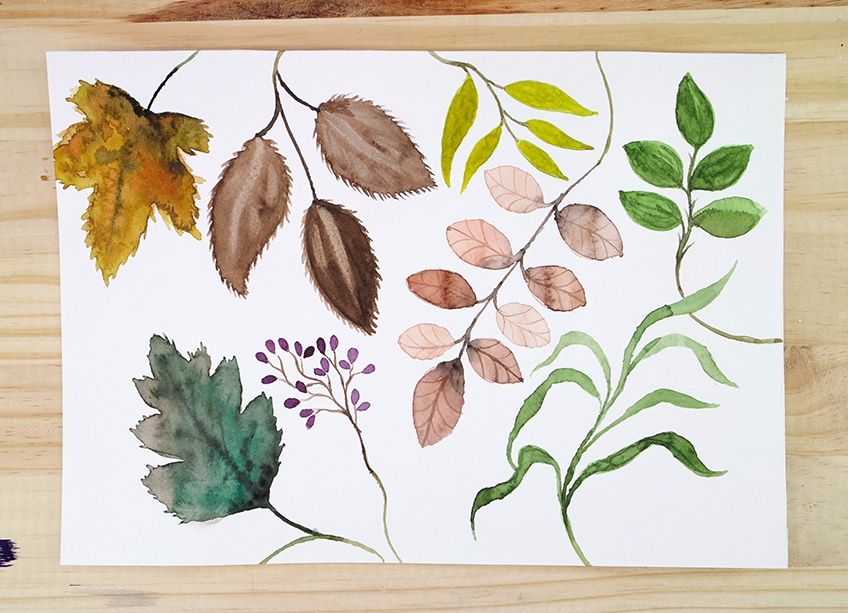
There you have it! A demonstration of watercolor greenery with various ways of how to paint watercolor leaves. We can also paint the stems of all our branches out of the page borders to make it seem as if they are a part of a larger branch. You could also keep adding more to your painting with the new skills you have learned.
Tips to Remember
As you learn how to paint watercolor leaves, this tutorial breaks down a few tips and tricks for watercolor leaves as well as watercolor branches easily and understandably.
- You want to explore different-sized brushes for different features within your watercolor leaves.
- Remember, watercolor branches are simply lines. It’s just a matter of how to place them together and how they connect to the leaves.
- When painting watercolor leaves keep two jars of water to rinse your brushes thoroughly between different applications of paint.

- Watercolor plants can be painted in various shades of green. Explore mixing your colors!
- Remember to act swiftly when adding details onto wet paint before it dries.
- Most of all, take your time, have fun and relax. Painting takes practice, so don’t worry about perfection as you learn how to paint leaves and watercolor plants.
As we learn how to paint leaves, we also learn how to paint a variety of shapes and color combinations that can make our leaves both autumn and summer-themed in their color palettes. Watercolor greenery and watercolor plants are very abstract in many ways, this allows us to play around with our color combinations to create interesting and vibrant leaves and plants.
Frequently Asked Questions
How Do You Paint Autumn Leaves in Watercolor?
Painting autumn leaves is mostly a matter of what color combinations you use. As opposed to watercolor greenery, autumn colors have more warm and earthy tones due to the leaves falling off the tree and being in a state of dying. Leaves painting, however, comes with some research into different leaf shapes. Maple leaves and simple oak tree leaf shapes work well with the autumn theme and color palette. That being said, when you learn how to paint leaves you will find that you can make any leaf into an autumn seasonal painting by paying attention to the color palette you use when doing a leaves painting. Colors to work with include, browns, blacks, yellows, and reds. These work well together to create warm mixes and autumn color palettes.
How to Paint Easy Watercolor Leaves?
Leaves are simple to paint. Despite seeming quite difficult, you will find that it is often a simple shape that can be contextualized as a leaf with a few little strokes and lines. Watercolor branches and watercolor plants often can be depicted as such by simply painting them in conjunction with one another. Leaves painting, most commonly, can be shaped such as a surfboard or spearhead shape which you then add some lines in for details and you can contextualize it further by connecting lines at their ends which can be classified as a branch. Simply, knowing how to paint watercolor leaves is about finding the generic shape and then choosing the right color with a little bit of detail to give it some texture. Don’t worry though, the paint and water do most of the work.
What Colors Should I Use to Paint Watercolor Leaves?
Exploring watercolor greenery or watercolor plants, in general, comes with a variety of color choices. You will find that you can make various mixes of greens and browns to define your watercolor leaves or watercolor plants in the summer or autumn seasons. Using greens can give your watercolor leaves a more summery feel. Using colors like red, yellow, brown, and black can work well with creating more autumn seasonal color palettes. Either way, leaves are very strange in many ways and can often be all sorts of colors. This tutorial demonstrates how to paint leaves as well as watercolor branches in a few easy steps.
Matthew Matthysen is an educated multidisciplinary artist and illustrator. He successfully completed his art degree at the University of Witwatersrand in South Africa, majoring in art history and contemporary drawing. The focus of his thesis was to explore the philosophical implications of the macro and micro-universe on the human experience. Matthew uses diverse media, such as written and hands-on components, to explore various approaches that are on the border between philosophy and science.
Matthew organized various exhibitions before and during his years as a student and is still passionate about doing so today. He currently works as a freelance artist and writer in various fields. He also has a permanent position at a renowned online gallery (ArtGazette) where he produces various works on commission. As a freelance artist, he creates several series and successfully sells them to galleries and collectors. He loves to use his work and skills in various fields of interest.
Matthew has been creating drawing and painting tutorials since the relaunch in 2020. Through his involvement with artincontext.org, he has been able to deepen his knowledge of various painting mediums. For example, watercolor techniques, calligraphy and lately digital drawing, which is becoming more and more popular.
Learn more about Matthew Matthysen and the Art in Context Team.
Cite this Article
Matthew, Matthysen, “How to Paint Watercolor Leaves – Easy Botanical Art Tutorial.” Art in Context. February 3, 2022. URL: https://artincontext.org/how-to-paint-watercolor-leaves/
Matthysen, M. (2022, 3 February). How to Paint Watercolor Leaves – Easy Botanical Art Tutorial. Art in Context. https://artincontext.org/how-to-paint-watercolor-leaves/
Matthysen, Matthew. “How to Paint Watercolor Leaves – Easy Botanical Art Tutorial.” Art in Context, February 3, 2022. https://artincontext.org/how-to-paint-watercolor-leaves/.


