How to Draw Block Letters – Easy Hand-Lettering Tutorial
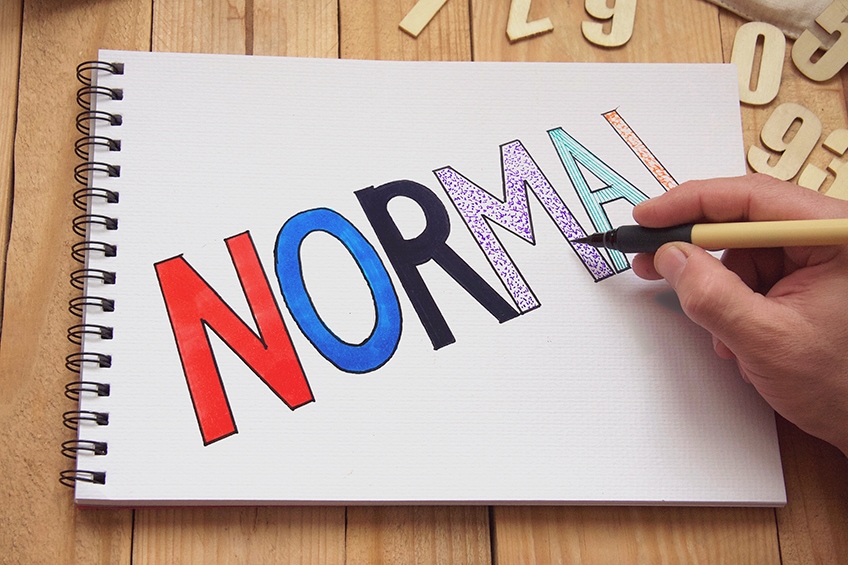
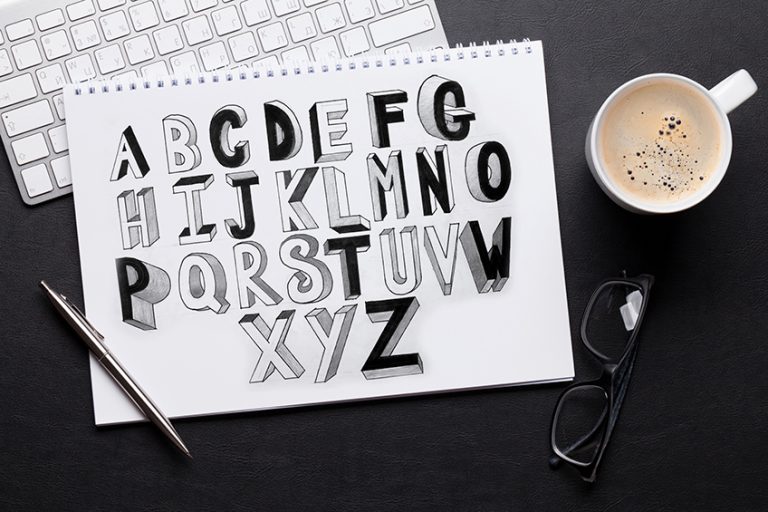
What is block lettering? Block lettering is the simplest form of letter construction, an essential for hand lettering. Learning how to draw block letters is a key skill to know when learning different forms of hand lettering. The process of block lettering is a foundational skill that teaches you how to add width and body to a text. Learning how to draw block letters is not difficult at all, and once you know how to create the blocky art style you can play around with how you add details to your blocky text. Learning how to draw letters, in the beginning, starts with knowing how block letters are formed. By understanding block letters, you will also give yourself a better understanding of letter formation. Understanding the formation of letters and how they are placed together will provide you with a more refined approach to hand lettering. What is nice about block lettering is that you can take the format and apply it to any text style, which will help you figure out how exactly you want to size your letters.
Table of Contents
An Easy Guide to Block Lettering
So, what is block lettering? In this tutorial, we will find out how to make block letters and how to construct our covering the basics in a digestible and easy-to-follow guide. You will learn how the process of block lettering begins with a basic approach, which you then can take and apply to all sorts of text. What’s nice about block lettering is that we are essentially learning the process of drawing letters.
Understanding the basic principles about drawing letters should never be overlooked, and by knowing the basic format of letter formation, we will then have greater confidence when making our letter drawings in the future.
As you learn about block lettering, you will also come to know how letters are formed in general. This is because the process of block lettering establishes the foundational approach to forming all sorts of lettering styles. Let’s see what materials we will need.
Necessary Materials
In this tutorial, we will be covering the basics of block lettering. This means we don’t need extravagant materials; however, we will need some decent markers, a ruler, and a pencil. We will begin every word formation with a written word in pencil, we will write out our text in different ways with a pencil first. We will also want to use a ruler for some written texts and an eraser for small mistakes along the way. We then will use a micron pen to embolden our letters as we go over the pencil lines to create a more visible image. From there we will fill in our text with a black marker, this way we practice filling letters in. Below are all the necessary materials needed for this tutorial:
- Black Copic Marker
- Micron 12mm pen
- Pencil
- Eraser
- Ruler (any ruler will do)
- Paper (any paper will do)
Step-by-Step Instructions on Block Lettering
In this tutorial on how to draw block letters, we will cover the basics, giving you a beginner-level approach to the process of drawing block letters. Block letters are a foundational skill for all lettering because the process can be applied to any text. We will go through the general format of writing a text with our pencils, which we will then proceed to make blocky by drawing and outlining shapes around each letter. By doing this we will see how we begin to give the letters more body and thickness. From there, we will see how this can be applied to other forms and styles of lettering. Lastly, we will cover how you can make your bock letters drawing more interesting by adding all sorts of detailing to your block letters.
Detailing can be done with all sorts of materials and can make your block letters drawing a little more interesting. Now that we know what to expect, we can get into the tutorial.
Normal Block Lettering
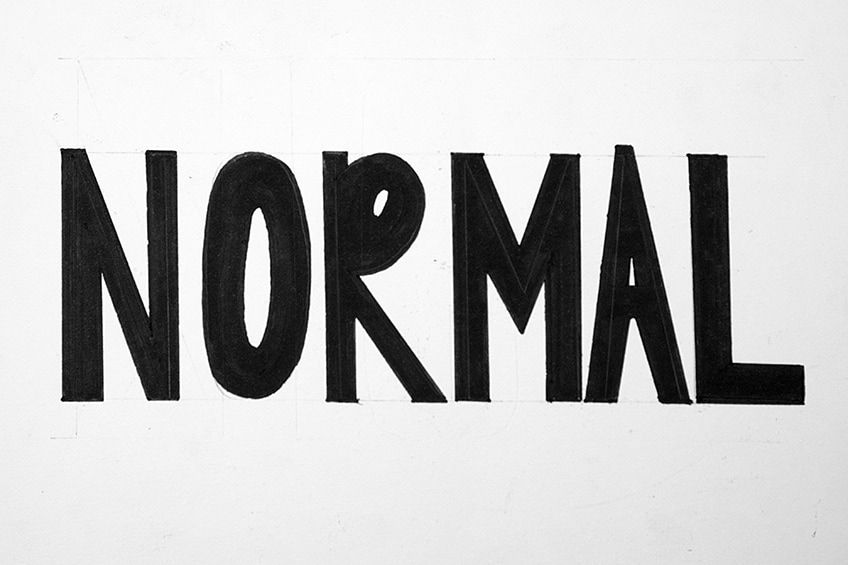
Normal block lettering is the first style of block lettering we will learn how to do. The basic formation of block lettering is going to set up the foundational knowledge for other block lettering styles that we will explore. We want to understand the basic formation of block letters to understand how the process of changing a normal text is performed. That being said, let us go through a few simple steps.
Step 1: Writing Out the Text
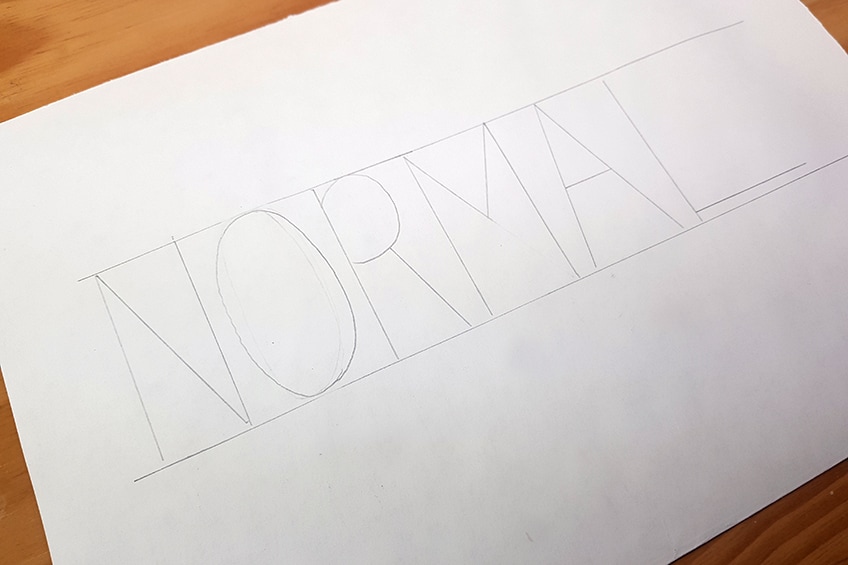
We want to begin by taking our rulers and pencils and proceed to draw two parallel horizontal lines across our page that will demarcate the area in which our block letters will be drawn. From there we need to choose a word for this exercise; to keep it simple, let us use the word “normal”.
We then want to write out the word “normal” within the two horizontal parallel lines. Using our pencils and rulers for accurate placement and lines.
Step 2: Outlining the Text
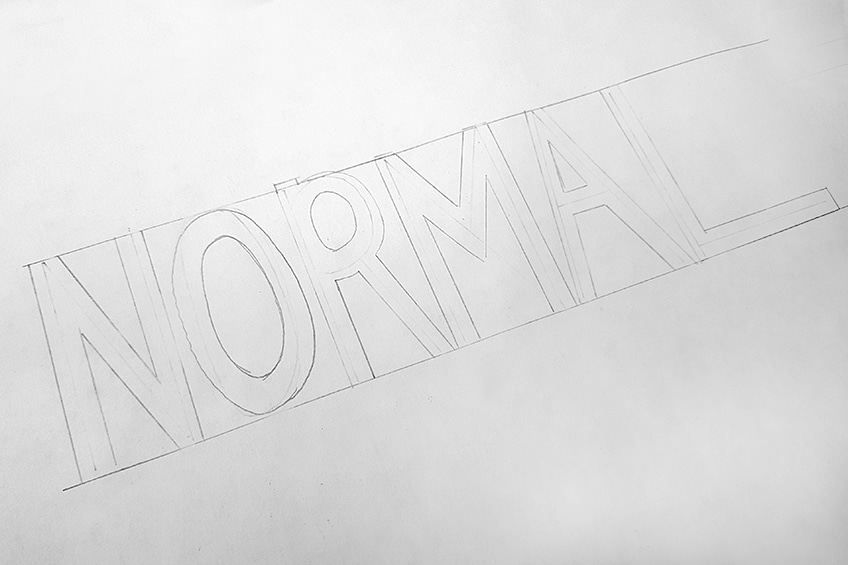
Once we have our word written down, we can take our pencils and begin to draw lines around each letter, outlining the letter. We want to leave a little space between the outlines and the letter, giving the text more width and body. This is how we turn the normal text into a blocky art-style drawing. Use your ruler for any letters that have a straight line for sharper and more accurate line work.

As you outline the text, you want to make sure that you keep a gap in between your written letter and the outlines. This is where you can play around with width, determining how thick or thin you would like your letters to appear.
Step 3: Erasing the Written Word
Once we have outlined each of the letters, drawing lines that go around each letter, we should be left with thicker lettering. We should also see how the written text is seen as a line that flows within the thicker body of each letter. We now can take erasers and erase those lines until we are left with an outlined version of the word “normal”.
Step 4: Outlining the Text With a Marker
Once we have erased the inner text lines, we can now take our micron pens and begin to go over the pencil outline of the word. We want to embolden the text using our pens; this way, we make the text more visible, and secondly, we give the text a clear blocky art style.
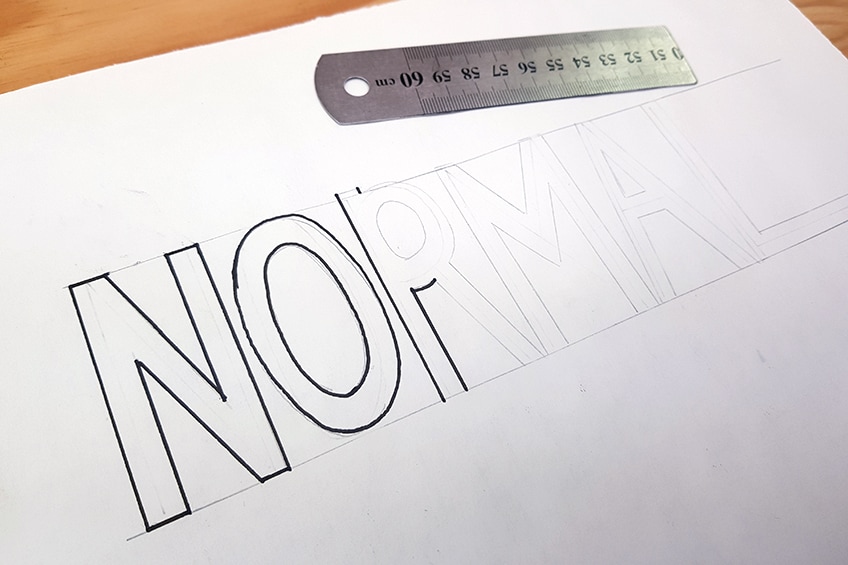
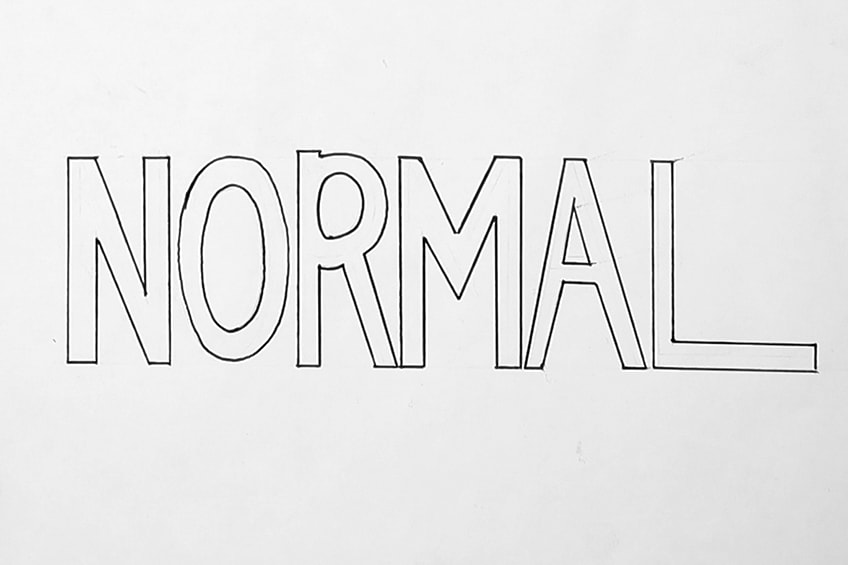
Remember to use your ruler when going over the straight lines within each letter. We want to keep the lettering clean and precise for the basic block lettering style. So, make sure that you take your time, especially around the circular shapes within each letter. That’s how the basic approach to block lettering is done.
Simple, right? From here, you can do all sorts of different things such as color it in, add funky details. The idea is to be left with a drawing of a text that can be changed with additional, but before we learn to do that let’s go through the different block lettering styles. This way you have an idea of how to create different styles using this simple method, which you then can tweak and change how you would like.
Bubble Block Lettering
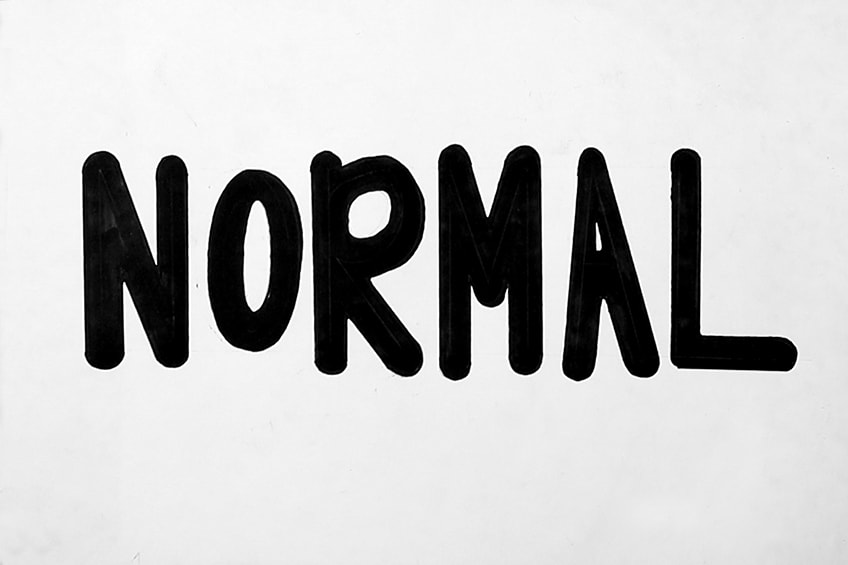
Another popular way to create a cool block lettering-styled text is to give the text slight changes. One great way to do this is by rounding the edges of each text to give the block letters drawing a softer quality. These are called bubble block letters or rounded block letters, which can be a great way to make a text seem less intense and sharp but rather lighter and softer. Let’s go through the few simple steps on how to create this block lettering style.
Step 1: Writing Out the Text
We will start by following the same beginning process as before, where we draw two horizontal lines on our page, parallel to one another. In between these two lines is where we are going to write our word. Again, let us use the word “normal” just to keep the exercise simple and easy to follow. We can proceed to write this word on the page in between the two horizontal lines.

Step 2: Outlining the Text
This time as we outline each letter, we want to add a curved edge to each of the letters. This means that wherever the letters end on either side of the horizontal lines, or wherever there is an edge in the letter, we can give it curvature to soften the edges. Simply by adding rounded edges to our text we make the block letters softer and bubblier.
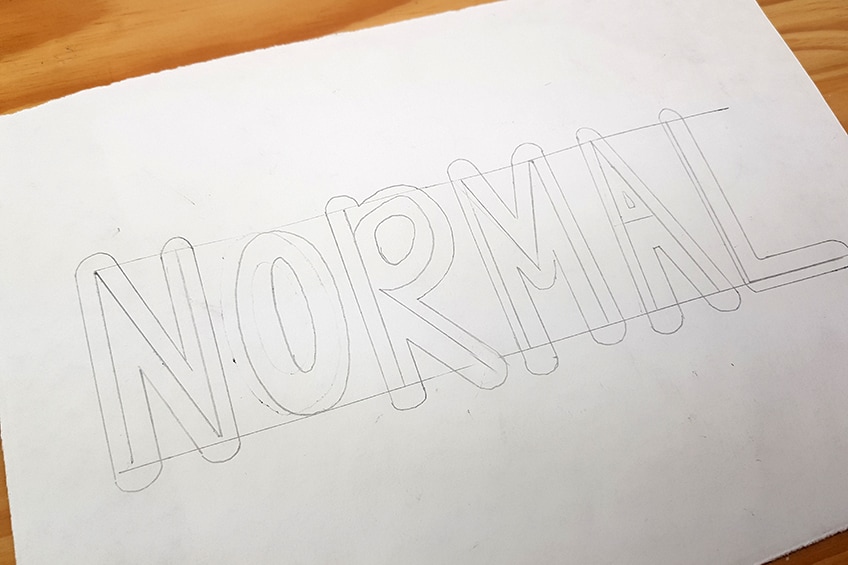
Make sure you take your time outlining the text, especially when you draw the rounded edges. You want to create arches that flow from one outlined side into the other as seamlessly as possible. Again, you can play around with how thick you want each of your letters to be.
Step 3: Outlining the Text With a Marker
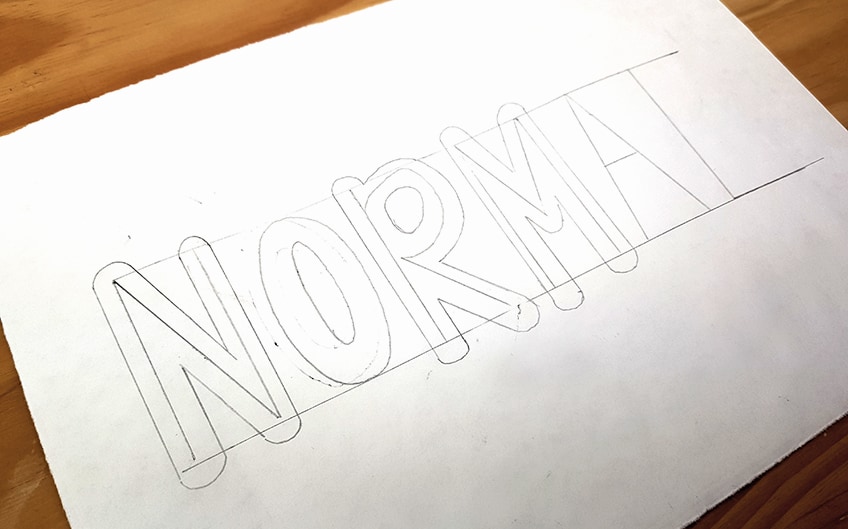
From here we can go straight into outlining the text with our micron pens. As you go over the pencil lines with your pen make sure you use a ruler for the straight lines, that way you can be precise when drawing the lines. Also, try and go slowly over the rounded edges, you want to make sure you go over the lines as smooth as possible.
Step 4: Filling in the Text
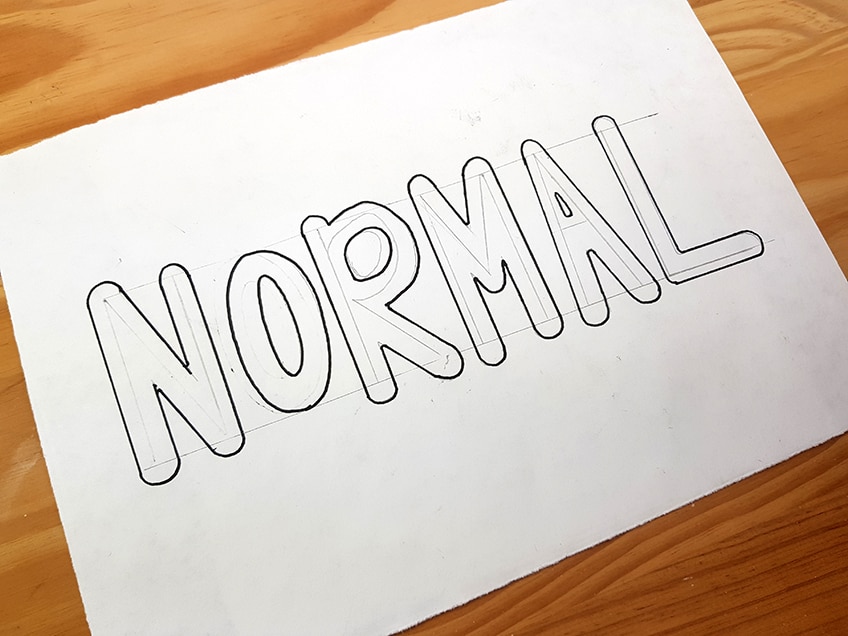
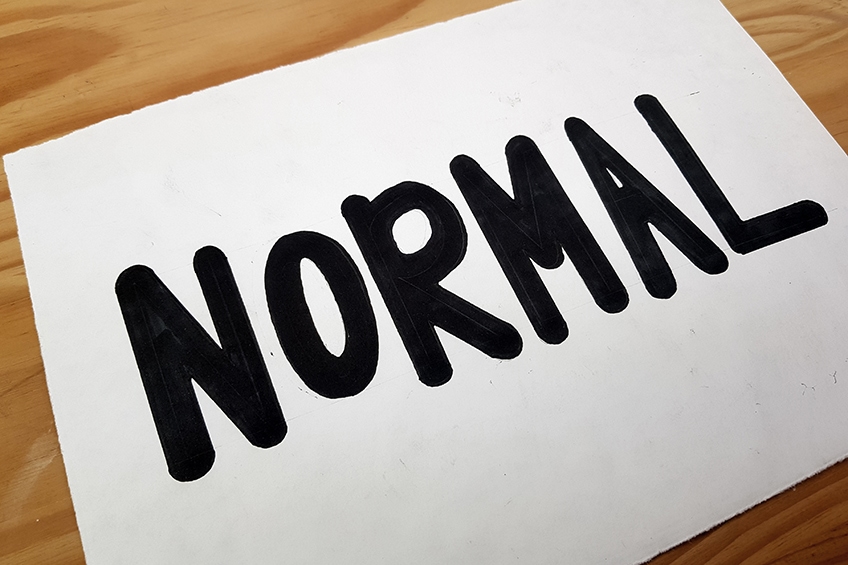
This time we can fill in the text with our black Copic markers. We want to fill in the text to get a sense of how the text becomes bolder and blockier when colored in. Using your black Copic marker, take your time coloring in the text, making sure you don’t go out of the outlined block letters. Lastly, just make sure you erase any unwanted pencil lines. There you have it, a simple way to create a bubble block letter drawing.
Curved Block Lettering
Another great way to make a block letter drawing is by playing around with the written text before adding in the outlines that make the text a blocky art style. We can do this by reshaping our letters without using pencil marks to indicate where we write the letters. We can also do this by reshaping the letters from straight simple lines, to curved lines..
Creating a curved block letter-style drawing is another great way to make a text interesting. Let’s go through the few simple steps on how to do this.
Step 1: Writing Out the Text
We will proceed to do the same thing as before, where we write out our text. This time, however, we won’t use any horizontal guidelines for placing our text. Allow yourself to write out the word “normal” once again, this time adding curvature to each of the letters. Explore curving the lines of each letter, making the text a little more strange and artsy.
Step 2: Outlining the Text
Once we have our word written out on the page, we can follow the same process of outlining each of the letters. In a way, drawing letters that aren’t straight can sometimes be easier as they don’t require precise straight lines. This is a great way to draw block lettering as you can explore the format with different letter formations. Proceed to outline your letters with your pencils, leaving space between the written word and the outlines.

Remember to keep a little bit of a gap between the outline lines and the written letter. Again, it’s completely up to you to explore the widths for each letter. You can also try to keep the letters consistent in width, as this is a great way to practice consistency within your block lettering. Either way, use the outlining principle and explore the process of thickening your letters.
Step 3: Outlining the Text With a Marker
Once we have finished outlining the word with our pencils, and we are satisfied with the outlined version of our word we can then move on to going over the word in black marker. Again, like before, we will go over the pencil lines with our micron pen.
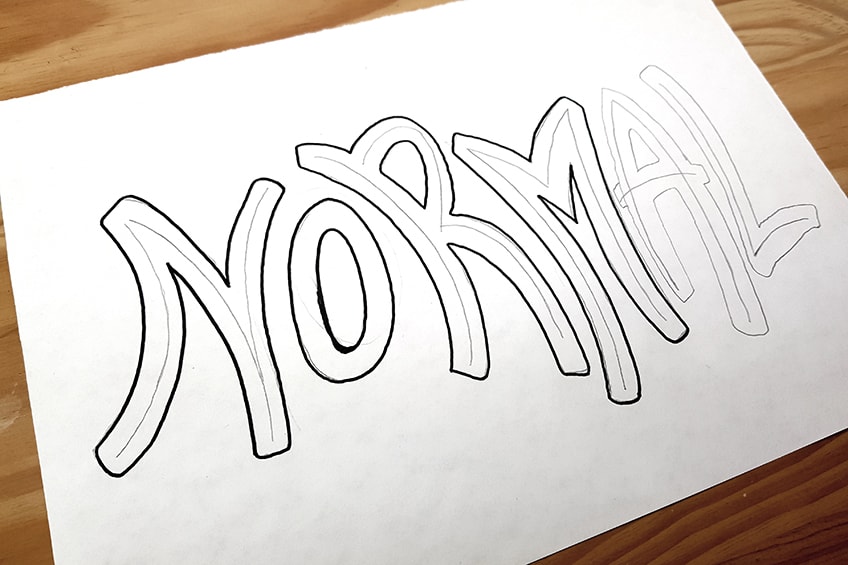
Remember to take your time when going over the pencil marks. We want to make sure that we go over the pencil marks as smoothly as possible. So, take your time when going through this step.
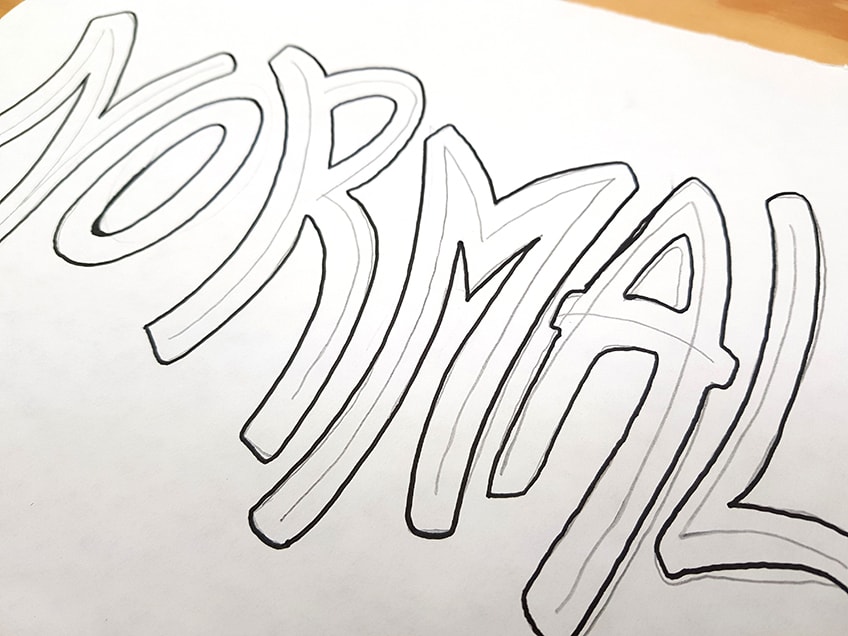
As you go over each letter with your micron pen, remember that you are working with curved lines. This means that we are not able to use a ruler to be precise, so try to plant your hand on the page as you slowly glide over each pencil line with your micron pen.
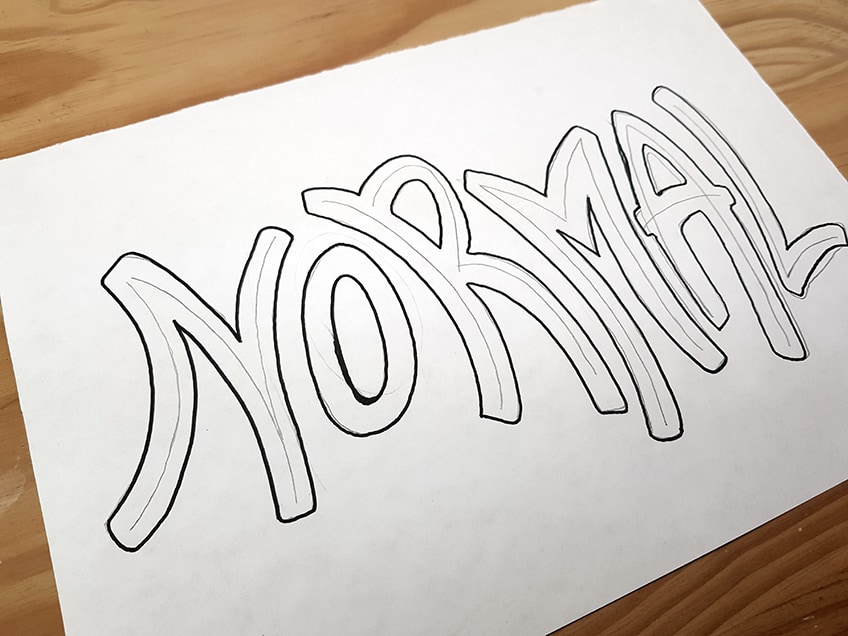
Step 4: Filling in the Text
Lastly, we will fill in our text once again after we have completed the outlining of the word with our micron pens. Filling in a text is a big part of learning how to create block lettering, and provides good practice for coloring within the lines of a text. Once again, take your black Copic marker and proceed to fill in each letter completely. There you have it, a simple process of creating another style of block lettering.
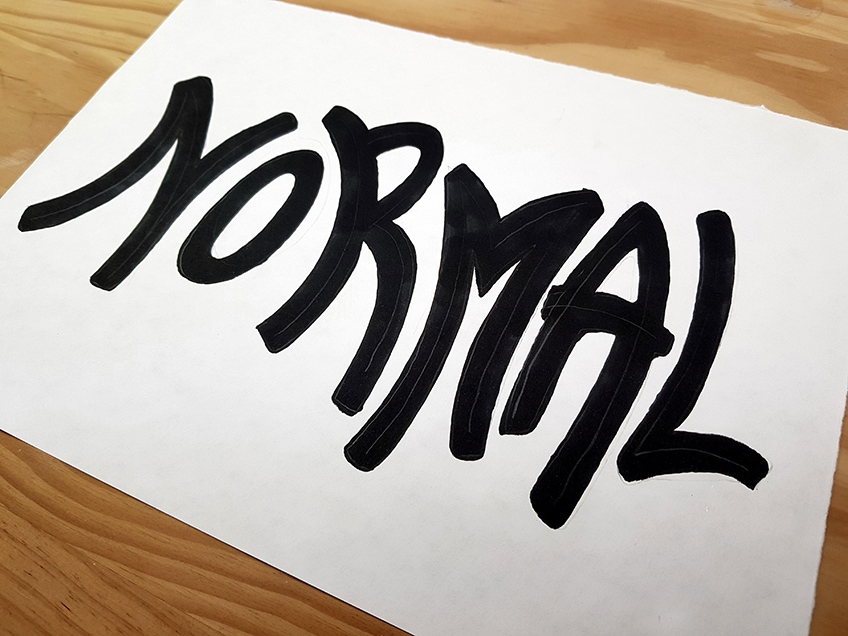
Creating Your Own Block Lettering
Now that we understand the process of how to create block lettering, a great exercise is to play around with creating your style of text. Similar to the curved block letters style, the form of the block lettering is determined by how we write our text. For this exercise, let’s still use the word “normal” for our block letters, just to keep it simple since we are used to the form of this word by now. Let us go through the few steps on how to create our block letters using the same process.
Step 1: Writing Out the Text
Let us begin with the same process of writing your text, however, this time you can explore writing your letters in any form or shape. However, we do want to keep our letters are written out in pencil and in a line form. Try to explore different sizes for your letters, some straight, some curvy – you can do anything this time. You could even make your letters very geometric; this time, it’s completely up to you.
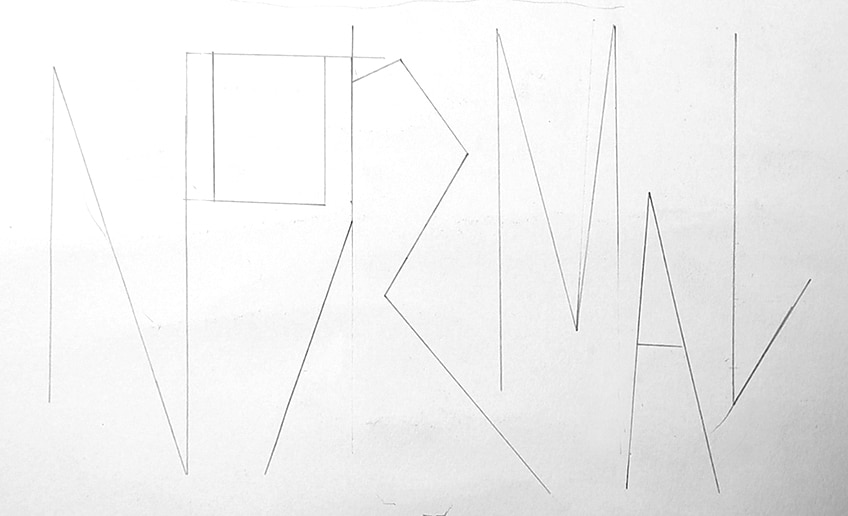
Step 2: Outlining the Text
We will still fill in the text with our black Copic marker, just so we can keep practicing filling in a text. So, this time you can take your micron pen and go over your line text to embolden the lines. From there we can proceed as we have with outlining our letters. We can give our letters a thick outline or a thin outline, it’s completely up to us and how wide we want to make our letters.
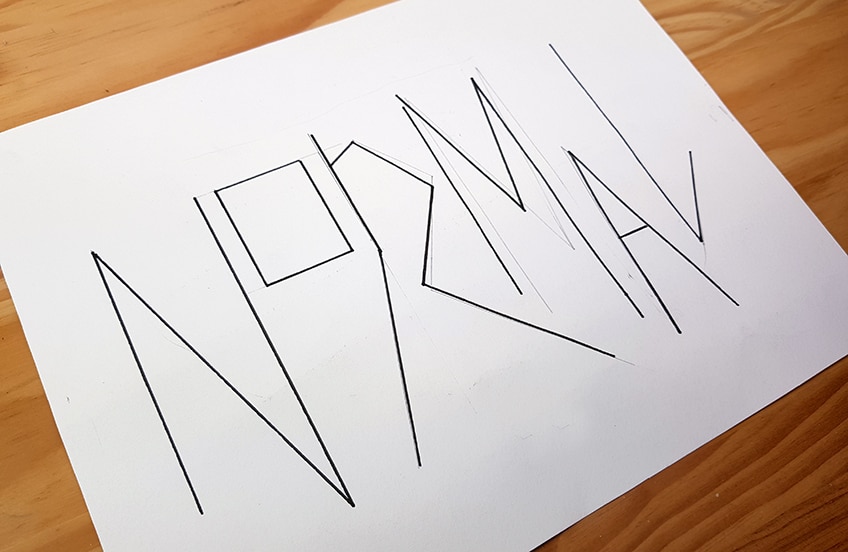
We can outline the text with our micron pens, now that we have the hang of the process, we don’t need pencil lines to guide us. Outlining a text directly with your micron pen also provides you with practicing how to outline a text directly with markers. Make sure you use a ruler for straight lines and take your time if you have curves outlined in your text.

Step 3: Filling in the Text
Once we have outlined our text completely, we can proceed with filling in our text as we have before. Use your black Copic marker to slowly fill in each of your letters. Make sure you take your time, keeping in the lines of the outlines.
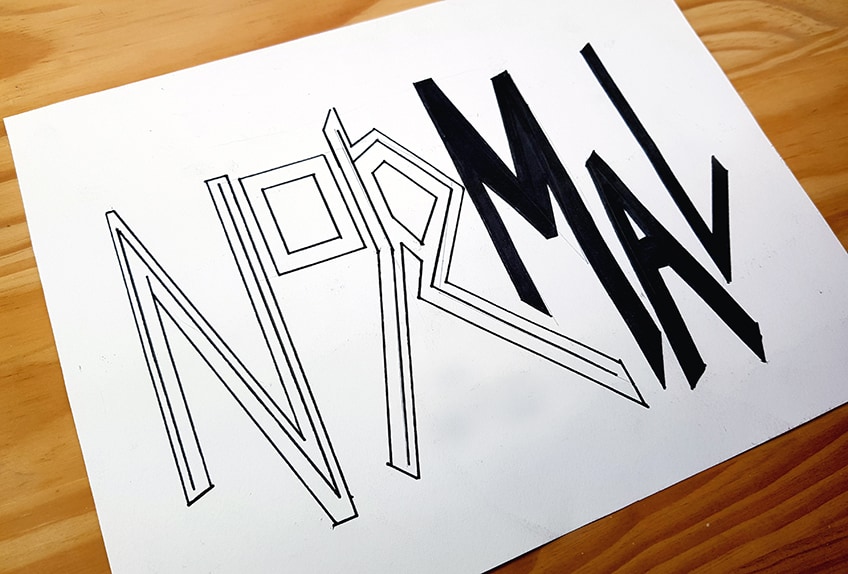
Filling in a text is a simple exercise but it teaches us how to color text without deviating out the lines of the words. It’s important because it is a common addition to hand lettering, and if practiced, it becomes an instinctual ability, making lettering much easier. Once you have completed filling in your text you have completed your block letters style.

Adding Details to Block Letters
This section is an additional part of the tutorial to provide you with some ideas for adding details to your block letters. Adding details is a great way to enhance your block lettering by using funky colors, creating shapes, and simply playing around with the look and feel of your block letters.
A good suggestion is to take the outlined block letters you did in the first exercise for the basic block letters, or you can create a new set of block letters, however, leaving them hollow and unfilled.
Let us take a look at a few ways we can add details to our block letters.
Filling in the Text
The first thing we can consider is filling in our text. This we have practiced with each block letter style exercise. Filling in letters is a great way to formalize letters, making them look professional and bold. So, filling in your block letters and detailing your letters can have a profound effect on the overall appearance of your lettering.

Filling in the Text With Color
The second thing we can do is explore filling in text with different colors. This is especially nice with block letters that are consistent in size and shape. This makes the color, or multiple colors, complement the consistency in shape and form. So, filling in letters with different colors is another great way of adding detail to your block letters.
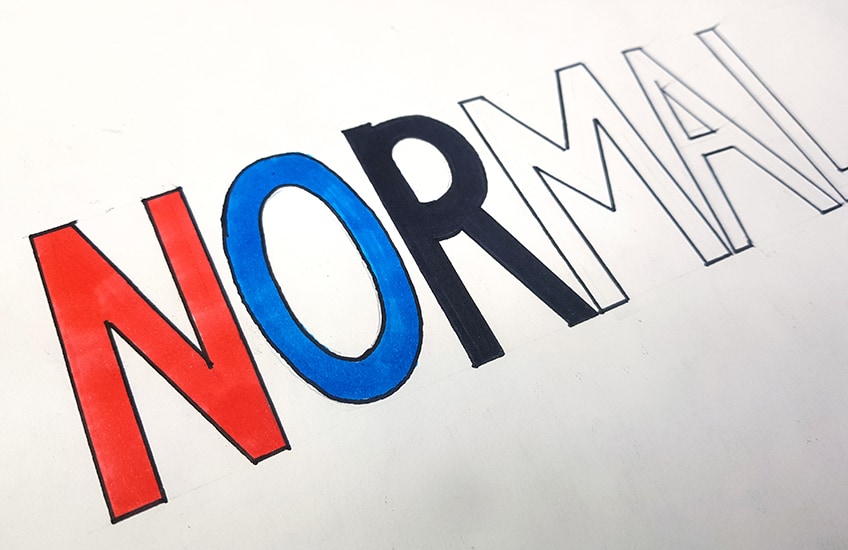
Adding Dots
When it comes to making letters funkier and stranger, playing around with different mark applications can be a great activity that can enhance block lettering. Dots or adding stipples is another way to give your letters some detailing. This can provide your letters with a more textural effect and can be a great addition to your block letters.
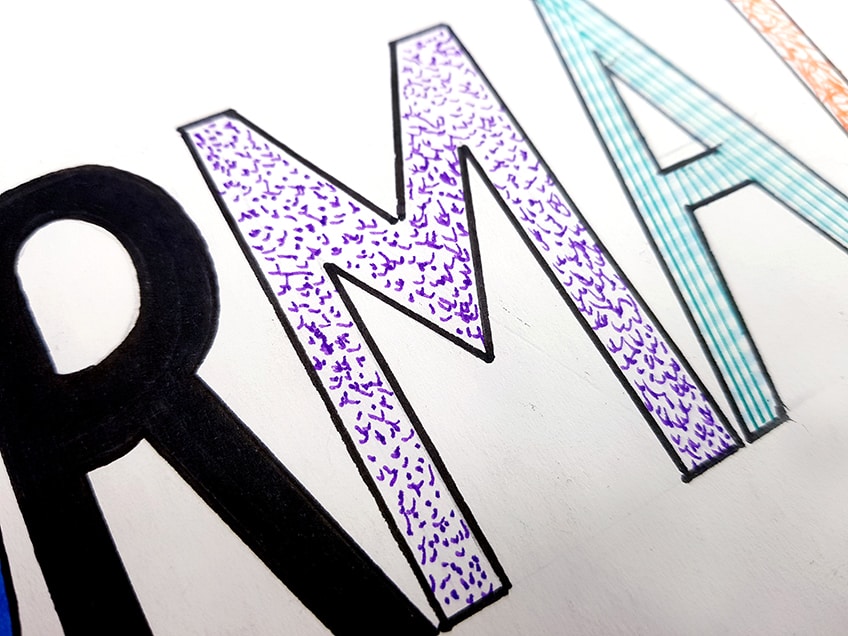
Adding Lines
Lines can be another great way of adding detail to your block letters. Lines are a simple and easy means to give a text an interesting and unique look. Playing around with crossing lines within a letter can also create a textural quality to the letter and can be a fun way to detail letters for more informal lettering ideas.
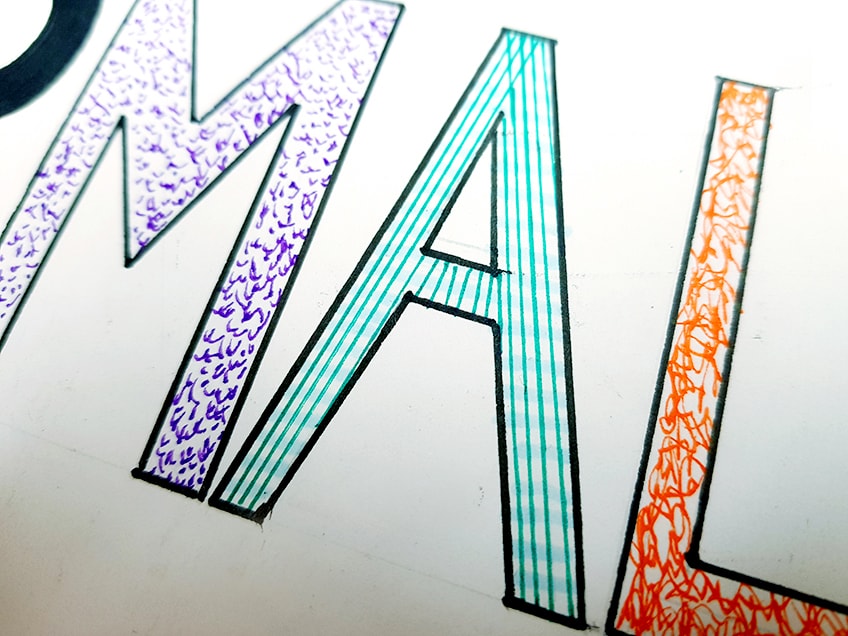
Scribbling
Scribbling is often an overlooked method of detailing, But, when added to a block letter text, it can be a nice detail. Scribbling is another fun way of adding detail to block letters, as it is a little less formal, it can give the text a more playful quality. Ultimately, it’s all about experimentation and seeing what suits your desired visual interest.
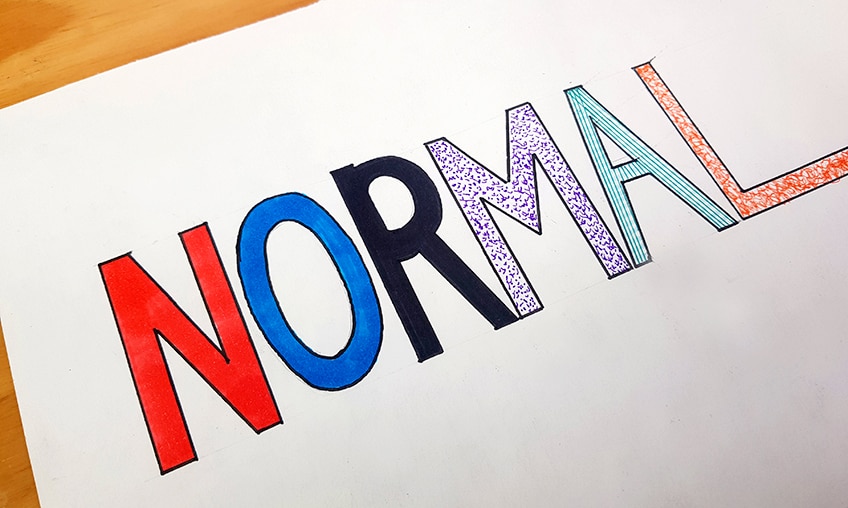
Combination
Lastly, playing around with all different types of details and putting them together is another great way to enhance block letters drawing. A combination of different styles, shapes, and details can provide your lettering with a more unique feel. Now that you understand the process of forming block letters, how to add them to any text shape, and how to give them details, you can now play around with all kinds of combinations.
Tips to Remember
- Play around with the format. Now that you know how to make block art-style letters, play around with different text formations and colors.
- Take your time. It’s always good to never rush the process, this way you will end up with a result that you are more likely to be happy with.
- Write your text as accurately as you can with your pencil. We want to write the text accurately and figure out scale before adding the blocky outlines and writing in markers.
- Use this tutorial as a tool. Take this process and apply it to all sorts of texts to add more body to your lettering.
- Most importantly, have fun. Enjoy the process of learning something new, so listen to some music and take it easy.
So, what is block lettering? It’s a simple way of thickening a text, to make a text bold basically. Learning how to draw block letters is a fundamental skill to learn when learning how to do hand-lettering or simply how the process of drawing letters is conducted. Block lettering is a great skill to learn, the rules of letter formation work for both physical and digital mediums. There is a lot you can do to your letters from shading block letters to adding quirky details like dots and lines. These principles can be used to guide your hand lettering process and can be applied and tweaked to create all different shapes of letters. So, use this tutorial as a resource that be can be utilized for other creative writing exploits.
Frequently Asked Questions
How Can I Improve My Block Letters?
The only way to get better at block lettering is to practice drawing letters as well as the process of drawing the outlines around the letters turning them into blocky art style letters. Essentially, it’s all about practice and experimentation. You can also practice using tools to assist you such as rulers and you could practice without tools to assist you. Trying variations of different block lettering can give you an instinctual ability to shape letters. You can also explore various forms of detailing in your block letters, such as shading block letters or adding lines. Most importantly, practice writing out a text and drawing the outlines around the text to get used to the basic block letter process. So, try all sorts of things and have fun experimenting with your block letter drawing.
What Are Different Styles of Block Letters?
There are many styles to explore when making block letter drawings. The first is the basic block lettering style, where you draw lines on the page to indicate the scale and positioning of your lettering. Using your ruler, you can draw sharp and straight lines within your letter as well as straight and accurate lines outlining your letter. Other styles include a bubble or rounded blocky art style, where you round the ends of each letter. Another great block lettering style is when you curve your letters, giving the text a weird, expanding aesthetic. Most importantly, is making your own style, where you explore elongating letters and playing around with how thick you make each letter. Once you understand the basic format of block lettering, you can play around with making your own block letter-styled texts. This way, you can explore your own text formations and turn them into a blocky art style by using the basic principles of block lettering.
What Is the Purpose of Block Letters Drawing?
Learning how to draw block letters is essentially learning how to do hand lettering. Most graphic styled lettering uses the principle of block lettering. When drawing letters and figuring out how to give each letter more body and width, using the block lettering method can assist you with that process. Mostly, block lettering is a skill that gives you foundational knowledge for hand lettering. So, the main purpose of block lettering is learning how to give text body and how to do that using a specific block lettering method of writing and outlining a text. This can be a principle that you apply to digital design, graphics, hand lettering, and artworks that include drawing letters. It’s a great skill to have as an artist and as someone interested in text-based artworks.
Matthew Matthysen is an educated multidisciplinary artist and illustrator. He successfully completed his art degree at the University of Witwatersrand in South Africa, majoring in art history and contemporary drawing. The focus of his thesis was to explore the philosophical implications of the macro and micro-universe on the human experience. Matthew uses diverse media, such as written and hands-on components, to explore various approaches that are on the border between philosophy and science.
Matthew organized various exhibitions before and during his years as a student and is still passionate about doing so today. He currently works as a freelance artist and writer in various fields. He also has a permanent position at a renowned online gallery (ArtGazette) where he produces various works on commission. As a freelance artist, he creates several series and successfully sells them to galleries and collectors. He loves to use his work and skills in various fields of interest.
Matthew has been creating drawing and painting tutorials since the relaunch in 2020. Through his involvement with artincontext.org, he has been able to deepen his knowledge of various painting mediums. For example, watercolor techniques, calligraphy and lately digital drawing, which is becoming more and more popular.
Learn more about Matthew Matthysen and the Art in Context Team.
Cite this Article
Matthew, Matthysen, “How to Draw Block Letters – Easy Hand-Lettering Tutorial.” Art in Context. August 21, 2022. URL: https://artincontext.org/how-to-draw-block-letters/
Matthysen, M. (2022, 21 August). How to Draw Block Letters – Easy Hand-Lettering Tutorial. Art in Context. https://artincontext.org/how-to-draw-block-letters/
Matthysen, Matthew. “How to Draw Block Letters – Easy Hand-Lettering Tutorial.” Art in Context, August 21, 2022. https://artincontext.org/how-to-draw-block-letters/.


