How to Draw a Pumpkin – A Festive Pumpkin Drawing Tutorial
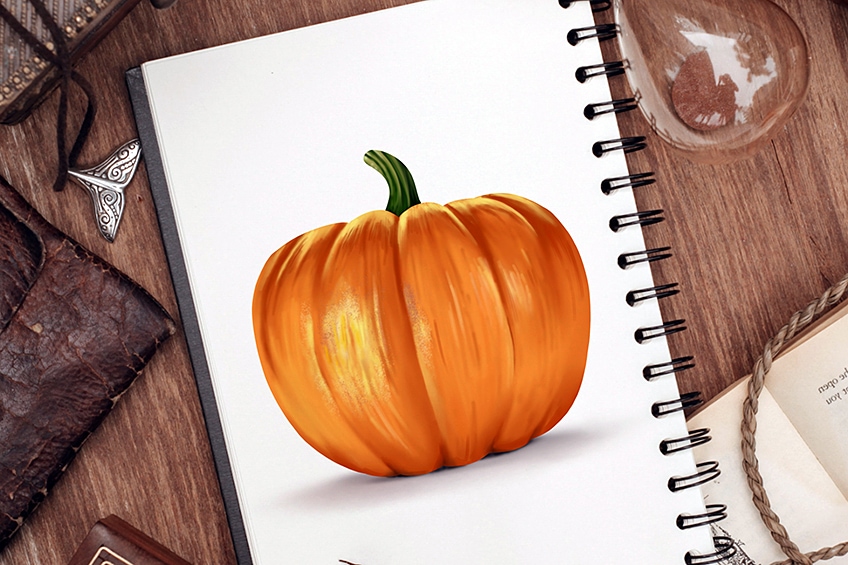
Halloween is just around the corner, which means it is time to get a little spooky. In today’s tutorial, we are going to learn how to draw a pumpkin in 12 easy steps! For that extra spooky sparkle, you can customize your pumpkin sketch with a carved face. If you are feeling festive, gather your drawing supplies, and let us jump right into this pumpkin drawing tutorial.
Table of Contents
- 1 A Step-by-Step Easy Pumpkin Drawing Tutorial
- 1.1 Step 1: Construct the Base Shape
- 1.2 Step 2: Create a More Realistic Pumpkin Shape
- 1.3 Step 3: Draw the Stalk and the Ribs
- 1.4 Step 4: Begin Coloring Your Pumpkin Sketch
- 1.5 Step 5: Add Color to the Stem
- 1.6 Step 6: Start Contouring Your Pumpkin
- 1.7 Step 7: Create Some Texture
- 1.8 Step 8: Add Some Highlights
- 1.9 Step 9: Enhance the Shading Further
- 1.10 Step 10: Add Some Texture to the Stem
- 1.11 Step 11: Create A Ground Shadow
- 1.12 Step 12: Finishing Your Pumpkin Drawing
- 2 Frequently Asked Questions
A Step-by-Step Easy Pumpkin Drawing Tutorial
Pumpkins have quite a symmetrical shape, but they can still be a little tricky to draw from scratch. To help you create a perfect pumpkin sketch, we use a series of simple construction steps to build up the basic shape. We then build on these shapes, adding more realistic curves and details. The final element is using color to add dimensionality and texture to our realistic pumpkin sketch. You can see an outline of the tutorial steps in the image below.
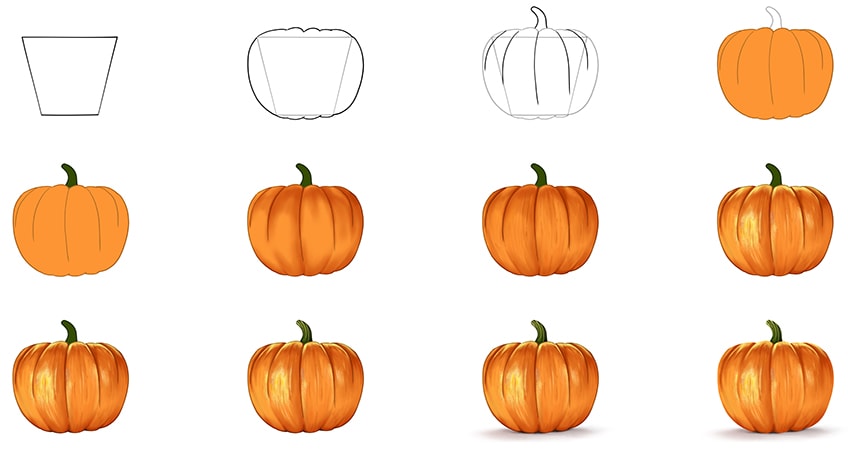
As you can see, color is the most impactful part of our pumpkin sketch. The choice of medium for this pumpkin drawing tutorial is completely up to you. Whether you are a digital artist, or you prefer to use more physical mediums, you can simply adjust the steps to suit your own individual needs. While we give quite detailed instructions, you do not have to follow us exactly.
It is always fun to add your own artistic flair and style to your drawings.
Step 1: Construct the Base Shape
We are going to begin our pumpkin sketch by creating a simple base shape. Begin by finding the central point of your canvas, and draw a large upside-down trapezoid shape. You can think of this base shape as looking a little like a pot for a plant. We are going to use this base to create a more curved and realistic pumpkin shape in the next step.

Step 2: Create a More Realistic Pumpkin Shape
Using the base shape, we are now going to create a more realistic outline of our pumpkin drawing. On either side, create an outwardly curving bulge from the top to bottom corners of the trapezoid. You can then create slight bumps on the top and bottom of the trapezoid. The top of your pumpkin sketch should have a few more bumps than the bottom.
These bumps do not need to be perfectly symmetrical or the same size.

Step 3: Draw the Stalk and the Ribs
We are going to do two things in this step. First, draw a small curving stalk that extends from the center of the top of your pumpkin. Next, from each of the bumps on the top outline, create curving lines down the front of your pumpkin. These lines should not extend all the way down to the bottom, and those on the edge should be slightly shorter. Once you have completed this step, you can erase all visible construction lines.

Step 4: Begin Coloring Your Pumpkin Sketch
We are now going to start coloring our pumpkin drawing. In order to create as much realism as possible, we are going to gradually build up the color in layers. Begin with a regular paintbrush and some bright orange paint, filling your pumpkin outline with an even coat of color.

Step 5: Add Color to the Stem
This is a very short and sweet step. All you need to do is add a base color to the stem of your pumpkin. Use a regular brush and a very dark shade of green paint to fill the entire stem.

Step 6: Start Contouring Your Pumpkin
We are now going to begin enhancing the structure of our pumpkin with some contouring. Begin with a small blending brush and a touch of black paint, adding some light brush strokes along the structure lines. You can then repeat this at the bottom of the pumpkin. You can then use a darker shade of orange to enhance these contours even more and blend the darker shade into the base color.
When using black, remember to start very gently, as it is very difficult to remove black if you use too much.

Step 7: Create Some Texture
We are now going to add a little fine-grain texture to the skin of our pumpkin drawing. Use a fine detailing brush and a combination of dark grey and black paint for this process. Following the curving shapes created by the rib lines, create fine texture lines. Continue the process, gradually building up a realistic texture across the entire pumpkin.

Step 8: Add Some Highlights
When it comes to creating realistic dimensions in any drawing, contouring and highlighting go hand in hand. Now that we have created some shadows, we are going to complement them with some highlights. Begin with a small blending brush and some white paint, adding subtle touches of highlight along the texture lines from the last step. You can also add highlights to the very top of your pumpkin, blending the color down gently. On the left side of your pumpkin, you can create a larger highlight spot, as if a light is hitting that small spot.
You can add additional texture using a rough stipple brush.

Step 9: Enhance the Shading Further
With a small blending brush and a darker shade of orange, add some additional streaks of shading between the highlighted brush strokes. Add more shading to the bottom of the pumpkin and gently blend it upwards.

Step 10: Add Some Texture to the Stem
Now that we have created some realistic texture in our pumpkin, we are going to begin creating texture in the stem. Begin with a small blending brush and some light yellow paint, adding some curving stripes within the stem. Between these stripes, you should still be able to see the base color coat. Next, with some light green paint, softly blend these colors together.

Step 11: Create A Ground Shadow
Just before we finish our pumpkin drawing, we are going to create a ground shadow below the base of the vegetable. Use a blending brush and some black paint, and apply a soft shadow right below the pumpkin. You can then use a clean blending brush to create a soft and subtle blend outwards in all directions.

Step 12: Finishing Your Pumpkin Drawing
To finish our pumpkin sketch and create a seamless result, we are simply going to remove the black outline. If you are drawing digitally, you can simply delete the outline layer. For physical mediums, use a fine detail brush and the corresponding color at each point of the outline to carefully trace over it. You will now be left with a beautiful realistic pumpkin drawing!

Just like that, you are now ready for Halloween with your very own realistic pumpkin drawing. You now know how to draw a pumpkin from scratch, from constructing the basic shape to adding texture and dimension with color! We hope that you have enjoyed this pumpkin sketch tutorial, and you feel that you have gained some knowledge and experience.
Frequently Asked Questions
How to Create A Halloween Pumpkin Drawing?
If you are a Halloween lover, then this pumpkin drawing tutorial is perfect for you! We show you how to draw a realistic pumpkin sketch, that you can adjust to turn into a carved lantern. To turn your pumpkin into a lantern, you simply need to create the face and use darker colors to add three dimensions.
What Colors Do You Need for A Pumpkin Sketch?
When it comes to the colors needed for a pumpkin sketch, you need quite a basic palette. You will need a few shades of orange, one that is lighter and one that is quite a lot darker. You will also need some warm yellow, dark and light greens, and the basic white and black shades.
Matthew Matthysen is an educated multidisciplinary artist and illustrator. He successfully completed his art degree at the University of Witwatersrand in South Africa, majoring in art history and contemporary drawing. The focus of his thesis was to explore the philosophical implications of the macro and micro-universe on the human experience. Matthew uses diverse media, such as written and hands-on components, to explore various approaches that are on the border between philosophy and science.
Matthew organized various exhibitions before and during his years as a student and is still passionate about doing so today. He currently works as a freelance artist and writer in various fields. He also has a permanent position at a renowned online gallery (ArtGazette) where he produces various works on commission. As a freelance artist, he creates several series and successfully sells them to galleries and collectors. He loves to use his work and skills in various fields of interest.
Matthew has been creating drawing and painting tutorials since the relaunch in 2020. Through his involvement with artincontext.org, he has been able to deepen his knowledge of various painting mediums. For example, watercolor techniques, calligraphy and lately digital drawing, which is becoming more and more popular.
Learn more about Matthew Matthysen and the Art in Context Team.
Cite this Article
Matthew, Matthysen, “How to Draw a Pumpkin – A Festive Pumpkin Drawing Tutorial.” Art in Context. October 15, 2022. URL: https://artincontext.org/how-to-draw-a-pumpkin/
Matthysen, M. (2022, 15 October). How to Draw a Pumpkin – A Festive Pumpkin Drawing Tutorial. Art in Context. https://artincontext.org/how-to-draw-a-pumpkin/
Matthysen, Matthew. “How to Draw a Pumpkin – A Festive Pumpkin Drawing Tutorial.” Art in Context, October 15, 2022. https://artincontext.org/how-to-draw-a-pumpkin/.


