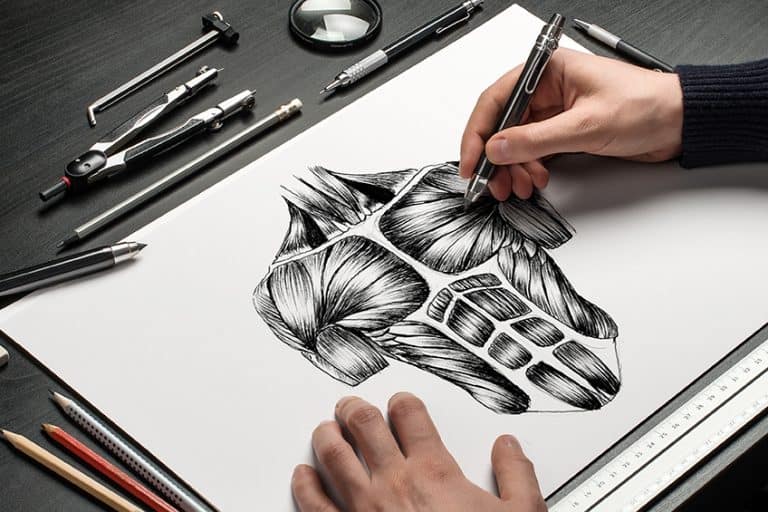
How to Draw a Rib Cage – An Easy Rib Cage Drawing
Learning how to draw a ribcage is a great task for advancing your drawing skills, specifically because a ribcage requires symmetry. Symmetry is always a challenge, and should always be approached with the utmost patience. The ribcage is an interesting structure, as it wraps around vital organs, its shape creates a hollow-like capsule. In this ribs drawing, we will go through each of the main bone structures that make up the rib, slowly drawing each and adding details along the way. The ribs’ skeleton structure can also be an interesting feature to add in various surreal artworks or other anatomical drawings. Doing anatomical drawings or a ribcage drawing provides the artist with a good observational skill-building opportunity.
Table of Contents
An Easy Guide to Drawing a Ribcage
A ribcage is a complex anatomical structure, as the bone structures curve, they move behind a set of bones that lie within the foreground. This means that the process of drawing should be approached by going through each row of bones one by one. Doing so will make the ribs drawing process much simpler, as we then can focus on a singular row of bones at a time. This tutorial on how to draw a ribcage will break down these processes into a few simple steps that will be easy to follow. However, learning how to draw a ribcage does require a lot of patience as we attempt to capture their shape as best we can, so we will want to take breaks in between and approach the process of doing ribs drawing with patience and focus.
Step-by-Step Instructions on How to Draw a Ribcage
In This tutorial we will break down the drawing process into a few simple steps, ultimately making it easier for us to make realistic ribs drawing. The ribs skeleton structure is quite symmetrical, this means we will begin by drawing a vertical line down the middle of our page to give us a line to guide the drawing process. Once we have done that, we will proceed with lightly sketching each row of bones, using the vertical line as a reference for keeping our row of bones in line. Once we have completed the full ribcage in pencil, we will then proceed to add some light pencil shading. Since we will be drawing in pen, which will take the longest time throughout the tutorial, we want to make sure our pencil shading is as best as it can be. Once we are satisfied with our ribs drawing completed in pencil, we will then proceed to lightly draw over those marks with our pens. We will do this until we are finished.
Now that we know what we are to expect, let us get into this tutorial on how to draw a ribcage.
Step 1: Drawing a Vertical Line for Symmetry
The most challenging part of drawing a ribcage is achieving an asymmetrical structure. One way of capturing this quality is by creating a grid, however, in this tutorial, we will learn a more advanced way of drawing that will make us rely more on our observational skills. Let us begin by drawing a vertical line down the center of our page.
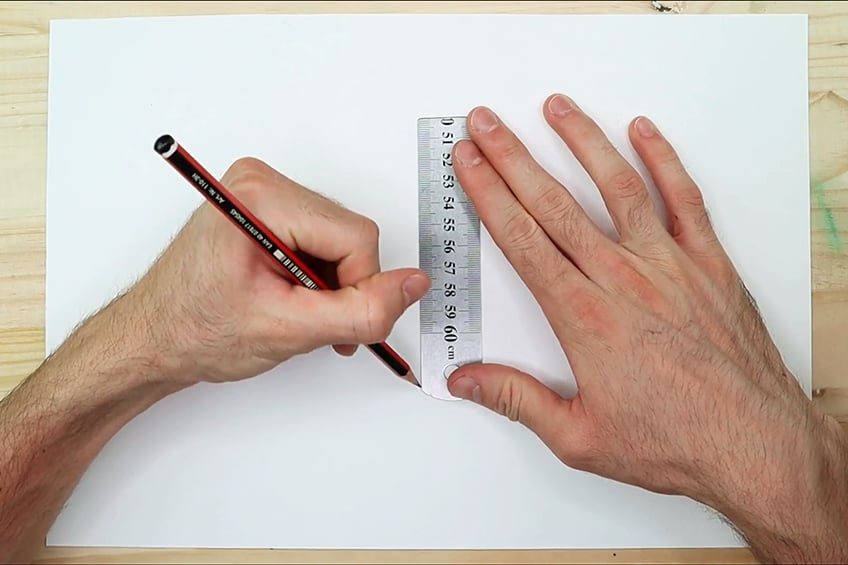
Step 2: Lightly Sketching the Ribcage
Once we have our vertical line drawn on the page, we will now proceed to make a light drawing of the ribcage. The aim here is to begin at the top, going through each row of ribs at a time. A good idea is to get an image from the internet that has labels, that way you can follow the steps whilst knowing the name of each component.
We want to begin by lightly drawing the first thoracic vertebra, keeping it in line with the vertical line.

From there we will proceed to draw the jugular notch and the clavicular notch, which will be attached to the first row of ribs. Consider how the source image depicts the first row of ribs to curve, from the front jugular notch toward the back where the thoracic vertebra. Again, we want to focus on each row one at a time.
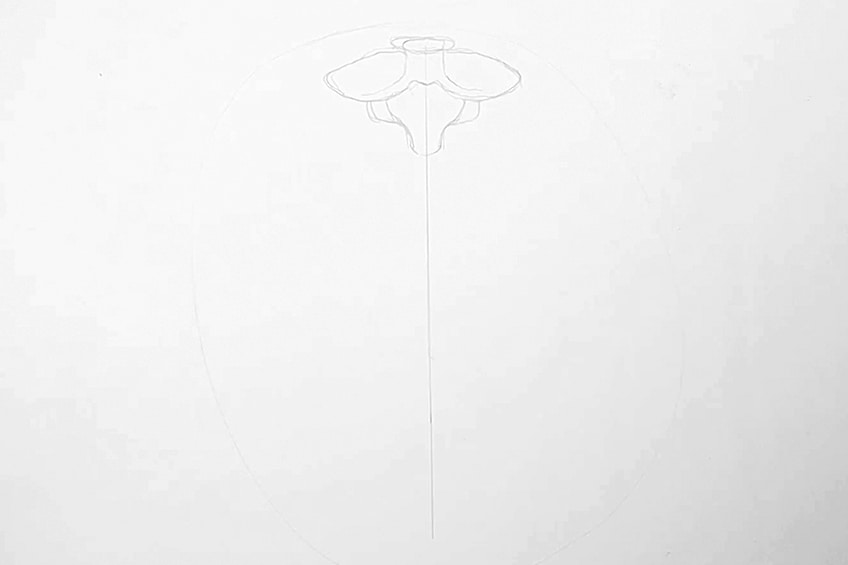
The aim is to use the vertical line as a spacing tool, as well as a way of starting each row. By constantly using the vertical line for guidance, we want to draw each row of ribs as carefully as possible as we refer to our source image for reference.
Take your time, use your erasers, and try to get each row’s shape as correct as possible.
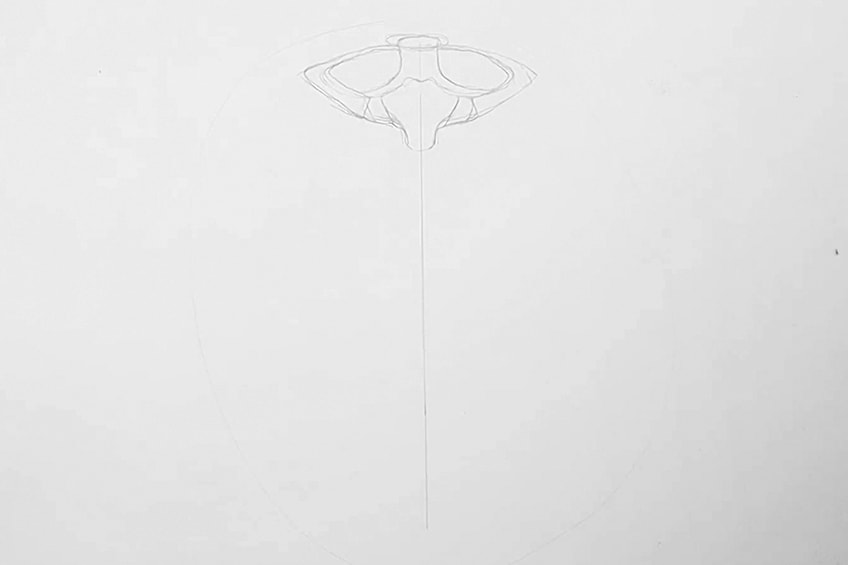
As we move to the second row of ribs, we want to try and mirror the shape of each row of ribs, on either side of the vertical line. Allow yourself to analyze the source image as you draw the ribs both in the foreground as well as the ribs in the background as they curve around to the back, connecting to the spine.
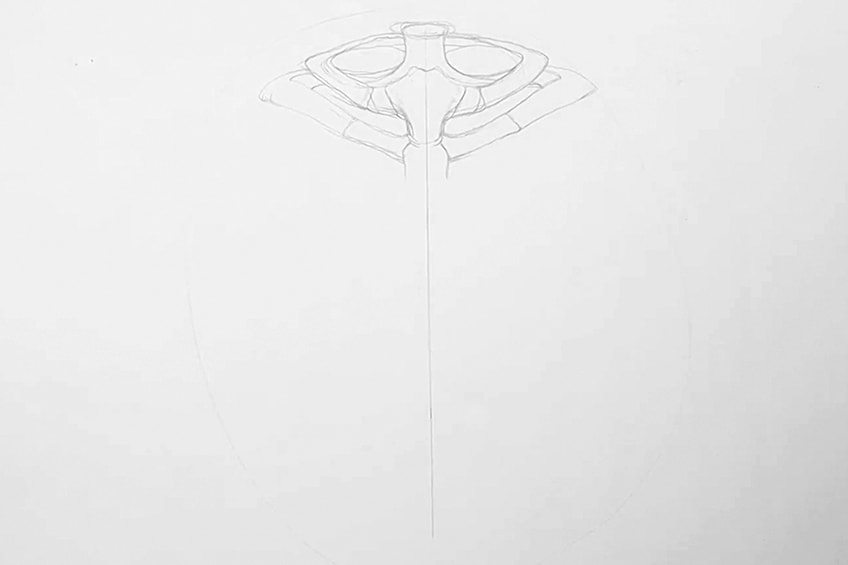
Another thing to consider is how thick the different rows of ribs are. Each row of ribs is different in thickness as the source image depicts them. This is something to consider as you proceed to outline and draw the shape of each row of ribs. We will make mistakes at first so keep your eraser in use during this step.
Another little trick you can do is as you draw each row of ribs you can place your pencil horizontally on the page on each row of ribs.
By doing so we are seeing if they are positioned correctly horizontally on the page. This is just a quicker method of seeing if they are placed correctly next to one another, rather than drawing a series of horizontal lines.
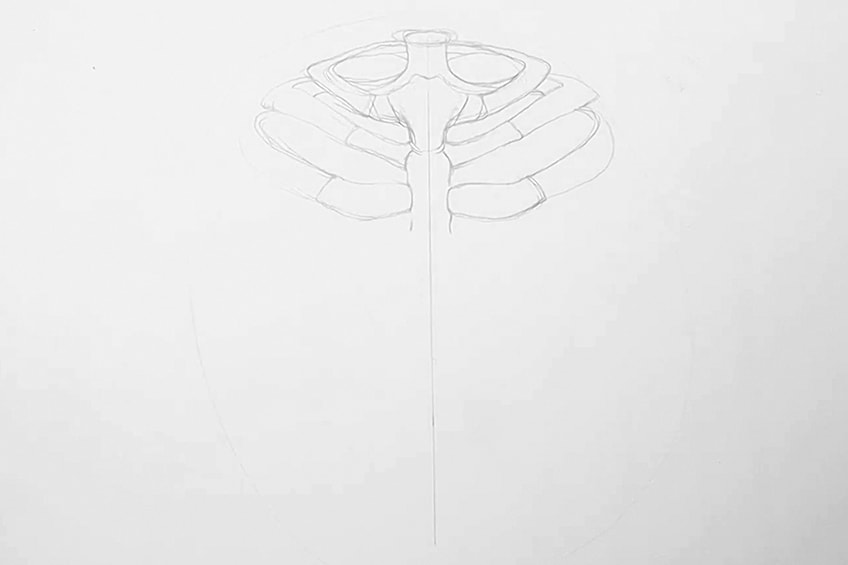
As you proceed to draw each row of ribs, keep practicing this pencil trick. This helps us to figure out the shape of the ribs and how accurately they mirror each other on each side of the vertical line, row by row. Again, take your time with each set of ribs, especially as you draw then curve around to the back, connecting to the spine.
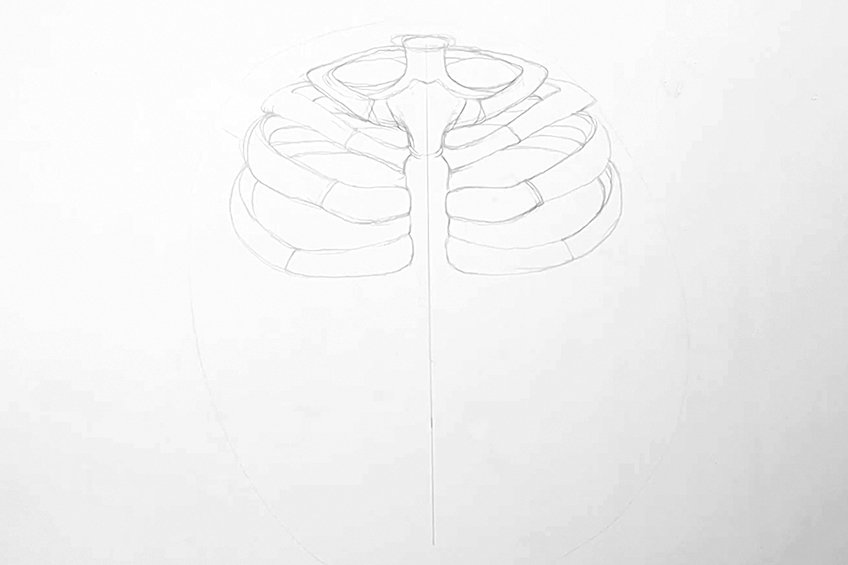
As we come to the lower row of ribs, we want to make sure we analyze the source image to give us the best possible chance of drawing the ribcage as accurately as possible. Another aspect to pay attention to, which helps configure the shapes of the ribs much easier, is the segments in each row of ribs. As you draw each row of ribs, we can see that they are divided into two sections.
The inner section of each rib is called the costal cartilage and is connected to the bone that runs vertically down the center, called the sternum. As you draw these sections connected to the sternum, we also want to see how much spacing is in between each row of ribs.
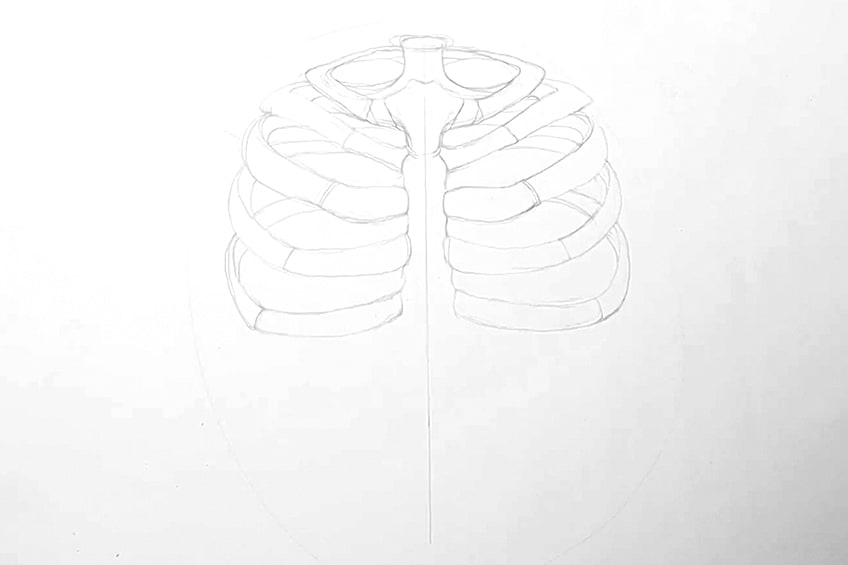
As we come to the lower ribs, we can see that the connection between the last three rows of ribs is slightly more complicated. They almost resemble antlers in the way the ribs are connected on each side. As we draw these lower rows of ribs make sure you constantly refer to the source image for guidance.
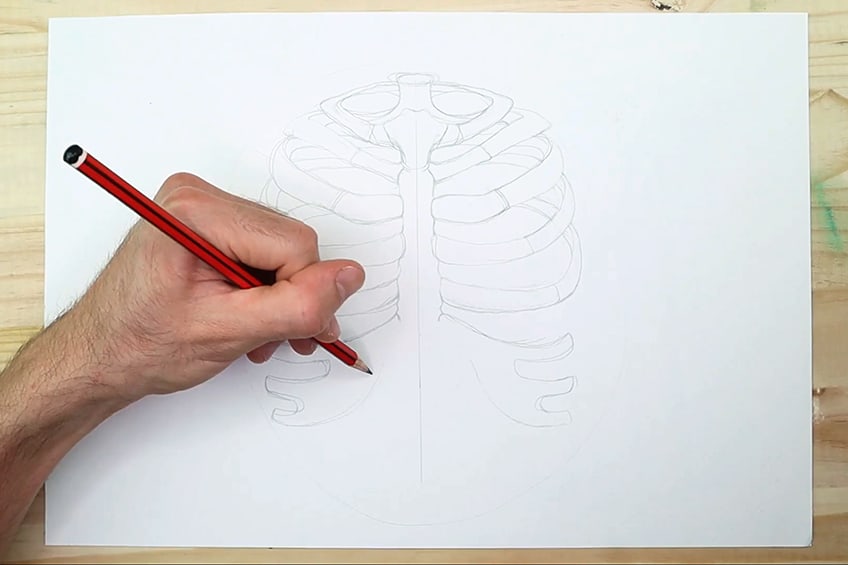
The sixth, seventh and eighth rows of ribs connect on each side of the ribcage. We want to take our time constantly referring to the source image as we proceed to draw this set of ribs on each side of the ribcage.
Remember, to take breaks when you feel that you might be getting tired.
This is conducive to a better result, as we will feel more refreshed when attempting to draw. Between the 6th and 7th ribs, there is a partition. Take your time on this feature as its shape is quite specific. The cavity has a gentle curve that separates the sixth and seventh rib on either side of the ribcage. Remember the pencil technique, place the pencil horizontally on the page connecting the same ribs on each side of the page to get a sense of how accurately they are placed.
With the lower rib, we also want to pay close attention to how they curve around the back of the ribcage. Again, these moments can be seen through the ribcage, thus making them visible in between some of the higher ribs. This is because they curve upward.
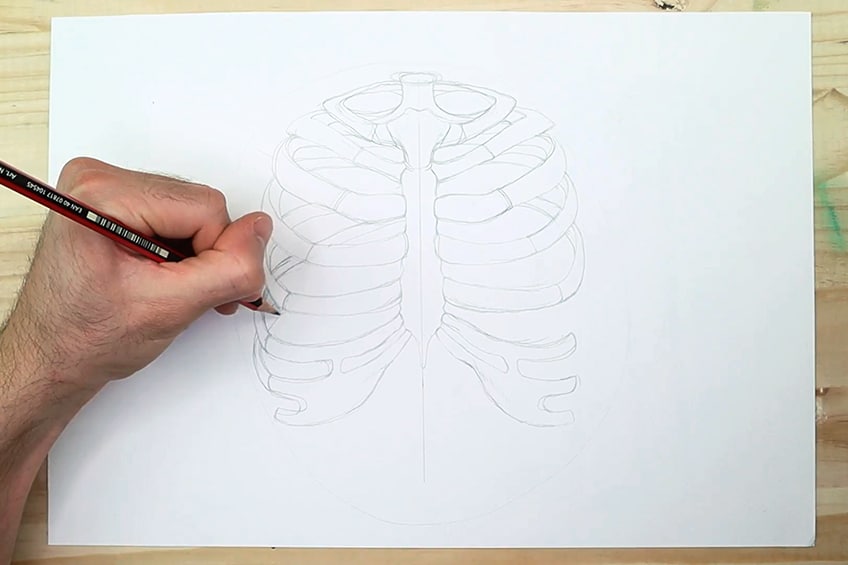
Getting this part of the drawing correct, will make the rest of the drawing process of the tutorial much easier. So allow yourself to take your time, constantly analyzing the source image for reference. You should draw and erase until you are satisfied with the ribcage resembling the source image as accurately as possible.
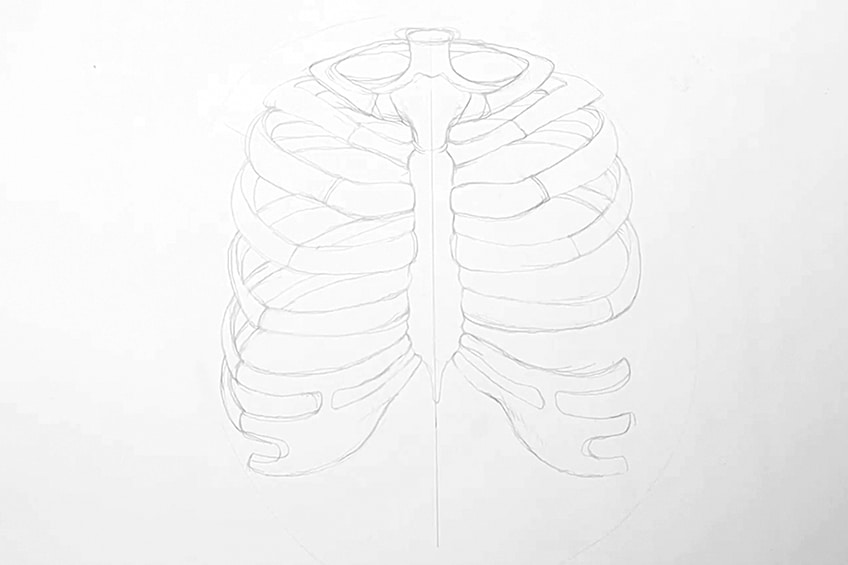
You will find that as you use your pencil to measure up the symmetrical nature between the left and right sides of the ribs, you will slowly develop a more refined observational skill. This is especially helpful for these moments of drawing the ribs curving toward the back of the rib cage.
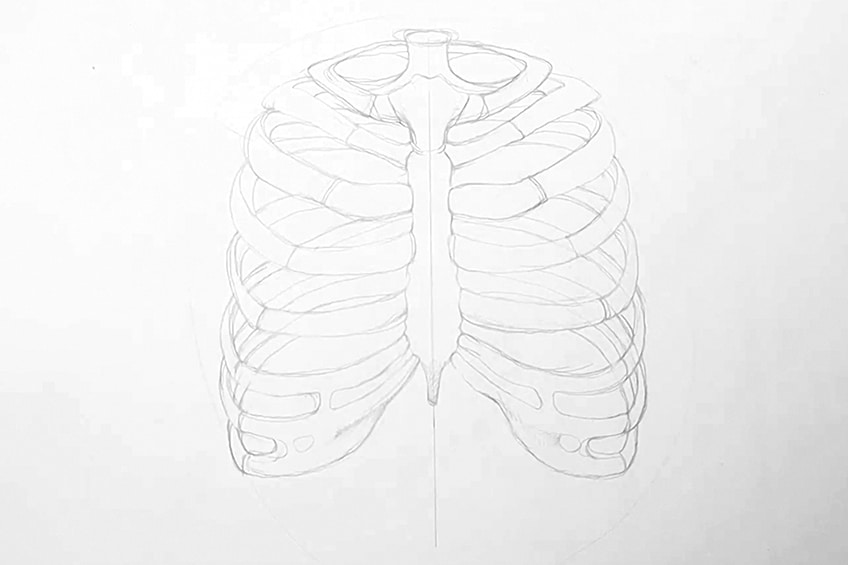
As we start to finalize the light pencil drawing of the ribcage, we want to make sure we capture the bottom section correctly. The 9th and 10th ribs also connect to the 6th, 7th, and 8th ribs uniquely. Analyze the source image and focus on the shape of the last two ribs.
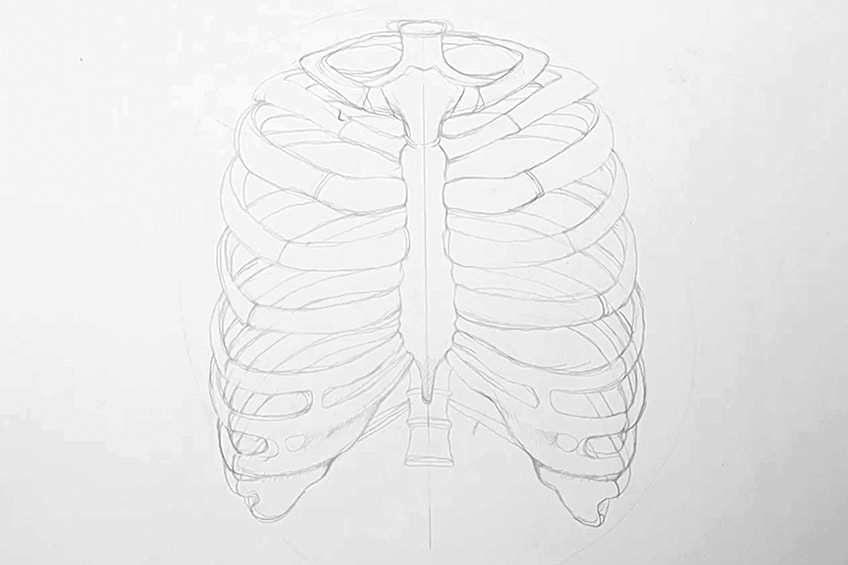
Lastly, we want to capture the bottom section of the vertebrae as they are present at the bottom of the ribcage. They also have bones that are connected to them that move outward from the thoracic vertebrae. These are the twelfth ribs, and they stick out from the lower vertebrae. Make sure you capture these features as best you can.
Step 3: Light Shading of the Ribcage
Once we have completed the linework and light drawing of the ribcage and its various bones, once we are satisfied with it seeing right, we have then moved on from the most difficult part of the tutorial. We now want to proceed with light shading of the ribcage.
We begin by lightly coloring in the ribs situated at the back of the ribcage.
By Coloring in the back ribs, we are giving the ribcage tonal variation that makes the front row of ribs stand out in the foreground. This also makes the back row of ribs lie behind them in the background. The aim here is to keep the shading very light, we can use a B pencil for this part of the tutorial.
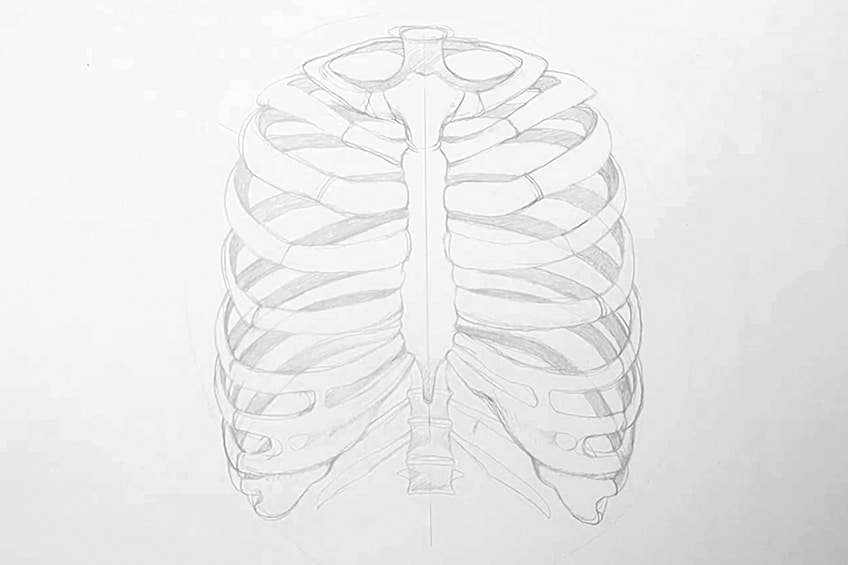
As we add some light shading with our pencils, let us notice how the costal cartilage is defined by shadow and light within the source image. Allow yourself to analyze each rib, row by row, as you add shading. Similar to how we drew each rib row by row, we want to add shading to each rib.
We want to keep our shading light during this process. By doing so we will make it much easier for ourselves when we start adding pen shading to the drawing.
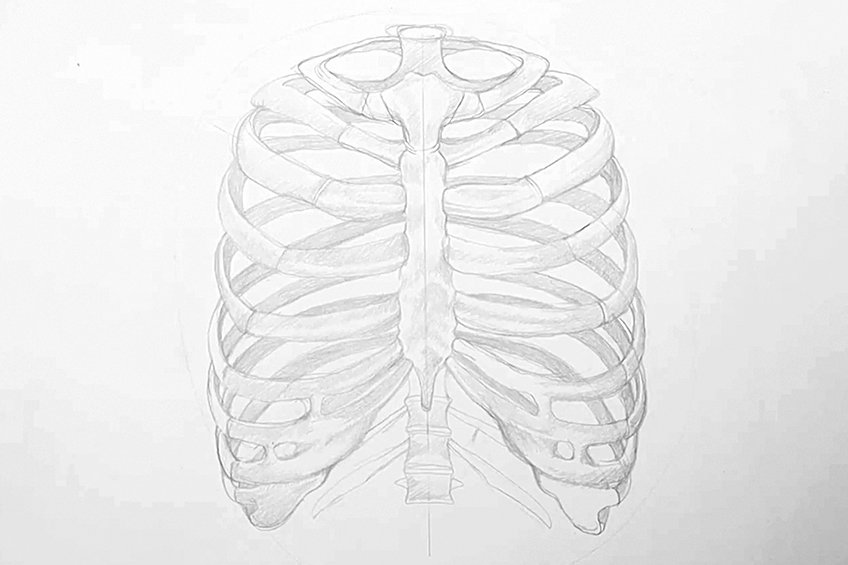
Allow yourself to rectify any mistakes as you go along, again, we want to get the pencil part of the tutorial down as best we can before moving on to drawing with a pen. As we add shading to the ribcage, the bottom area gets a little trickier. Near the seventh and eighth ribs, there is a little cavity. This cavity has shading around it that allows it to seem more three-dimensional and sunken in.
Focus on this area as you shade the ribcage. Continue with the shading process until you are satisfied.
Step 4: Shading with Pen
We have come to the last step of the tutorial. By no, we should have a realistic, lightly pencil-drawn ribcage. From here on, we are simply proceeding to add pen marks over our pencil marks, again slowly working our way from the top of the ribcage to the bottom of the ribcage.
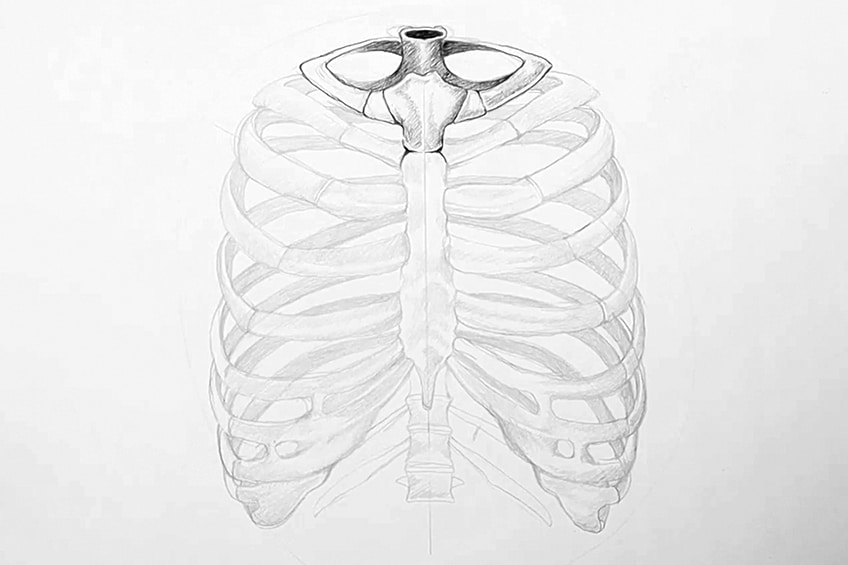
As we move from the top of the ribcage, slowly working our way down to the bottom of the ribcage, we want to make sure we attend to each row one by one. The costal cartilage areas of each rib are different in tonal value to that of the rest of the bone. Again, we want to make sure we darken each rib as they move toward the back of the ribcage.
Keeping the ribs that are visible at the back of the ribcage darker, gives the quality of shadow within the ribcage. Allowing for more dimension between the ribs in the foreground and the background.
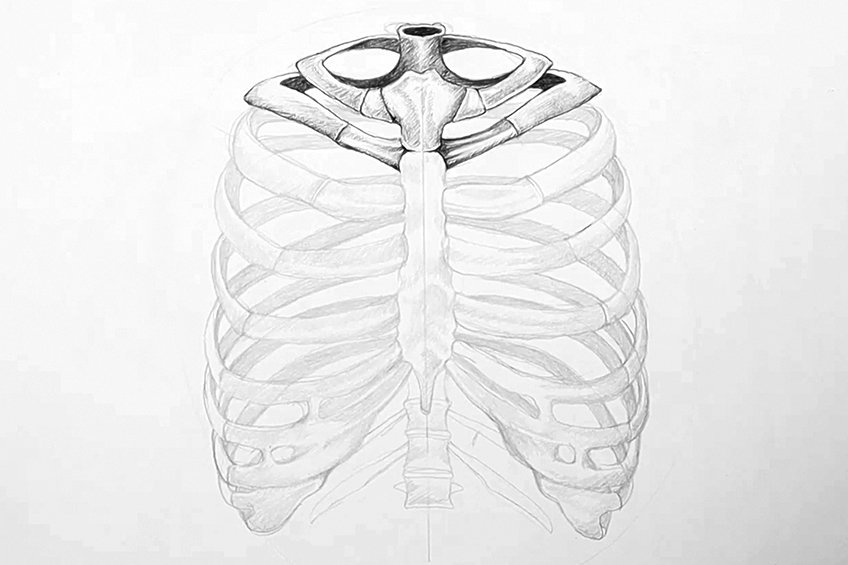
Again, we want to make sure we focus on one row at a time. We should allow ourselves to lightly shade over the pencil marks that we made in the previous step. We also want to pay attention to the pressure that we apply to the pen, as the harder we push the darker the marks. Make sure you are aware of this as you go.
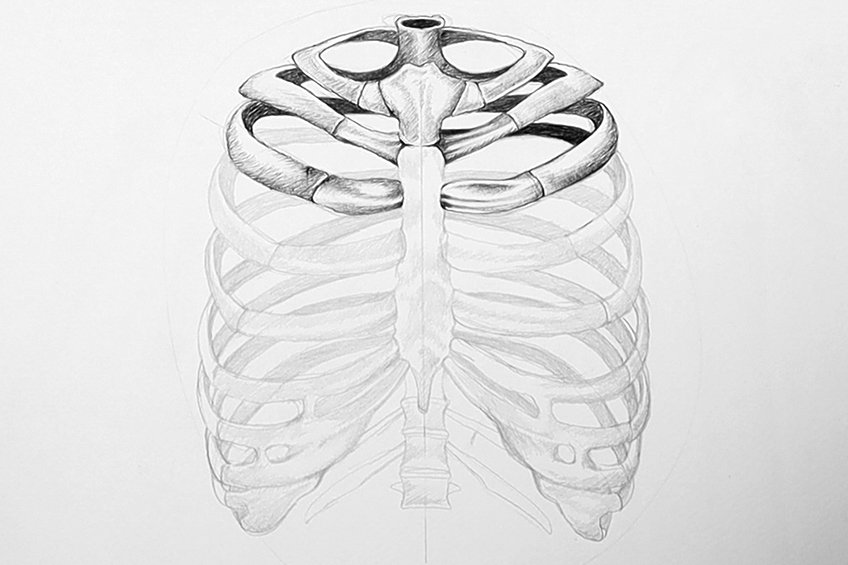
A particular feature to make sure we focus on is the way the bones curve. Notice the areas of curvature, as there is a moment where the bone moves from light to darker tones. We also want to allow light areas of bone to curve on top of the darker areas near the sides where the ribs begin to curve inward, toward the back of the ribcage.
As we shade in each rib, the distinction between bone and costal cartilage should be distinct. We can see that the source image defines these features of each row of ribs quite specifically. We still want to use the source image as we work the pen marks into the drawing for a more accurate result.
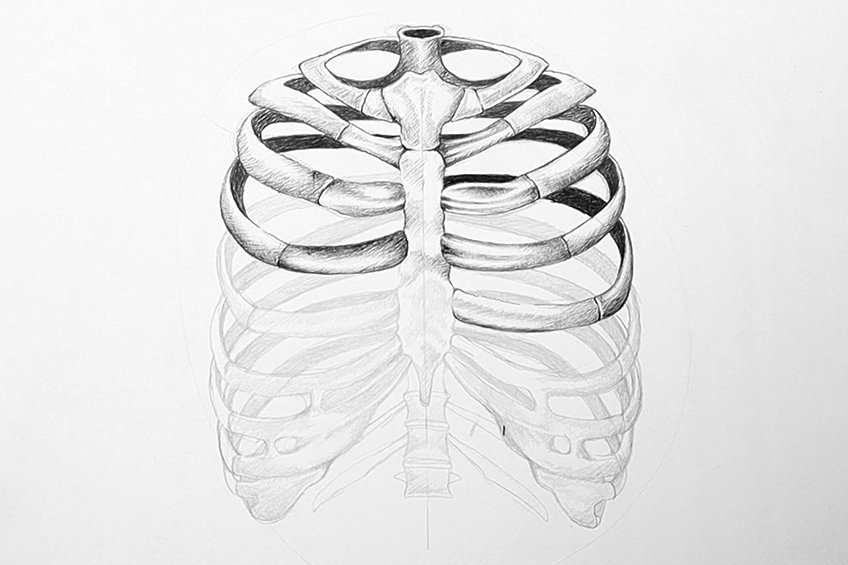
The shadow formation of each row of the rib is also slightly different, this is also something to notice within the source image as you shade. Again, we want to make sure we pay attention to the pressure that we apply to our pen as we go.
It is better to add lighter layers onto one another rather than pressing hard and making darker marks.
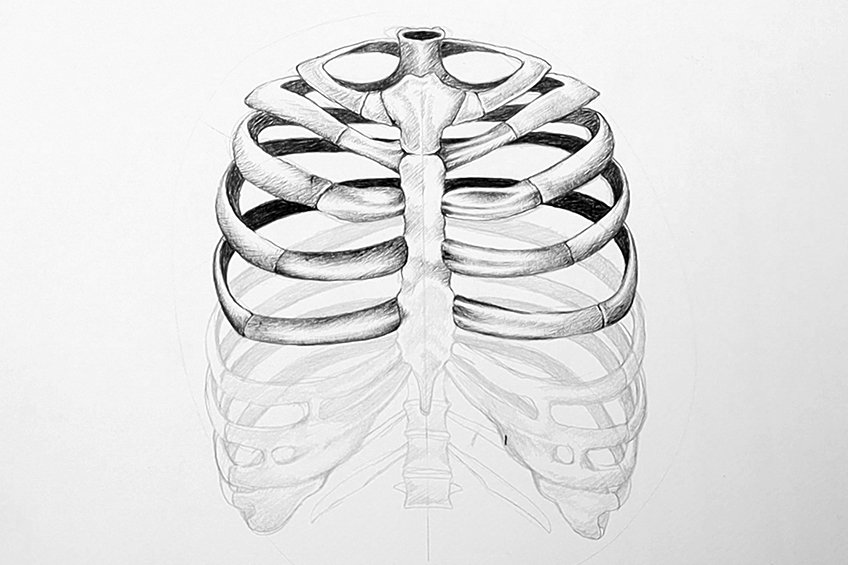
As we get to the lower row of ribs, between the sixth and the 10th row of ribs, we want to pay close attention to how the source image describes the shadow formation here. Especially around the two cavities on each side of the ribs, between the eighth and the 7th rib.
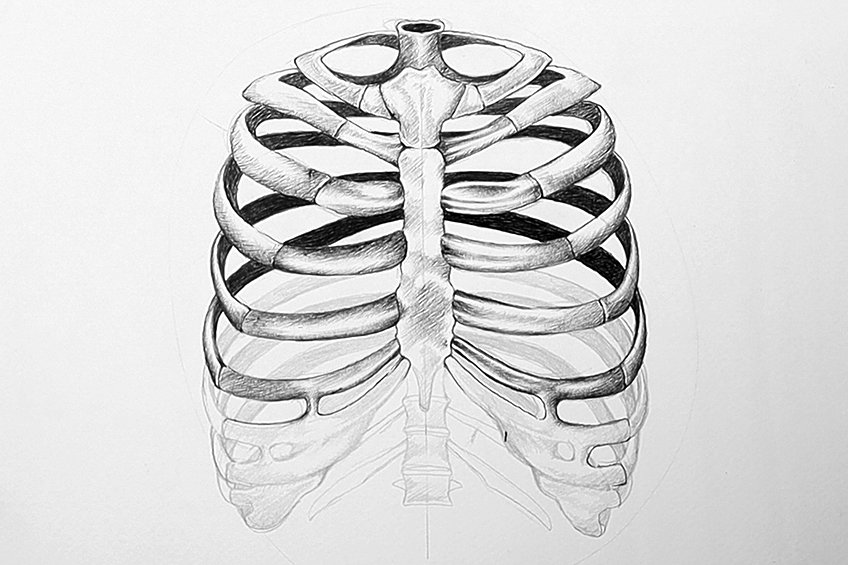
Spend your time here, slowly adding in your pen shading over your pencil marks as you refer to the source image. Also notice how the ribs curve to the back of the ribcage, remember we can make the back ribs darker by coloring them in with our pens completely. Once you feel that you have, to your satisfaction, completed one lower cluster of ribs on one side of the ribs, then move to the next.
It’s good to work in sections. Doing this allows you to focus on something more intensively, thus resulting in the best imitation of the source image.
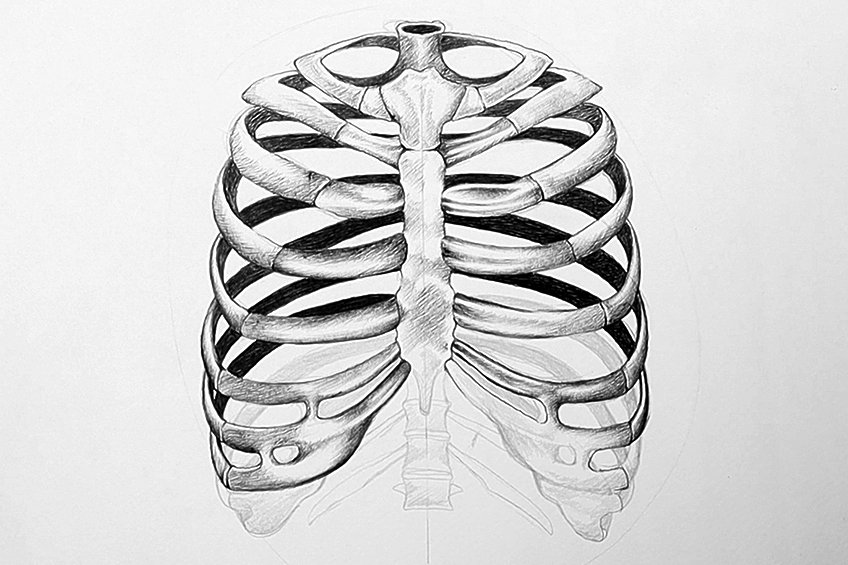
The lower ribs are the most intricate part of the ribcage. So, allow yourself to take it slowly, perhaps take a break as well, if need be. Ribcage drawing can be tiring, so it is good to take a break in between moments of drawing.
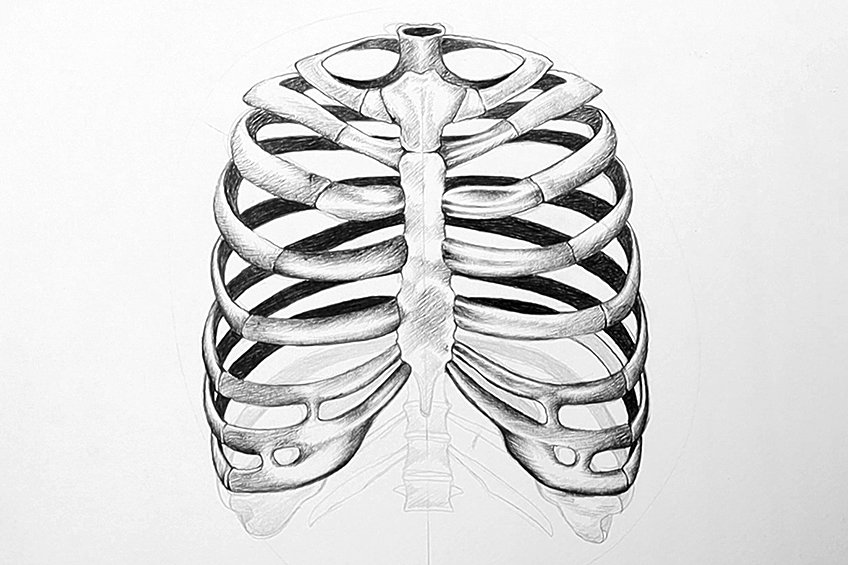
As we define the ribs skeleton with various tonal values, we want to make sure we capture the ribs that move to the back of the ribcage as best we can. We also want to make sure we make them darker than the ribs that sit in the foreground, for good depth in the ribs drawing. The ninth and tenth ribs are slightly darker, as depicted in the source image. We want to make sure we notice all the little details within each row of ribs as we draw.
The curvature of these lower ribs as they move to the back of the ribcage can be seen very minimally through the bottom costal cartilage areas. Spend some time in this area.
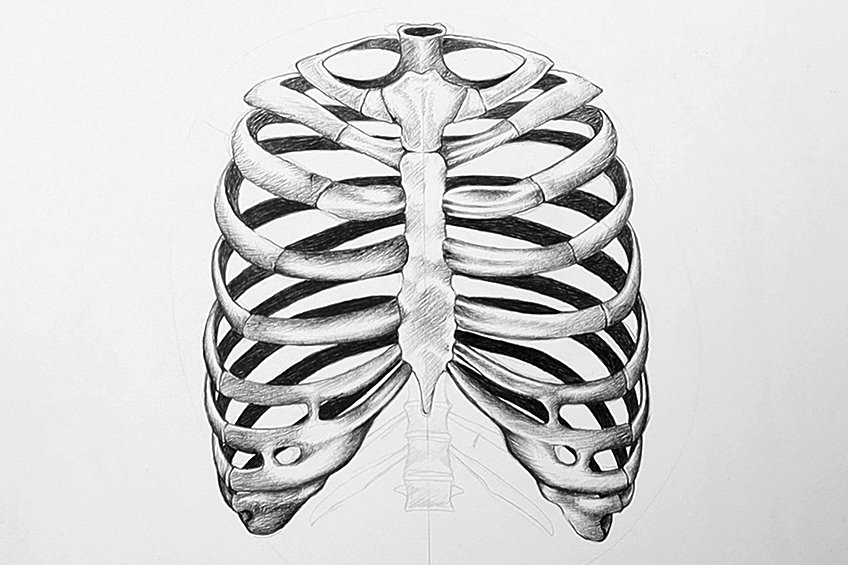
We also want to make sure we attend to the sternum, as there are light moments of shadow that give it depth. Try mimicking this quality, as you refer to the source image whilst lightly shading with your pen. We can also begin to add some shading to the bottom thoracic vertebrae as depicted within the source image. We should be finalizing our ribs drawing by now, adding the last moments of shading near the bottom of the spine.
The spine is divided by these lighter strips of cartilage, try to notice this as you shade in this component of the spine.
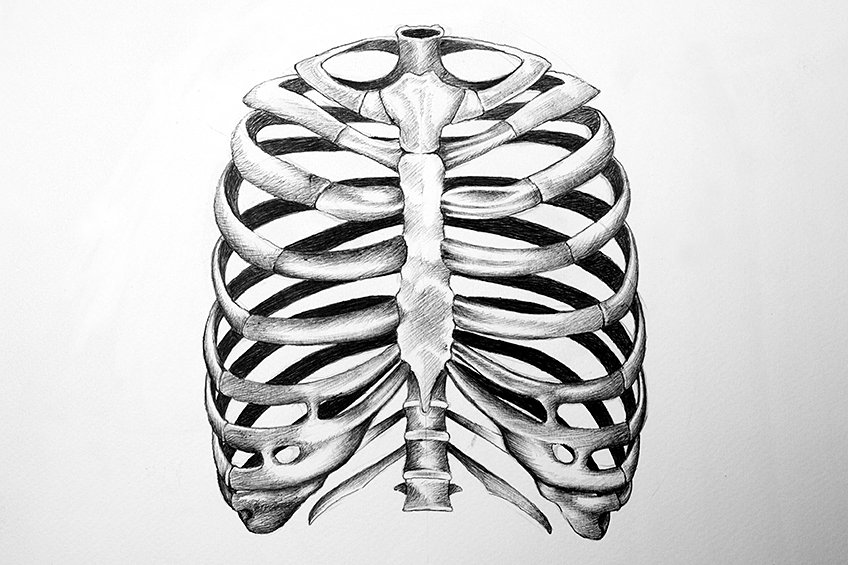
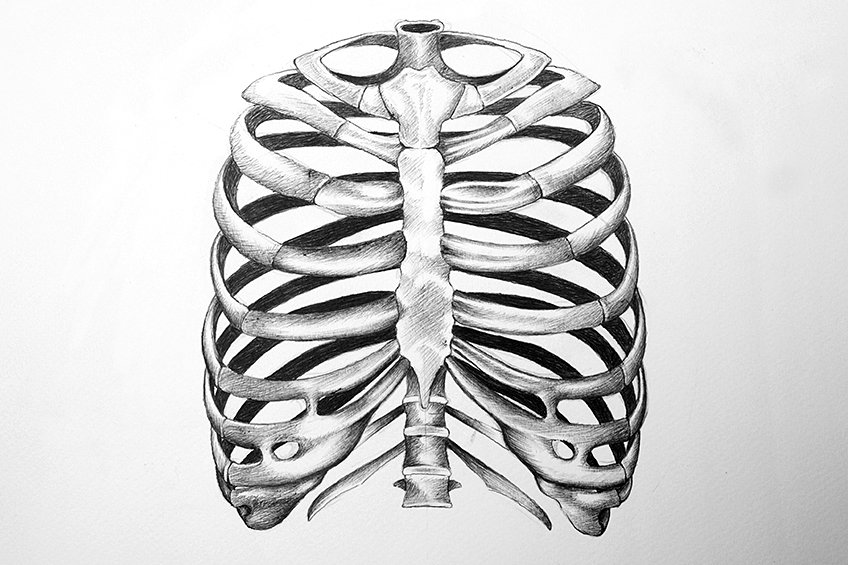
Lastly, we should add some shading to the back rib bones that protrude from the bottom of the spine. After that, we can see if there are any areas of shading we might have missed. That is it! the last bit of shading. A comprehensive four-step guide on drawing a ribcage.
Tips to Remember
- Be Patient. Drawing a ribcage is difficult, this means we want to be patient through the process.
- Use your Eraser. We want to use our erasers during the pencil drawing parts of the tutorial. Trying our best to draw the ribcage as best we can in pencil, before moving on using a pen
- Constantly refer to the source image. When drawing something realistic, we want to make sure we are using the source image for guidance.
- Take your time. This can become exhausting in moments, learning to take breaks rather than giving up.
- Most importantly, have fun. Enjoy the process, see it as a way of developing both your observational skills and drawing skills. Take something away from the learning experience.
Drawing is a practice that gets more refined with time. So don’t worry if your drawing didn’t come out perfectly, it is all a part of the process. Learning a new skill, especially one that involves drawing complex structures like ribcages, can be tricky. Ribcage drawing is a unique task that helps to develop not only your drawing skill but your observational skills as well. The rib’s skeleton structure is complicated and requires a great deal of attention. So, allow yourself to see this tutorial on how to draw a ribcage as a resource to come back to again and again until you feel that you are confident enough in your skills.
Frequently Asked Questions
How Do You Draw a Symmetrical Ribcage?
Learning how to draw a ribcage comes with its challenges, the most difficult one is making the ribcage drawing symmetrical. There are many ways to do this, one can create a grid on both their source image and drawing page. However, the simplest way to achieve symmetry within a ribcage is by drawing a vertical line down the middle of your page. You then proceed to draw each row of ribs one at a time, using the vertical line as a reference point for accuracy. By doing this we also learn to not rely too much on drawing with a grid but still allow ourselves to still use a tool, like a simple vertical line, to keep our ribcage drawing as symmetrical as possible. This will also help with the horizontal aspects of the rows, as the vertical line will give you a good indication of spacing as you go through each row of ribs. This will help to develop your instinctive and observational ability to determine space as you carry out your rib cage drawing while referring to a source image.
How Do You Draw a Realistic Rib Cage?
Using a reference image is very important, this is because drawing something as realistic as a ribcage can be done without a reference image. We then begin by establishing the shape and form of the ribs by drawing them lightly with a pencil. We can do this by configuring the symmetrical nature of the ribcage with linework. We then proceed to add light shading to our rib cage drawing with our pencils. From there, once we are satisfied with the pencil drawing, and we feel that it is somewhat realistic within its lightest sketched-out version, we then can start adding more details. We do this by either using some darker pencils or in the case of this tutorial, we can do this by adding a pen to the drawing. Using a pen in an anatomical drawing can be great for enhancing the contrast within the subject matter. As you slowly add more detailing and shading, layer by layer, we will see that the drawing starts to become more realistic.
How Do You Shade in a Rib Cage?
In this tutorial we work with both pencil and pen, to create a more refined, contrasted drawing of a rib cage. We want to have a good reference image to guide us throughout the shading process of the ribcage. What we want to pay attention to the most is how we define the background and the foreground of the ribcage. We can do this by playing around with different tonal variations that will bring the front row of ribs that stand in the foreground and the back row of ribs that sit in the background. A good suggestion is to darken the ribs that sit in the background, as this will make them seem more shaded as they are covered and less exposed to a light source. Whereas, the front row of ribs can have a lighter tonal value as they sit in the foreground, as they are more exposed to the light source. Another good suggestion, is lightly layer marks over each other, by doing so you add contrast in a more controlled fashion. You do this by constantly referring to a source image, that should guide your shading process, helping you draw marks more accurately.
Matthew Matthysen is an educated multidisciplinary artist and illustrator. He successfully completed his art degree at the University of Witwatersrand in South Africa, majoring in art history and contemporary drawing. The focus of his thesis was to explore the philosophical implications of the macro and micro-universe on the human experience. Matthew uses diverse media, such as written and hands-on components, to explore various approaches that are on the border between philosophy and science.
Matthew organized various exhibitions before and during his years as a student and is still passionate about doing so today. He currently works as a freelance artist and writer in various fields. He also has a permanent position at a renowned online gallery (ArtGazette) where he produces various works on commission. As a freelance artist, he creates several series and successfully sells them to galleries and collectors. He loves to use his work and skills in various fields of interest.
Matthew has been creating drawing and painting tutorials since the relaunch in 2020. Through his involvement with artincontext.org, he has been able to deepen his knowledge of various painting mediums. For example, watercolor techniques, calligraphy and lately digital drawing, which is becoming more and more popular.
Learn more about Matthew Matthysen and the Art in Context Team.
Cite this Article
Matthew, Matthysen, “How to Draw a Rib Cage – An Easy Rib Cage Drawing.” Art in Context. May 8, 2023. URL: https://artincontext.org/how-to-draw-a-rib-cage/
Matthysen, M. (2023, 8 May). How to Draw a Rib Cage – An Easy Rib Cage Drawing. Art in Context. https://artincontext.org/how-to-draw-a-rib-cage/
Matthysen, Matthew. “How to Draw a Rib Cage – An Easy Rib Cage Drawing.” Art in Context, May 8, 2023. https://artincontext.org/how-to-draw-a-rib-cage/.


