How to Draw Waves – A Realistic Ocean Wave Sketch in Pencil
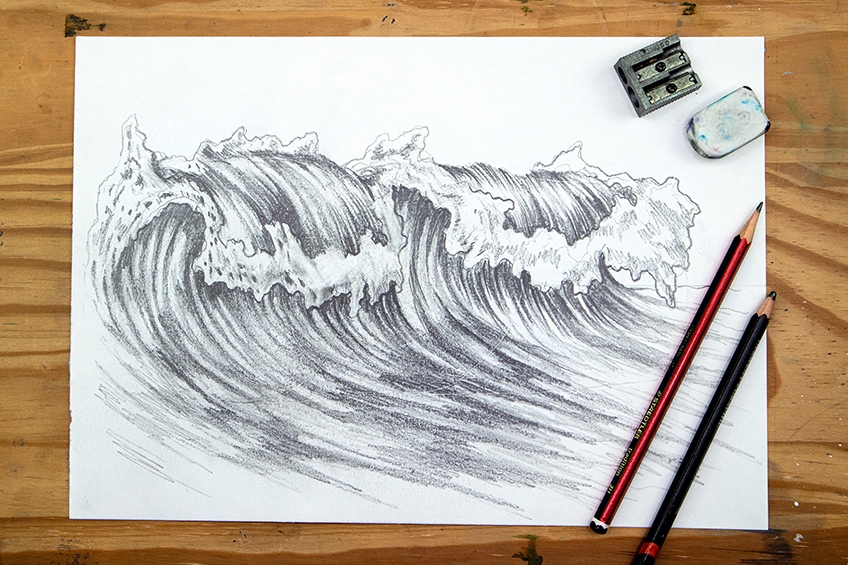
Throughout the history of art, the ocean’s waves have inspired many great artworks due to their beauty and grandiosity. In many ways learning how to draw waves is a great skill to have in your drawing repertoire as it can enhance a scene that is set in the ocean. A wave drawing has the ability to determine the environment or setting of the ocean, giving it more ferocity and intensity. An ocean waves drawing can set up various scenarios within an ocean scene, as it can be used as a setting for battleships or large beasts lurking beneath the surface of the ocean. However, if you choose to use your wave drawing, it will provide another element to your ocean drawings that give them more life and movement.
Table of Contents
An Easy Guide to Drawing Waves
A drawing of a wave might seem complicated due to the abstract nature of water. When waves are created, they create a lot of movement and crashes in the water that seems complicated to replicate within a drawing. In this easy wave drawing, we will learn step-by-step how to draw waves in an easy and digestible way. Ocean wave drawing is not as difficult as you might think, as waves can be reduced to their basic form. We will learn how to construct a simple wave sketch using basic structures and slowly refine it into a unique drawing of a wave.
Necessary Materials
For this tutorial, we will be working out the basic form and flow of a wave drawing, which means we will only need a set of pencils. We want to work out how to draw a wave in its most basic form, so we will only need a few pencils, perhaps a sharpener, and an eraser for any silly mistakes. Once we have these materials, we can get into our tutorial on how to draw waves. All the materials can be found through the links below:
- Graphite pencils
- Eraser
- Sharpener
- Good paper (200 g/m – 250 g/m recommended)
Preparation
Once we have our pencils and paper, we want to find a space where we can sit and engage with the tutorial this tutorial is an easy wave drawing tutorial, that demonstrates the basic process of drawing waves. So, relax and have fun with the drawing process as you learn a new skill of how to draw waves.
Step-by-Step Instructions on How to Draw Waves
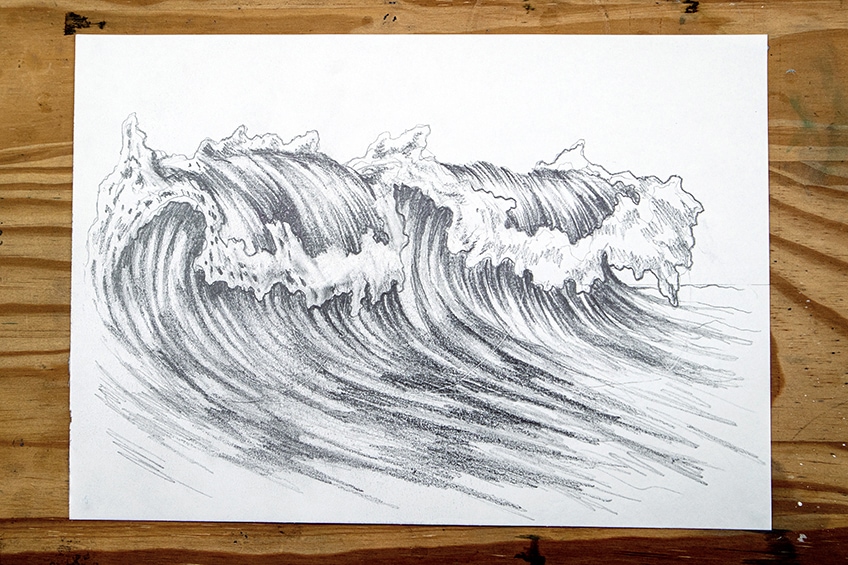
In this tutorial, we will break down the process of how constructing a simple wave sketch and slowly refine it into a more realistic wave drawing. We will begin by establishing the scale of the wave drawing by drawing the basic cylindrical shape of the wave. From there, we will slowly work with our pencils and erasers to refine and shape the wave into a shape that resembles a wave.
Then, lastly, we will work with our darker pencils to add some shading and movement to the water, giving the wave drawing a realistic wave-like flow.
Step 1: Sketching the Basic Structure
We want to start by drawing a horizon line. This is going to establish the plane along which the wave will be drawn.
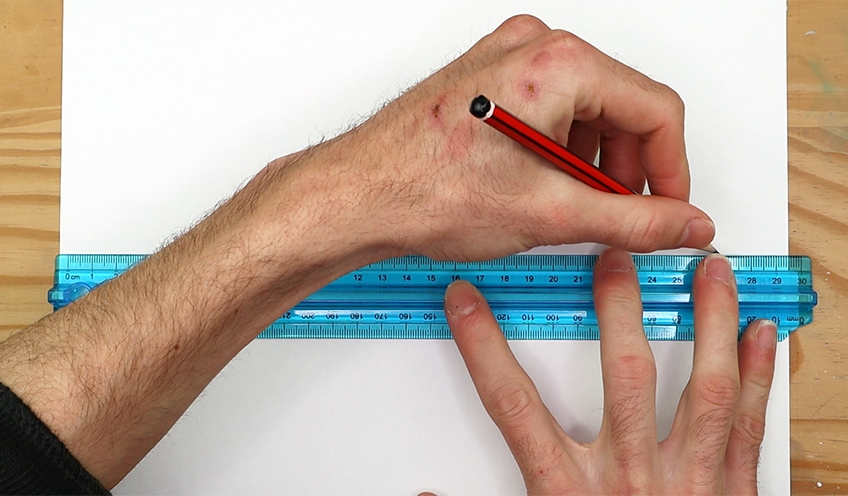
The wave structure is essentially a cylindrical shape on its side. We want to use our pencils and draw this shape over the horizon line. The horizon line should evenly divide the cylindrical shape.
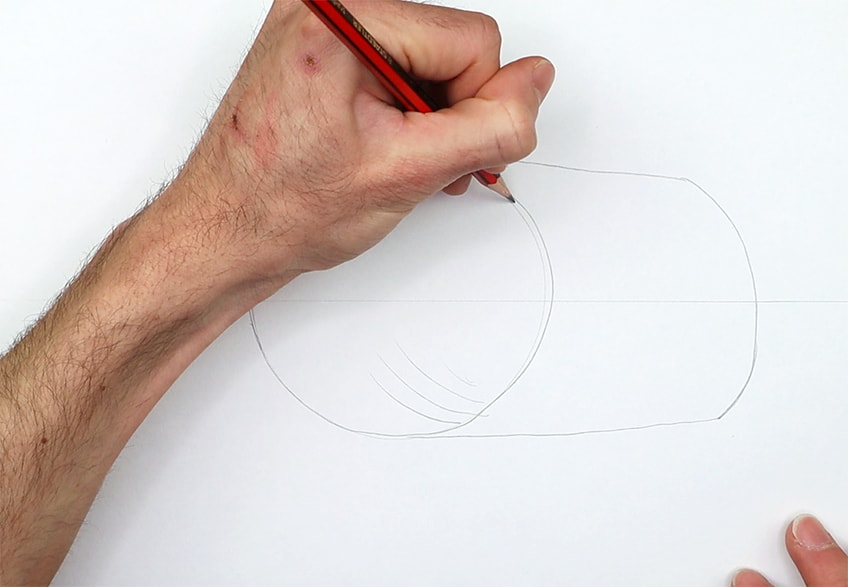
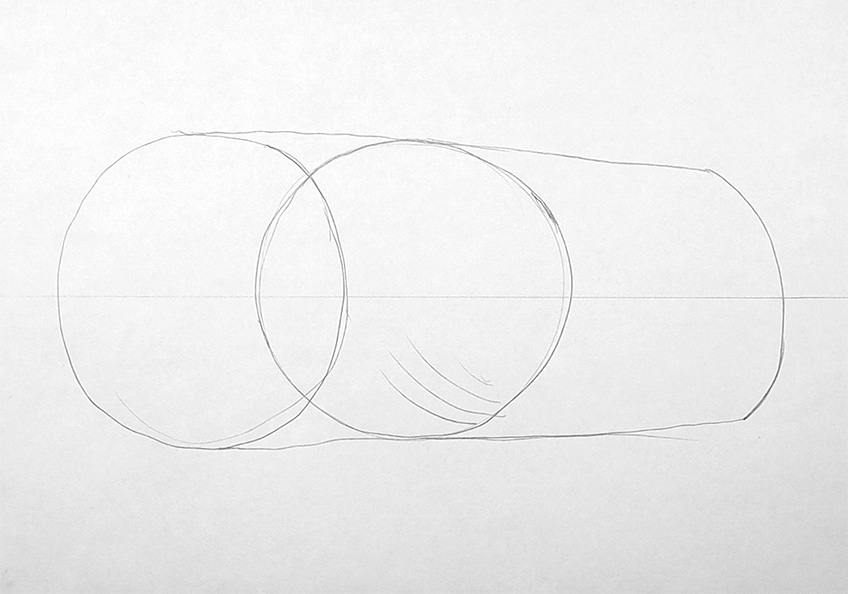
If you want to extend your wave by making it longer, you can simply draw another circle next to the first one. You can then connect the circles along with horizontal lines to the cylindrical shape.
Step 2: Forming the Wave
We now want to form the wave drawing with some freehand drawing. We basically want to use the horizon line to determine the curve of the wave. Along the horizon line, we want to start drawing squiggly lines.
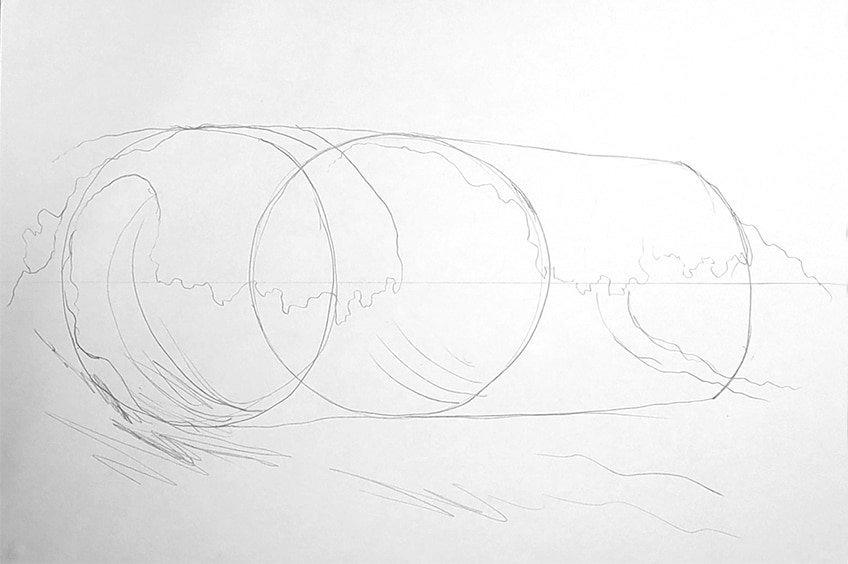
We want to think about the cylindrical shape as if it were hollow. We want to form the wave as if it were a hollowed-out cylinder, like a toilet roll. The horizon line should determine where the wave ends as it overlaps itself.
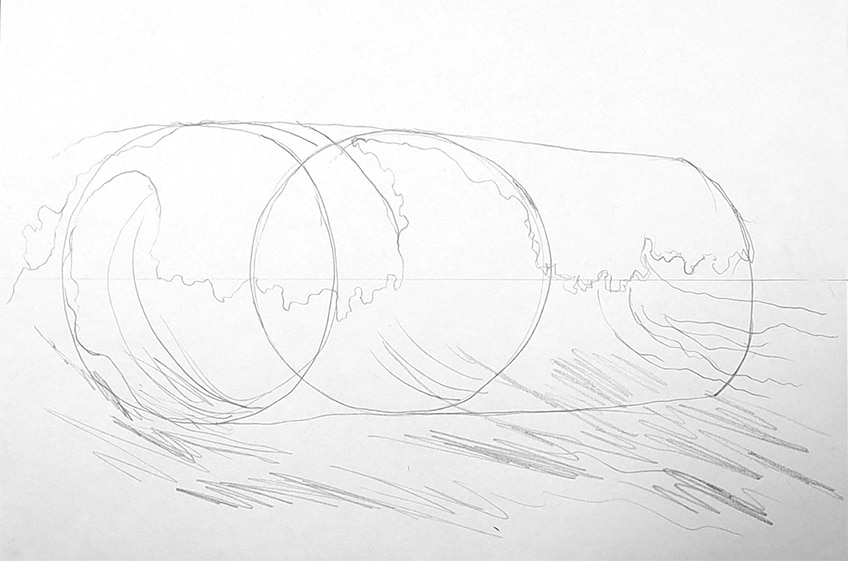
We want to imagine that the cylindrical shape is cut at the horizon line point. The wave should curl over itself near that point. However, we don’t want a straight line along the horizon line, but rather curvy squiggly lines to suggest a water-like form.
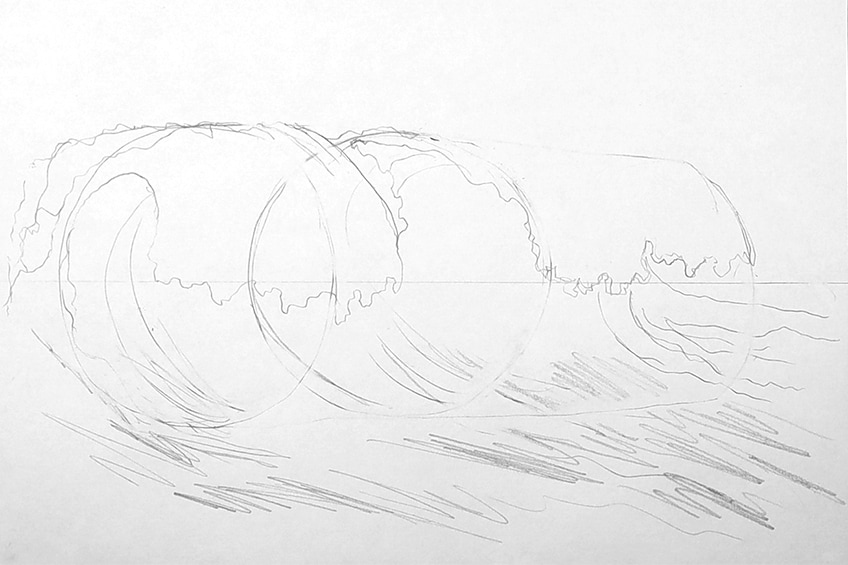
As you form the wave, using the cylindrical shape as a guide, you can extend the bottom of the wave along a horizontal plane. This part can extend all the way to the other side of the page.
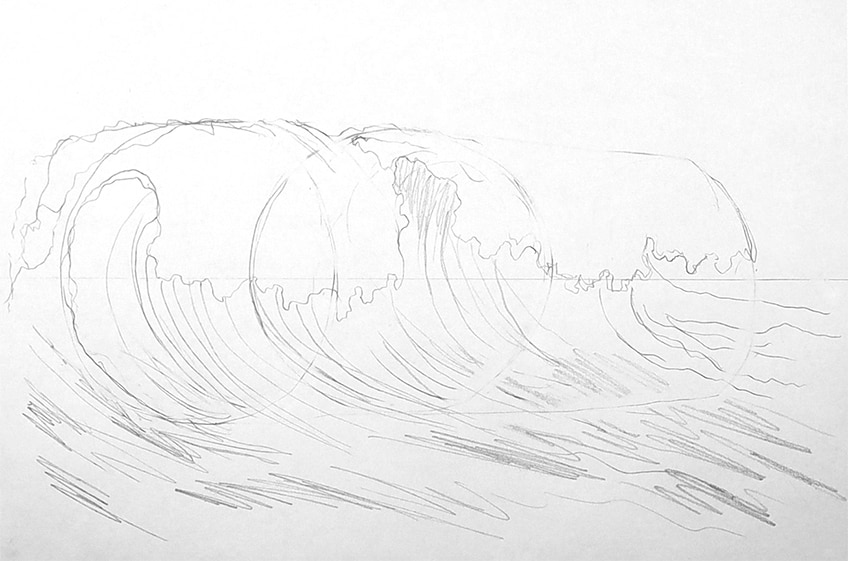
We want to imagine that the wave is like a C-shape, where the top curve of the C curls over to the point where you can only see partially inside of it.
Step 3: Refining Your Wave Sketch
We want to slowly refine the wave by the use of light shading and linework. We want to make strokes from the inner section of the wave extending outward as it flows along the bottom of the page.
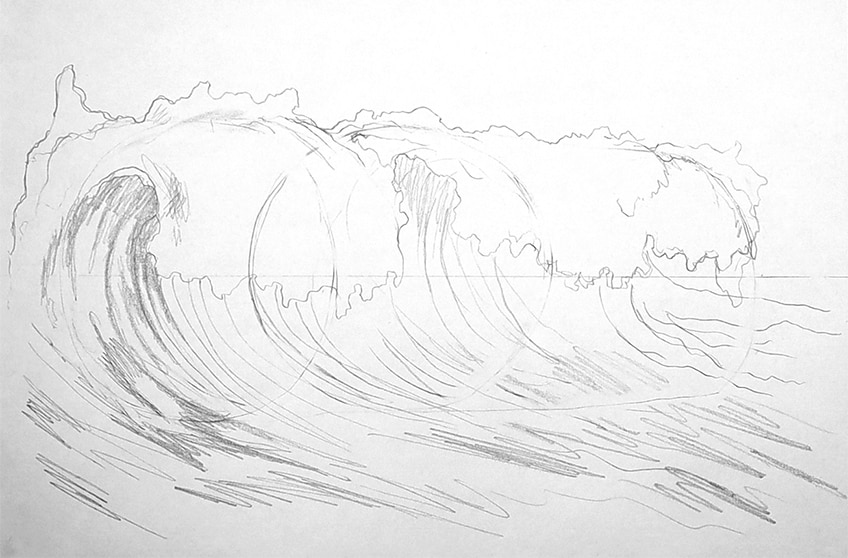
These lines and shading patterns are looser and scribble-like rather than clean perfect lines. It’s almost as if they slightly zig-zag, moving from the inside of the wave and extending out of the wave along the bottom of the page.
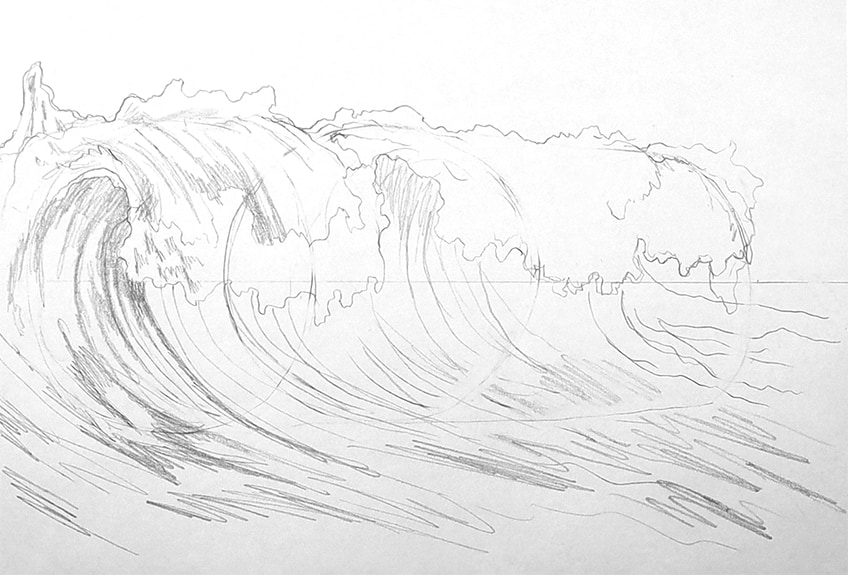
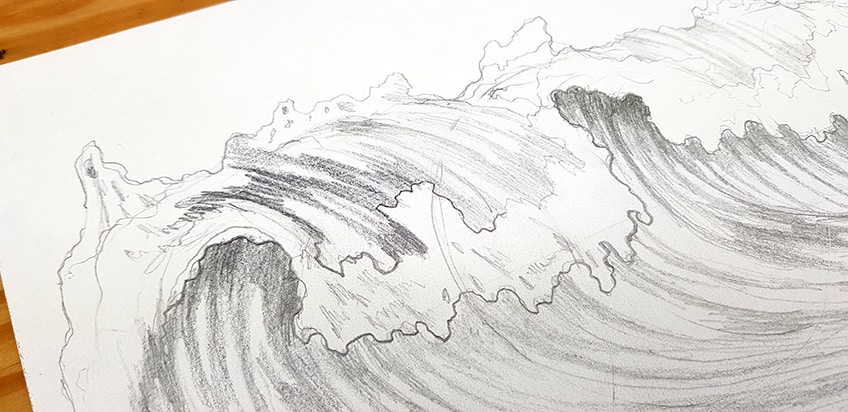
We want to make sure that we are drawing the crashing part of the wave along the edge of the wave’s curl. This shape should be like a cloud-like shape that has a squiggly outline to suggest a crashing quality in the water.
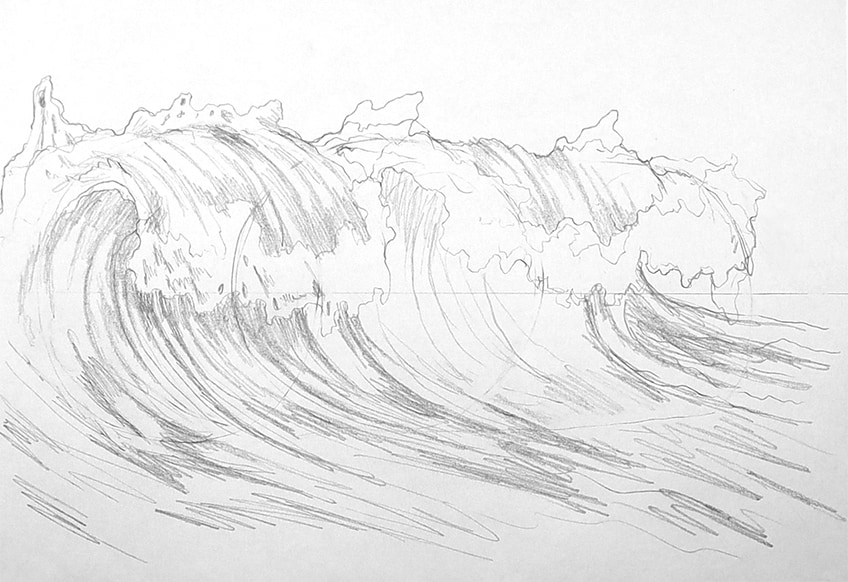
We want to have a contrast between the swift curving water and the crashing water. We do this by giving the swift curling water a horizontal zig-zag shading pattern, whereas the crashing part can be squigglier and more sporadic.
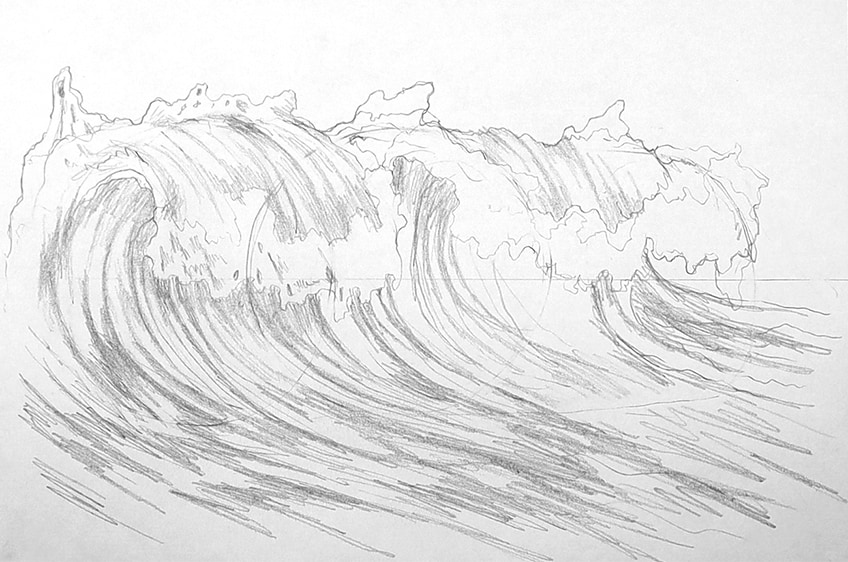
Step 3: Refining the Wave With Light Shading
We want to make sure there is a contrast between the swift curling water and the crashing water. The swift water is less interrupted which means that it will be darker in color. This means we want to add darker shading to the water that curls.
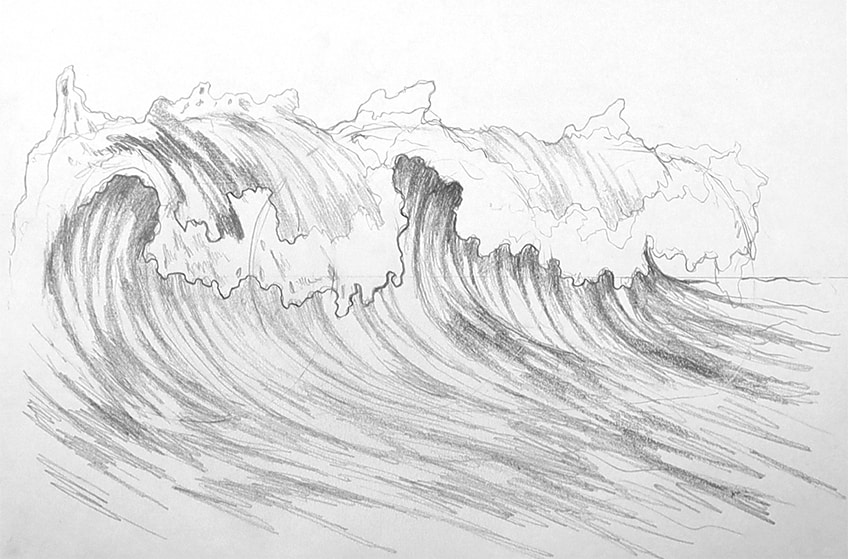
When water crashes it normally is lighter due to the amount of bubbling that happens, so we want to keep the crash of the wave lighter. We can do this by shading the swiftly moving water around the crashing cloud-like shape. We want to use a darker pencil like a 2B to go over the swift-moving water areas, whereby we add line work that flows with the curve of the wave. This should be shaded around the crash of the wave, both in the barrel and on top of the barrel of the wave.
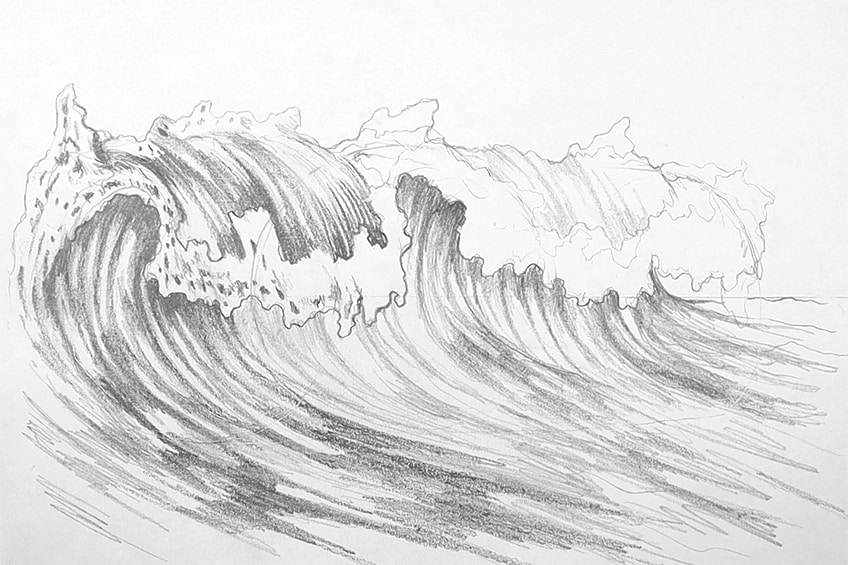
The more you add in that zig-zag flow, extending from the inner curl of the wave to the bottom of the page, you will find that it starts to represent flowing water. You want to spend time adding in the shading along the top curve on top of the wave, as well as within the curl of the wave.
As the water comes out of the curl, it flattens, which means it should flow along a horizontal plane.
Step 4: Adding Darker Shading
Once we understand how the flow of shading should be for both the swift-moving water and crashing water, we can incorporate darker shading. We simply want to create a contrast between the crash and swift-moving water. When it comes to the crashing water, we can be quite sporadic with our shading, creating light scribble-like movements within the shape. We don’t want to shade too dark in this area.
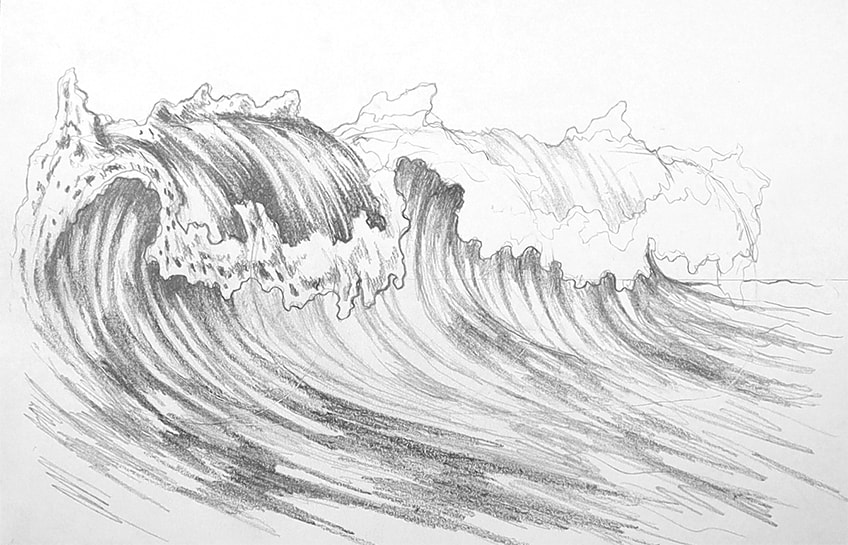
We can also outline the crashing water shape, making the squiggly cloud shape more distinct. We want to separate the structures of the swift-flowing water and the crashing water. Make sure you keep that zig-zagging scribble-like shading along a horizontal plane for the swift water. If it is flattened it will make sense with regards to how water flows from the outside to the inside of the wave.
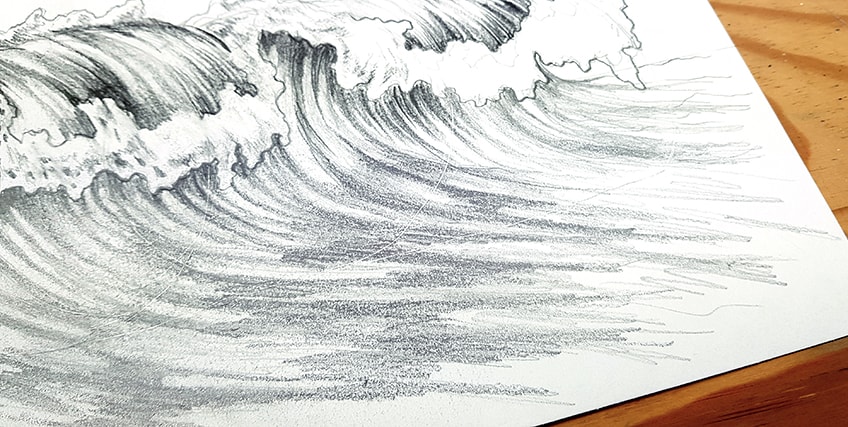
We also want to make sure that we darken the line work within the curl of the wave. These strokes should also flow with the curve of the wave, both inside and on top of the wave. If we keep the same shading style flowing along the curves on both the top and inside the wave, it will make sense. However, the only place it should not be the same is within the crashing water shape. Be sure to shade the inside of the wave dark with pencil strokes. We really want a distinction between the swift curving water and the crashing water. We want to make sure that the line along the top curve is dark as well.
We also want to make sure we are not adding too much line work along the curves in the wave.
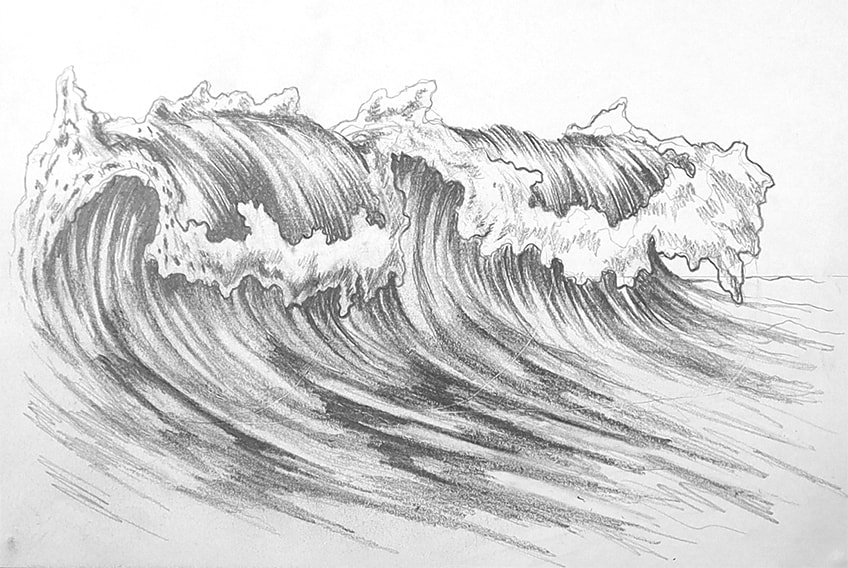
We don’t want to color in the swift-curving water areas completely. The line work should be dark with moments of negative space to suggest a highlight in the water. The line work in the curves and zig-zag shading within the swift-moving water should not be colored in completely because we want to create an effect of highlights in the water. Make sure that you are using stroke-like actions when creating your line work within the curling of the wave, both inside and on top of the wave. Make sure that you don’t completely color in these areas, as the negative space will represent a smooth reflection of light on the water.
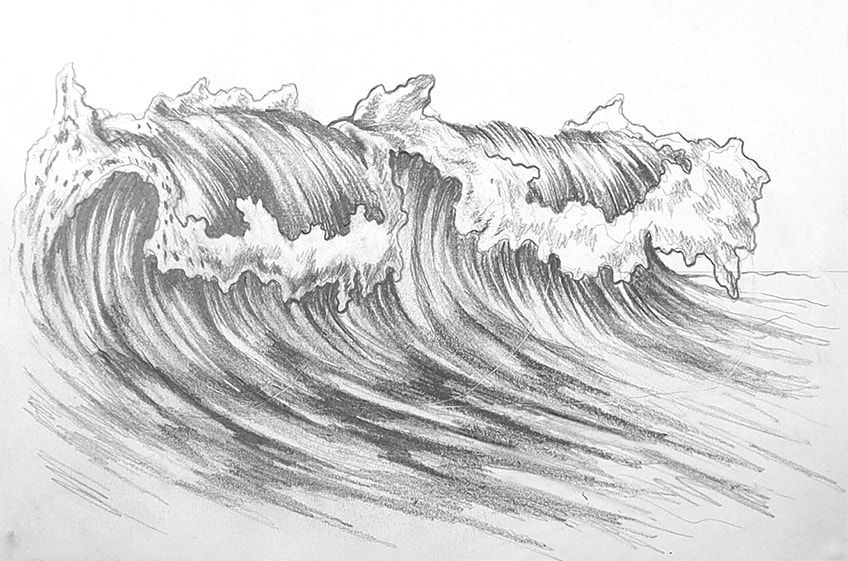
You also want to make sure that you keep your shading light and loose within the crashing water shape. We want to have good contrast between the water that swiftly curls and the crashing of the wave. The main aim is to represent two types of water, crashing water and swift smooth flowing water. We do this with contrast and shading styles, making sure we keep a distinct difference between the two.
And there you have it, how to draw waves in a few simple steps!
Tips to Remember
As with all new drawing adventures, there may be some slight confusion as you begin. We have gathered our top four tips to help you create a realistic but easy wave drawing.
- Figure out the cylindrical shape first. Once you have this basic shape, you can then work the drawing over it.
- Create differences with shading for the two types of water. The swift curling water is smoother with lines, whereas the crashing water is more scribble-like.
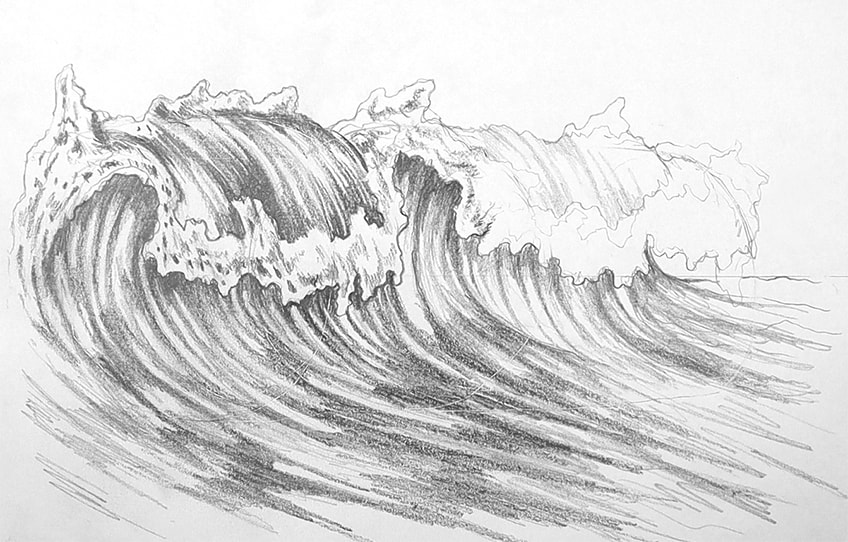
- Give the wave drawing a contrast. You want to make sure that the swift-moving water is darker and that the crashing water is light.
- Take your time. Be patient with your wave drawing.
Ocean waves drawing is not difficult once you understand the curling cylindrical shape. From there, it is a matter of linework and how you add shading to your wave drawing in a strategic way. From there on, you simply want to take your time refining the shading so that it flows with the wave formation. Taking your time is what will develop your wave sketch into a realistic drawing of a wave.
Take a look at our waves drawing webstory here!
Frequently Asked Questions
How Do You Draw the Barrel of a Wave?
The wave structure is technically a cylindrical shape that extends from the foreground to the background. The way to draw this is very simple as it starts with one large circle on one side of the page and then a smaller circle on the other side of the page. From there, you connect the upper and bottom points of both circles with straight lines along a horizontal plane. From there, you can use that cylindrical shape to inform the flow of your wave, giving it a barrel-like quality. From there, you will sketch the wave over the cylindrical shape, making the top part of the waver overlap the bottom part of the wave. Then, it is a matter of shading and changing the shape to have a water-like texture.
How Do You Draw the Crashing of a Wave?
The crash of a wave is not difficult to draw once you have the cylindrical shape of the wave drawn. You want to imagine that the cylinder is cut off on one side so that you are able to see the inside of the barrel and the part that overlaps the barrel. From there, you want to change the straight lines of the cylinder to a more water-like shape. As you sketch the wave using the cylindrical shape to assist you, you can slowly give the lines a squiggly shape. The squiggly sketch can follow the lines of the cylinder, as you sketch over the cylindrical shape to help navigate you and your line placement. From there, you can shade in the wave but you want to leave out a cloud-like or squiggly-blob shape at the edge of the wave. You then can make the curl of the wave dark and the edge of the wave lighter to create a white crash in the wave.
Matthew Matthysen is an educated multidisciplinary artist and illustrator. He successfully completed his art degree at the University of Witwatersrand in South Africa, majoring in art history and contemporary drawing. The focus of his thesis was to explore the philosophical implications of the macro and micro-universe on the human experience. Matthew uses diverse media, such as written and hands-on components, to explore various approaches that are on the border between philosophy and science.
Matthew organized various exhibitions before and during his years as a student and is still passionate about doing so today. He currently works as a freelance artist and writer in various fields. He also has a permanent position at a renowned online gallery (ArtGazette) where he produces various works on commission. As a freelance artist, he creates several series and successfully sells them to galleries and collectors. He loves to use his work and skills in various fields of interest.
Matthew has been creating drawing and painting tutorials since the relaunch in 2020. Through his involvement with artincontext.org, he has been able to deepen his knowledge of various painting mediums. For example, watercolor techniques, calligraphy and lately digital drawing, which is becoming more and more popular.
Learn more about Matthew Matthysen and the Art in Context Team.
Cite this Article
Matthew, Matthysen, “How to Draw Waves – A Realistic Ocean Wave Sketch in Pencil.” Art in Context. November 6, 2022. URL: https://artincontext.org/how-to-draw-waves/
Matthysen, M. (2022, 6 November). How to Draw Waves – A Realistic Ocean Wave Sketch in Pencil. Art in Context. https://artincontext.org/how-to-draw-waves/
Matthysen, Matthew. “How to Draw Waves – A Realistic Ocean Wave Sketch in Pencil.” Art in Context, November 6, 2022. https://artincontext.org/how-to-draw-waves/.


